×
ToyotaParts- Hello
- Login or Register
- Quick Links
- Live Chat
- Track Order
- Parts Availability
- RMA
- Help Center
- Contact Us
- Shop for
- Toyota Parts
- Scion Parts
My Garage
My Account
Cart
OEM Scion xB A/C Compressor
Air Conditioning Compressor- Select Vehicle by Model
- Select Vehicle by VIN
Select Vehicle by Model
orMake
Model
Year
Select Vehicle by VIN
For the most accurate results, select vehicle by your VIN (Vehicle Identification Number).
5 A/C Compressors found

Scion xB Compressor Part Number: 88310-52250-84
$484.38 MSRP: $717.26You Save: $232.88 (33%)Ships in 1-3 Business Days
Scion xB Compressor Assembly Part Number: 88310-02520
$384.30 MSRP: $563.20You Save: $178.90 (32%)Ships in 1-3 Business DaysScion xB Compressor Assembly Part Number: 88310-1A731
$522.77 MSRP: $769.72You Save: $246.95 (33%)Ships in 1-3 Business Days

Scion xB Compressor Part Number: 88310-52570-84
$717.32 MSRP: $1062.18You Save: $344.86 (33%)Ships in 1-3 Business DaysScion xB Compressor Part Number: 88310-52530
$1615.54 MSRP: $2367.59You Save: $752.05 (32%)Ships in 1-3 Business Days
Scion xB A/C Compressor
Choose genuine A/C Compressor that pass strict quality control tests. You can trust the top quality and lasting durability. Shopping for OEM A/C Compressor for your Scion xB? Our website is your one-stop destination. We stock an extensive selection of genuine Scion xB parts. The price is affordable so you can save more. It only takes minutes to browse and find the exact fit. Easily add to cart and check out fast. Our hassle-free return policy will keep you stress-free. We process orders quickly for swift delivery. Your parts will arrive faster, so you can get back on the road sooner.
Scion xB A/C Compressor Parts and Q&A
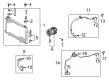
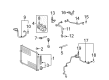
- Q: How to replace the A/C Compressor assembly on Scion xB?A:The w/pulley compressor assembly replacement process requires draining refrigerant from the refrigeration system through Special Service Tool: 07110-58060 (07117-58080, 07117-58090, 07117-78050, 07117-88060, 07117-88070, 07117-88080). Reset refrigeration system by draining its refrigerant with Special Service Tool: 07110-58060 (07117-58080, 07117-58090, 07117-78050, 07117-88060, 07117-88070, 07117-88080). After removing the engine under cover and fan and generator V belt disconnect cooler refrigerant discharge hose No.1 using a bolt and O-ring removal followed by vinyl tape-based opening sealing to stop moisture and foreign matter intrusion. Operate by unfastening the bolt from the suction hose sub-assembly while also replacing the O-ring before applying vinyl tape for closing the system openings. Disconnect the w/pulley compressor assembly connector then remove its four bolts to perform the removal. The compressor oil must be properly drained from the new w/pulley compressor assembly before installation at a volume of 60 + 15 cc (3.0 + 0.5 fl. oz.) below the present oil level of the removed compressor by using ND-OIL 8 for compressor oil. Mount the new w/pulley compressor assembly by fastening 4 bolts with 25 Nm (255 kgf.cm, 221 in.lbf) torque and then join the connector. Begin with the suction hose sub-assembly where you need to remove vinyl tape before applying compressed oil onto a fresh O-ring followed by bolt attachment. The installation of cooler refrigerant discharge hose No.1 requires removal of the vinyl tape followed by installation of oil-coated O-ring and secure bolt torqued to 9.8 Nm (100 kgf.cm, 87 in.lbf). The technician should install the fan and generator V belt afterwards adjust its position and fill the system with refrigerant through Special Service Tool: 07110-58060 (07117-58060, 07117-58070, 07117-58080, 07117-58090, 07117-78050, 07117-88060, 07117-88070, 07117-88080) until the system reaches 380 plus or minus 30 g (13.9 plus or minus 1.1 oz.) before engine warming and leak inspection.
- Q: How to install the A/C Compressor on Scion xB?A:The first step to install the HVAC compressor for the 2AZ-FE involves oil level adjustment by draining appropriate oil from indicated vents after helium inert gas service valve discharge. This process should match the total oil quantity of a new compressor (90 (+15) cc (3 (+0.51) fl.oz.)) minus the amount still inside the removed compressor unit. ND-OIL8 or equivalent compressor oil must be used while taking care against overfilling because excessive oil can result in refrigeration breakdown. The compressor assembly installation requires use of a "TORX" socket wrench (E8) to torque the 2 stud bolts to 9.8 Nm (100 kgf-cm, 87 in-lbf) then completion with 2 bolts and 2 nuts torqued to 25 Nm (255 kgf-cm, 18 ft-lbf). This must be done according to the specified tightening sequence. When assembling the discharge hose between the compressor and discharge hose you must first remove the vinyl tape and apply compressor oil to both the O-ring and fitting surface before installing the O-ring onto the discharge hose while using a bolt with torque set at 9.8 Nm (100 kgf-cm, 87 in-lbf). The installation method must be performed again on the suction hose sub-assembly. The fan and generator V belt as well as rear engine under cover RH followed by No. 1 engine under cover and center transmission under cover assembly need to be installed next. End the process by charging the refrigerant system then heating the engine before conducting refrigerant leak testing.


Related Scion xB Parts
 Scion xB Cabin Air Filter
 Scion xB Blower Motor
 Scion xB Heater Core
 Scion xB Blower Motor Resistor
 Scion xB A/C Accumulator
 Scion xB A/C Condenser
 Scion xB A/C Expansion Valve
 Scion xB A/C Hose
 Scion xB Ambient Temperature Sensor
 Scion xB Blend Door Actuator
 Scion xB Evaporator
 Scion xB HVAC Pressure Switch