×
ToyotaParts- Hello
- Login or Register
- Quick Links
- Live Chat
- Track Order
- Parts Availability
- RMA
- Help Center
- Contact Us
- Shop for
- Toyota Parts
- Scion Parts
My Garage
My Account
Cart
OEM Scion xB A/C Condenser
Air Conditioning Condenser- Select Vehicle by Model
- Select Vehicle by VIN
Select Vehicle by Model
orMake
Model
Year
Select Vehicle by VIN
For the most accurate results, select vehicle by your VIN (Vehicle Identification Number).
7 A/C Condensers found


Scion xB Condenser Assembly Part Number: 88450-12280
$260.25 MSRP: $371.56You Save: $111.31 (30%)Ships in 1-3 Business Days

Scion xB Condenser Part Number: 88460-AZ039
$125.81 MSRP: $177.81You Save: $52.00 (30%)Ships in 1-3 Business DaysScion xB Condenser Assembly Part Number: 88460-AZ002
$134.50 MSRP: $190.10You Save: $55.60 (30%)Ships in 1-3 Business Days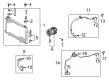
Scion xB Discharge Hose Part Number: 88450-52131
$247.15 MSRP: $352.88You Save: $105.73 (30%)Ships in 1-2 Business Days
Scion xB Condenser Assembly Part Number: 88450-12300
$259.32 MSRP: $370.25You Save: $110.93 (30%)Ships in 1-3 Business DaysScion xB Condenser Part Number: 88450-52231
$324.79 MSRP: $463.73You Save: $138.94 (30%)Ships in 1-3 Business DaysScion xB Condenser Part Number: 88450-52230
$325.65 MSRP: $464.96You Save: $139.31 (30%)Ships in 1-3 Business Days
Scion xB A/C Condenser
Choose genuine A/C Condenser that pass strict quality control tests. You can trust the top quality and lasting durability. Shopping for OEM A/C Condenser for your Scion xB? Our website is your one-stop destination. We stock an extensive selection of genuine Scion xB parts. The price is affordable so you can save more. It only takes minutes to browse and find the exact fit. Easily add to cart and check out fast. Our hassle-free return policy will keep you stress-free. We process orders quickly for swift delivery. Your parts will arrive faster, so you can get back on the road sooner.
Scion xB A/C Condenser is one of the optimal and most efficient parts famous for its quality and needed for Scion xB climate control. Located ahead of the car's radiator, the A/C Condenser effectively reduces the temperature of the gas like refrigeration and thus turns into a liquid form prior to proceeding to the accumulator system. This is quite important in management of cabin temperature so as to ensure that the comfort of passengers by way of temperature does not rely with outside conditions. The Scion xB A/C Condenser fits different models of xB with the same design profile in emphasizing proper refrigerant cooling in the consequent generations. This compatibility improves the vehicle's performance and safety because a well-designed A/C Condenser plays a pivotal role in the functionality of the Air Conditioner unit by preventing the trapping of heat within the cabin to cause overheating. More notably, one can identify the Scion xB A/C Condenser among all auto components in the market as one of the sturdiest structures capable of handling day-to-day use. Bearing the characteristics of durability, the A/C Condenser not merely boosts up the efficiency of Scion xB but also underlines Scion's unending concern towards the customers. In conclusion, Scion xB A/C Condenser is play important role for anybody who use vehicle for driving, or as a passenger.
Scion xB A/C Condenser Parts and Q&A
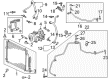
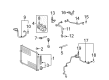
- Q: How to install an A/C Condenser on Scion xB?A:Start the condenser installation by putting it into the vehicle while protecting both components from damage. When using a new condenser a technician should add 40 cc (1.35 fl. oz.) of ND-OIL8 or equivalent compressor oil to it. First unwind the vinyl tape from both the condenser joining section and air conditioning tube before applying ND-OIL8 or an equivalent compressor oil to a new O-ring along with the tube fitting surface. After fitting the O-ring to the air conditioning tube connect it with a bolt torqued to 5.4 Nm (55 kgf-cm, 48 in-lbf). You must follow the same procedure for the discharge hose sub-assembly by removing vinyl tape and applying compressor oil to a new O-ring and installing it on the discharge hose before securing it to the condenser with a bolt which requires a torque of 5.4 Nm (55 kgf-cm, 48 in-lbf). Use 2 bolts to install the No. 2 fan shroud to the Radiator while tightening them to 11 Nm (112 kgf-cm, 8 ft-lbf). After that, install the radiator support cushion followed by the hood lock support sub-assembly and hood lock control cable assembly. The No. 1 water hose clamp bracket requires installation with 2 bolts that must be torqed to 5.0 Nm (51 kgf-cm, 44 in-lbf) and the battery carrier implementation with a bolt and nut maintained at 17 Nm (168 kgf-cm, 12 ft-lbf) for the bolt and 3.5 Nm (35 kgf-cm, 31 in-lbf) for the nut. To finish the work install all front components including the bumper cover and radiator grille and No. 1 radiator grille garnish before inspecting and adjusting the hood and charging the refrigerant while allowing engine heating and searching for any refrigerant leaks.
- Q: How to remove the A/C Condenser on Scion xB?A:Before removing the HVAC condenser the refrigerant needs to be discharged from the refrigeration system. Begin by taking out the No. 1 radiator grille garnish after which you should remove the radiator grille and the front bumper cover. You must start by taking out the battery carrier after eliminating the bolt and untightening the nut. The two bolts securing the No. 1 water hose clamp bracket must be removed to enable the disconnection of the hood lock control cable assembly. Start by removing the hood lock support sub-assembly along with the radiator support cushion before accessing the No. 2 fan shroud through removal of its 2 bolts. Reposition the discharge hose sub-assembly by first removing its bolt and secondly disconnecting the discharge hose from the cooler condenser before removing the O-ring from the discharge hose. The disconnected parts need vinyl tape applied to their openings to stop water and outside materials from getting inside. You must disconnect the air conditioning tube with accessory assembly by removing the bolt to detach the air conditioning tube from the condenser before removing the O-ring from the air conditioning tube. The removed openings need sealing with vinyl tape. When finishing the operation remove the condenser from the vehicle while taking care not to harm either the condenser or radiator structures.


Related Scion xB Parts
 Scion xB Blower Motor
 Scion xB Heater Core
 Scion xB Blower Motor Resistor
 Scion xB A/C Accumulator
 Scion xB A/C Compressor
 Scion xB A/C Expansion Valve
 Scion xB A/C Hose
 Scion xB Ambient Temperature Sensor
 Scion xB Blend Door Actuator
 Scion xB Blower Control Switches
 Scion xB Evaporator
 Scion xB HVAC Pressure Switch