×
ToyotaParts- Hello
- Login or Register
- Quick Links
- Live Chat
- Track Order
- Parts Availability
- RMA
- Help Center
- Contact Us
- Shop for
- Toyota Parts
- Scion Parts
My Garage
My Account
Cart
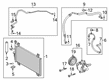
OEM Scion A/C Condenser
Air Conditioning Condenser- Select Vehicle by Model
- Select Vehicle by VIN
Select Vehicle by Model
orMake
Model
Year
Select Vehicle by VIN
For the most accurate results, select vehicle by your VIN (Vehicle Identification Number).
15 A/C Condensers found


Scion Condenser Part Number: 88460-52130
$248.28 MSRP: $354.50You Save: $106.22 (30%)Ships in 1-3 Business DaysProduct Specifications- Other Name: Condenser Assembly; A/C Condenser; Condenser Assembly, Cooler
- Replaces: 88460-52090


Scion Condenser Assembly Part Number: 88450-12280
$260.25 MSRP: $371.56You Save: $111.31 (30%)Ships in 1-3 Business DaysProduct Specifications- Other Name: Condenser Assembly, With Receiver; A/C Condenser; Condenser; Condenser Assembly, W/Receiver

Scion Condenser Assembly Part Number: SU003-02116
$284.96 MSRP: $378.37You Save: $93.41 (25%)Ships in 1-3 Business DaysProduct Specifications- Other Name: A/C Condenser; Condenser; Condenser Assembly, Cooler


Scion Condenser Part Number: 88460-AZ039
$125.81 MSRP: $177.81You Save: $52.00 (30%)Ships in 1-3 Business DaysProduct Specifications- Other Name: Condenser Assembly; A/C Condenser
Scion Condenser Assembly Part Number: 88460-AZ002
$134.50 MSRP: $190.10You Save: $55.60 (30%)Ships in 1-3 Business DaysProduct Specifications- Other Name: A/C Condenser; Condenser
Scion Condenser Part Number: 88460-AZ015
$148.06 MSRP: $209.25You Save: $61.19 (30%)Ships in 1-3 Business DaysProduct Specifications- Other Name: Condenser Assembly; A/C Condenser

Scion Condenser Assembly Part Number: 88460-AZ024
$173.92 MSRP: $245.80You Save: $71.88 (30%)Ships in 1-3 Business DaysProduct Specifications- Other Name: A/C Condenser
Scion Discharge Hose Part Number: 88450-52131
$247.15 MSRP: $352.88You Save: $105.73 (30%)Ships in 1-2 Business DaysProduct Specifications- Other Name: Condenser Assembly, With Receiver; A/C Condenser; Condenser; Condenser Assembly, W/Receiver

Scion Condenser Assembly Part Number: 88450-12300
$259.32 MSRP: $370.25You Save: $110.93 (30%)Ships in 1-3 Business DaysProduct Specifications- Other Name: Condenser Assembly, With Receiver; A/C Condenser; Condenser; Condenser Assembly, W/Receiver

Scion Condenser Assembly Part Number: 88450-12340
$275.04 MSRP: $392.71You Save: $117.67 (30%)Ships in 1-3 Business DaysProduct Specifications- Other Name: Condenser Assembly, With Pa; A/C Condenser; Condenser; Condenser Assembly, W/Receiver
Scion Condenser Assembly Part Number: 88460-21050
$282.45 MSRP: $403.29You Save: $120.84 (30%)Ships in 1-3 Business DaysProduct Specifications- Other Name: A/C Condenser; Condenser; Condenser Assembly, Cooler
Scion Condenser Part Number: 88450-52231
$324.79 MSRP: $463.73You Save: $138.94 (30%)Ships in 1-3 Business DaysProduct Specifications- Other Name: Condenser Assembly, With Receiver; A/C Condenser; Condenser Assembly, W/Receiver
Scion Condenser Part Number: 88450-52230
$325.65 MSRP: $464.96You Save: $139.31 (30%)Ships in 1-3 Business DaysProduct Specifications- Other Name: Condenser Assembly, With Receiver; A/C Condenser; Condenser Assembly, W/Receiver

Scion Condenser Assembly Part Number: 88460-WB002
$520.33 MSRP: $762.56You Save: $242.23 (32%)Ships in 1-2 Business DaysProduct Specifications- Other Name: CONDENSER ASSY

Scion Condenser Assembly Part Number: 88460-74010
$236.02 MSRP: $336.98You Save: $100.96 (30%)Product Specifications- Other Name: A/C Condenser; Condenser; Condenser Assembly, Cooler
Scion A/C Condenser
OEM parts deliver unmatched quality you can rely on. They pass extensive quality control inspections. Scion produces them to the official factory specifications. This process helps prevent defects and imperfections. So you can get exceptional lifespan and a flawless fit. Need new OEM Scion A/C Condenser? You'll love our wide selection of genuine options. Shop in minutes and skip the hunt. Our prices are unbeatable, you'll save time and money. It's easy to shop and find the right piece. Our committed customer service team gives professional help from start to finish. Every part includes a manufacturer's warranty. We ship quickly, your parts will arrive fast at your door.
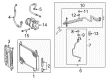
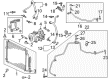
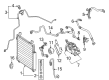
Scion A/C Condenser cools the cabin air by releasing it to the outside on every drive. In 2003, Scion shook up the market by selling small cars without any haggling, crazy paint, and Release Series drops that left buyers with a feeling of snatching sneakers. Scion drove a virtual city, fans were assembling cars on the internet, and then they were going into showrooms that were already devoted; digital buzz could shift metal without having to drive old commercials. Scion was the Toyota test laboratory, with new colors, frequent revisions, and additional features to allow drivers to customize fast and provide the parent company with actual sales information. In 2016, Scion bowed out with 1,000,000 sales, but the rebel brand continues to influence the way compacts manage to boast of customization and simplified costs. The radiator is preceded by A/C Condenser, which condenses the hot vapor of refrigerant in tight finned tubing cooled by the incoming air before the fluid can pass into the dryer and expansion valve. A/C Condenser also rules out the spikes in pressure, and therefore a bulky core prevents leakage, compressor workload, and vents are kept cool even when traffic is crawling in the blazing sun. A/C Condenser uses common mounting points and hose fittings through the years, allowing a new one to drop in without ugly brackets. A/C Condenser is loaded with thick tubing and coated with corrosion-resistant material that scatters grit aside to ensure cold air never has a day off.
Scion A/C Condenser Parts and Q&A
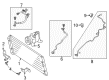
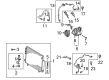
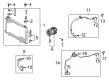
- Q: How to remove the A/C Condenser from the HVAC system on Scion tC?A:The procedure to remove the HVAC system condenser includes battery terminal cable disconnect and waiting at least 90 seconds to avoid activating Air Bags and seat belt pretensioners. The refrigeration system requires refrigerant discharge as the next step in the process. Disconnect the No. 1 cooler refrigerant discharge hose by removing the bolt attached to the hose and picking off the O-ring before covering the openings with vinyl tape. Sealing the disconnected part openings requires vinyl tape to stop both moisture and foreign matter from entering. Disconnect the cooler refrigerant liquid pipe through removal of its two bolts and the pipe before removing its O-ring and sealing the openings with tape. The process requires users to remove two bolts with accompanying brackets from the radiator support upper bracket. Unscrewing the 3 bolts together with the hood lock enables hood lock assembly removal. After that sequence remove the low pitched horn assembly and the high pitched horn assembly. The radiator support upper bracket requires removal by removing its 2 nuts and 5 bolts. To complete the procedure you must eliminate the cooler condenser assembly.
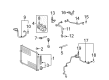
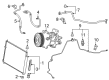
- Q: How to reassemble the A/C Condenser on Scion xB?A:Begin the HVAC condenser reassembly by mounting the cooler dryer to the modulator with pliers and apply 8 or equivalent ND-OIL oil to both O-ring and cap fitting surfaces. Proceed with installing the cap over the cooler condenser core through the use of a 14 mm straight hexagon wrench until the torque reaches 2.9 Nm (30 kgf-cm, 26 in-lbf). As the final step of installation add the 4 cooler condenser cushions.