×
ToyotaParts- Hello
- Login or Register
- Quick Links
- Live Chat
- Track Order
- Parts Availability
- RMA
- Help Center
- Contact Us
- Shop for
- Toyota Parts
- Scion Parts
My Garage
My Account
Cart
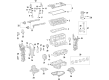
OEM Toyota Highlander Timing Chain
Engine Timing Chain- Select Vehicle by Model
- Select Vehicle by VIN
Select Vehicle by Model
orMake
Model
Year
Select Vehicle by VIN
For the most accurate results, select vehicle by your VIN (Vehicle Identification Number).
9 Timing Chains found


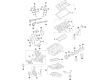
Toyota Highlander Timing Chain Part Number: 13507-0P010
$73.58 MSRP: $103.28You Save: $29.70 (29%)Ships in 1-2 Business Days


Toyota Highlander Timing Chain Part Number: 13507-28010
$92.18 MSRP: $129.39You Save: $37.21 (29%)Ships in 1-2 Business Days

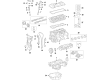
Toyota Highlander Timing Chain Part Number: 13506-0V010
$210.74 MSRP: $300.88You Save: $90.14 (30%)Ships in 1-2 Business Days


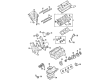
Toyota Highlander Timing Chain Part Number: 13506-0P011
$240.91 MSRP: $343.96You Save: $103.05 (30%)Ships in 1-2 Business Days

Toyota Highlander Timing Chain Part Number: 13506-0H011
$268.87 MSRP: $383.89You Save: $115.02 (30%)Ships in 1-2 Business DaysToyota Highlander Chain Sub-Assembly Part Number: 13506-0P030
$241.38 MSRP: $344.63You Save: $103.25 (30%)Ships in 1-2 Business Days
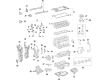
Toyota Highlander Timing Chain Part Number: 13506-F0010
$217.38 MSRP: $310.37You Save: $92.99 (30%)Ships in 1-3 Business Days
Toyota Highlander Chain Sub-Assembly Part Number: 13506-F0030
$207.82 MSRP: $296.73You Save: $88.91 (30%)Ships in 1-2 Business DaysToyota Highlander Chain Part Number: 13507-F0030
$102.49 MSRP: $143.86You Save: $41.37 (29%)Ships in 1-2 Business Days
Toyota Highlander Timing Chain
Choose genuine Timing Chain that pass strict quality control tests. You can trust the top quality and lasting durability. Shopping for OEM Timing Chain for your Toyota Highlander? Our website is your one-stop destination. We stock an extensive selection of genuine Toyota Highlander parts. The price is affordable so you can save more. It only takes minutes to browse and find the exact fit. Easily add to cart and check out fast. Our hassle-free return policy will keep you stress-free. We process orders quickly for swift delivery. Your parts will arrive faster, so you can get back on the road sooner.
Toyota Highlander Timing Chain Parts and Q&A
- Q: How to service and repair the timing chain on Toyota Highlander?A:The servicing of timing chain starts by taking off the hood sub-assembly followed by the front wheel RH and engine under cover No.1 and front fender splash shield front RH and front fender apron seal RH. You must drain engine oil followed by installing a new gasket before torquing the drain plug to 25 Nm (255 kgf-cm, 18 ft. lbs.). Start the procedure by taking off the Exhaust Pipe assembly front, engine moving control rod with bracket, engine mounting stay No.2 RH, engine mounting bracket No.2 RH, fan and generator V belt, engine cover sub-assembly No.1, disconnecting the engine wire, generator assembly, and vane pump assembly without detaching the hose. The maintenance procedure requires removal of Ignition Coil assembly with ventilation hoses No.1 and No.2 and cylinder head cover sub-assembly. Set the first cylinder to TDC to perform the compression check and use Special Service Tools: 09213-54015 and 09330-00021 to fix the pulley and loosen the bolt before using 09950-50013 and its variants to detach the pulley and bolt. The first step includes removing the Crankshaft Position Sensor together with the oil pan sub-assembly and chain tensioner assembly No.1 and V-ribbed belt tensioner assembly. The technician needs to install engine hangers No.1 and No.2 before torquing bolts to 38 Nm (387 kgf-cm, 30 ft. lbs.) and removes the engine mounting insulator by hanging the engine with a chain hoist from these hangers while disconnecting the insulator FR and steaming the return hose clamp from the frame. Raise the engine while you remove its mounting insulator RH with its four nuts then eliminate both the RH components in sequence. First remove the stud bolt from the cylinder block which connects the Drive Belt tensioner then take out 16 bolts and 2 nuts to remove the timing chain or belt cover sub-assembly with careful prying of the timing chain cover. The required components for removal include the crankshaft position sensor plate No.1, chain tensioner slipper, chain vibration damper No.1, chain sub-assembly, and crankshaft timing gear or sprocket. The No.2 chain sub-assembly installation requires users to insert the crankshaft key to its left horizontal position and to rotate the drive shaft cutout toward the top before aligning the yellow-colored mark links with sprocket timing marks then installing the sprockets with chain to crankshaft and oil pump shafts. After tightening the oil pump driven sprocket nut momentarily then place the damper spring into its adjusting hole before installing the chain tensioner plate with nut torque at 12 Nm (122 kgf-cm, 9.0 ft. lbs.). Use a 4 mm (0.16 inch) diameter bar to temporarily fix the oil pump driven sprocket into place while setting its adjusting hole properly into the oil pump groove. Tighten the nut to 30 Nm (306 kgf-cm, 22 ft. lbs.). Install the chain vibration damper No.1 by torquing it to 9.0 Nm (92 kgf-cm, 80 inch lbs.) while the crankshaft is oriented at a 90 degrees angle counterclockwise with the key aligned to the top position.
- Q: How to replace the timing chain on Toyota Highlander?A:You must start the timing chain replacement process by taking out the hood sub-assembly and driving wheel RH followed by the engine under cover No.1 and front fender splash shield front RH and finishing up with front fender apron seal RH. Before proceeding with installation you should drain engine oil and install a new gasket then secure the drain plug with 25 Nm (255 kgf-cm, 18 ft. lbs.) torque. The Exhaust Pipe assembly front together with the engine moving control rod with bracket needs to be detached followed by the removal of engine mounting stay No.2 RH and engine mounting bracket No.2 RH. Continuing with the procedure requires uninstalling the fan and generator V belt and engine cover sub-assembly No.1 along with engine wire disconnection. As the next step disconnect the generator assembly followed by the vane pump assembly (without hose attachment), Ignition Coil assembly, and ventilation hoses No.1 and No.2. The cylinder head cover sub-assembly must be removed first before setting No.1 cylinder to TDC/compression position for crankshaft pulley removal using Special Service Tools: 09213-54015 (91651-60855), 09330-00021 to fix the pulley and loosen the bolt. Final steps require removing the bolt and pulley with Special Service Tools: 09950-50013 (09951-05010, 09952-05010, 09953-05020, 09954-05021). The first step is to remove the Crankshaft Position Sensor together with the oil pan sub-assembly and both the chain tensioner assembly No.1 and the V-ribbed belt tensioner assembly. First install engine hanger No.1 and No.2 with bolts tightened to 38 Nm (387 kgf-cm, 30 ft. lbs.), before removing the engine mounting insulator along with the bracket RH along with the timing chain or belt cover sub-assembly without damaging any contact surfaces. The service technician must remove the crankshaft position sensor plate No.1 in addition to the chain tensioner slipper and chain vibration damper No.1 followed by the chain sub-assembly and crankshaft timing gear or sprocket. To access No.2 chain sub-assembly professionals need to turn the crankshaft counterclockwise 90 degrees while aligning the oil pump driven sprocket and securing it temporarily with a 4.0 mm (0.16 inch) bar followed by removing the nut, bolt, chain tensioner plate and spring. The installation process for the new No.2 chain sub-assembly starts by setting the crankshaft key to its left horizontal position before aligning timing marks with the mark links then securing the oil pump driven sprocket nut to 30 Nm (306 kgf-cm, 22 ft. lbs.). Place chain vibration damper No.1 then install the chain sub-assembly followed by chain tensioner slipper (torque at 19 Nm (194 kgf-cm, 14 ft. lbs.)) on the assembly. Install the timing chain together with crankshaft position sensor plate No.1 and timing chain or belt cover sub-assembly after cleaning off all oil residues and using specified torque values when installing seal packing equivalent to Part No. 08826-00080. The technician must install Chain Tensioner Assembly No.1 followed by V-ribbed Belt Tensioner Assembly and Engine Mounting Bracket RH (torque to 54 Nm (551 kgf-cm, 40 ft. lbs.)), then complete with specified torque values. Reinstall all the mentioned parts in their defined torque settings including the oil pan sub-assembly followed by the crankshaft position sensor and crankshaft pulley (torque: 180 Nm (1,835 kgf-cm, 133 ft. lbs.)). Finally, install the remaining components including the cylinder head cover sub-assembly, ignition coil assembly (torque: 19 Nm (194 kgf-cm, 14 ft. lbs.)), vane pump assembly, generator assembly, engine wire, fan and generator V belt, engine mounting bracket No.2 RH (torque: 52 Nm (531 kgf-cm, 38 ft. lbs.)), engine mounting stay No.2 RH (torque: 64 Nm (653 kgf-cm, 47 ft. lbs.)), engine moving control rod with bracket, exhaust pipe assembly front, front wheel RH, and hood sub-assembly (torque: 13 Nm (133 kgf-cm, 10 ft. lbs.)). The technician should add engine oil before inspecting the vehicle for any fluid leakage.


Related Toyota Highlander Parts
 Toyota Highlander Engine Cover
 Toyota Highlander Valve Cover Gasket
 Toyota Highlander Crankshaft Gear
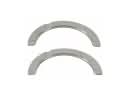 Toyota Highlander Crankshaft Thrust Washer
 Toyota Highlander Harmonic Balancer
 Toyota Highlander Intake Valve
 Toyota Highlander Oil Pan
 Toyota Highlander Oil Pump Gasket
 Toyota Highlander Piston
 Toyota Highlander Piston Ring Set
 Toyota Highlander Spool Valve
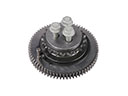 Toyota Highlander Timing Idler Gear