×
ToyotaParts- Hello
- Login or Register
- Quick Links
- Live Chat
- Track Order
- Parts Availability
- RMA
- Help Center
- Contact Us
- Shop for
- Toyota Parts
- Scion Parts
My Garage
My Account
Cart
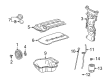
OEM Toyota Highlander Timing Cover
Engine Timing Cover- Select Vehicle by Model
- Select Vehicle by VIN
Select Vehicle by Model
orMake
Model
Year
Select Vehicle by VIN
For the most accurate results, select vehicle by your VIN (Vehicle Identification Number).
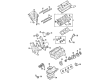
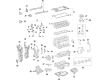
15 Timing Covers found


Toyota Highlander Timing Cover Part Number: 11310-0P050
$691.88 MSRP: $1013.96You Save: $322.08 (32%)Ships in 1-3 Business Days

Toyota Highlander Cover, Timing Belt, Upper Inner Part Number: 11323-20030
$175.20 MSRP: $250.15You Save: $74.95 (30%)Ships in 1-2 Business Days


Toyota Highlander Timing Cover Part Number: 11310-0H011
$237.76 MSRP: $339.47You Save: $101.71 (30%)Ships in 1-3 Business Days


Toyota Highlander Timing Cover Part Number: 11310-0V020
$308.95 MSRP: $441.11You Save: $132.16 (30%)


Toyota Highlander Cover, Timing Belt, Lower Part Number: 11321-0A020
$50.18 MSRP: $69.84You Save: $19.66 (29%)Ships in 1 Business Day


Toyota Highlander Timing Cover, Upper Outer Part Number: 11303-20040
$91.00 MSRP: $127.73You Save: $36.73 (29%)Ships in 1-3 Business Days
Toyota Highlander Timing Cover, Lower Part Number: 11310-31020
$623.78 MSRP: $914.16You Save: $290.38 (32%)Ships in 1-3 Business Days
Toyota Highlander Timing Cover Part Number: 11320-F0040
$217.49 MSRP: $310.53You Save: $93.04 (30%)Ships in 1-2 Business Days
Toyota Highlander Cover Assembly, Timing Chain, Inner Part Number: 11310-F0010
$222.50 MSRP: $317.68You Save: $95.18 (30%)Ships in 1-3 Business Days
Toyota Highlander Timing Cover, Outer Part Number: 11320-F0010
$222.74 MSRP: $318.02You Save: $95.28 (30%)Ships in 1-3 Business Days
Toyota Highlander Front Cover, Outer Part Number: 11320-25011
$222.74 MSRP: $318.02You Save: $95.28 (30%)Ships in 1-3 Business Days
Toyota Highlander Cover Assembly, Timing Chain Part Number: 11310-F0040
$222.97 MSRP: $318.35You Save: $95.38 (30%)Ships in 1-2 Business Days
Toyota Highlander Cover Assembly, Timing Chain Part Number: 11310-25050
$252.29 MSRP: $360.22You Save: $107.93 (30%)Ships in 1-2 Business DaysToyota Highlander Timing Cover Part Number: 11310-28070
$256.64 MSRP: $366.42You Save: $109.78 (30%)Ships in 1-3 Business Days
Toyota Highlander Timing Cover Part Number: 11321-28020
$261.64 MSRP: $373.55You Save: $111.91 (30%)Ships in 1-3 Business Days
Toyota Highlander Timing Cover
Choose genuine Timing Cover that pass strict quality control tests. You can trust the top quality and lasting durability. Shopping for OEM Timing Cover for your Toyota Highlander? Our website is your one-stop destination. We stock an extensive selection of genuine Toyota Highlander parts. The price is affordable so you can save more. It only takes minutes to browse and find the exact fit. Easily add to cart and check out fast. Our hassle-free return policy will keep you stress-free. We process orders quickly for swift delivery. Your parts will arrive faster, so you can get back on the road sooner.
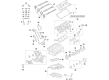
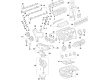
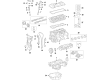
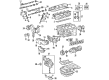
Timing Cover can be described as a critical part which serves a significant purpose in the Toyota Highlander cars, particularly regarding the engine. Intended to shield the timing mechanism this is usually a belt or a chain; the Timing Cover is made of solid materials like aluminum, plastic or steel. This strong layout protects the delicate parts of the timing mechanism from getting affected by debris and in this way, improves on efficiency and safety of the Toyota Highlander. Being applicable to all kinds of Highlander models including five-seat and seven-seat ones, the Timing Cover caters to the necessity of Toyota users. Timing belt is secured and protected in many Timing Covers and additional gaskets add to this layer of protection. Though being a reliable vehicle, the Toyota Highlander may experience some failure if its Timing Cover is not replaced on time. The altering nature of the Highlander from the classic off-road vehicles or SUVs to the recent hybrid Highlander with the Toyota Hybrid Synergy Drive system, illustrates the need for an efficient Timing Cover that is correctly and effectively installed. This is true in the market especially when it comes to timing cover and Timing Cover distinguishes itself in this market as very reliable hence offering a lot of satisfaction for any driver who wishes to have a safe and efficient car. All in all, the Timing Cover can be named one of the key components in the Toyota Highlander enhancing its quality and performance.
Toyota Highlander Timing Cover Parts and Q&A
- Q: How to replace the Timing Cover or Timing Chain Case Oil Seal on Toyota Highlander?A:Begin with front wheel RH and then disconnect the front fender splash shield front RH along with front fender apron seal RH, engine mounting stay No. 2 RH, engine cover sub-assy No. 1, and engine moving control rod with bracket by removing their 3 bolts. The subsequent step involves removing the engine mounting bracket No. 2 RH, fan and generator V belt, and crankshaft pulley after employing Special Service Tool: 09213-54015 (91651-60855), 09330-00021 to loosen the pulley bolt and then employing Special Service Tool: 09950-50013 (09951-05010, 09952-05010, 09953-05020, 09954-05021) to completely remove it. The repair process for the oil seal starts with knife-cutting its lip before using a screwdriver with taping tip to pry the lip out. Inspect the crankshaft for damage and fix any seen damage by sanding with #400 sandpaper before moving to the installation step. Fit the new oil seal by applying MP grease to its lip while checking for foreign materials then use Special Service Tool: 09223-22010 plus a hammer to tap it until it reaches the rear oil seal retainer edge before wiping off surplus grease on the crankshaft. The crankshaft pulley installation requires inserting the pulley set key into the key groove before tightening the pulley bolt by using Special Service Tools: 09213-54015 (91651-60855), 09330-00021 while torquing it to 170 Nm (1,733 kgf-cm, 125 inch lbs.). Use Special Service Tool: 09249-63010 to install the fan alongside generator V belt before setting the engine mounting bracket No. 2 RH to 52 Nm (531 kgf-cm, 38 ft. lbs.) torque and adding the engine moving control rod with bracket which needs 64 Nm (653 kgf-cm, 47 ft. lbs.) torque. Complete the process by reinstalling and torquing the front wheel RH to 103 Nm (1,050 kgf-cm, 76 ft. lbs.). Then install and torque engine mounting stay No. 2 RH to 64 Nm (653 kgf-cm, 47 ft. lbs.). The last step requires leak detection during the inspection.

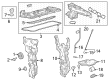
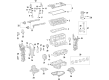
Related Toyota Highlander Parts
 Toyota Highlander Timing Belt
 Toyota Highlander Engine Mount
 Toyota Highlander Valve Cover Gasket
 Toyota Highlander Camshaft Bearing
 Toyota Highlander Intake Valve
 Toyota Highlander Oil Drain Plug Gasket
 Toyota Highlander Oil Filler Cap
 Toyota Highlander Oil Pan
 Toyota Highlander Oil Pump Gasket
 Toyota Highlander Timing Chain Tensioner
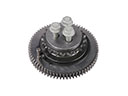 Toyota Highlander Timing Idler Gear
 Toyota Highlander Variable Timing Sprocket
Browse Toyota Highlander Timing Cover by Years
2025 2024
2023
2022
2021
2020
2019
2018
2017
2016
2015
2014
2013
2012
2011
2010
2009
2008
2007
2006
2005
2004
2003
2002
2001