×
ToyotaParts- Hello
- Login or Register
- Quick Links
- Live Chat
- Track Order
- Parts Availability
- RMA
- Help Center
- Contact Us
- Shop for
- Toyota Parts
- Scion Parts
My Garage
My Account
Cart
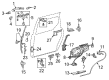
OEM Toyota Door Lock
Power Door Lock Actuator- Select Vehicle by Model
- Select Vehicle by VIN
Select Vehicle by Model
orMake
Model
Year
Select Vehicle by VIN
For the most accurate results, select vehicle by your VIN (Vehicle Identification Number).
939 Door Locks found


Toyota Lock Actuator, Driver Side Part Number: 69040-02440
$255.24 MSRP: $364.43You Save: $109.19 (30%)Product Specifications- Other Name: Lock Assembly, Front Door; Latch Assembly, Front/Rear Left; Lock Actuator Motor; Door Lock; Lock Assembly; Lock; Lock Assembly, Front Door W/Motor, Driver Side
- Position: Driver Side


Toyota Lock Actuator, Driver Side Part Number: 69040-42250
$289.61 MSRP: $413.49You Save: $123.88 (30%)Ships in 1-2 Business DaysProduct Specifications- Other Name: Lock Assembly, Front Door W; Door Lock Actuator Motor, Front Left; Door Latch Assembly, Front Left; Lock Assembly; Front Door W/Motor, Driver Side; Door Lock Actuator Motor; Door Latch Assembly.
- Position: Driver Side


Toyota Lock Assembly, Back Door, Rear Part Number: 69350-60120
$139.58 MSRP: $197.59You Save: $58.01 (30%)Ships in 1-3 Business DaysProduct Specifications- Other Name: Door Lock Actuator; Door Lock
- Position: Rear


Toyota Lock Actuator, Passenger Side Part Number: 69030-42230
$267.82 MSRP: $382.39You Save: $114.57 (30%)Ships in 1-2 Business DaysProduct Specifications- Other Name: Lock Assembly, Front Door W; Door Lock Actuator Motor, Front Right; Door Latch Assembly, Front Right; Lock Assembly; Front Door W/Motor, Passenger Side; Door Lock Actuator Motor; Door Latch Assembly.
- Manufacturer Note: WIRELESS DOOR LOCK-WITH(PANIC BUTTON)&DOOR OUTSIDE HANDLE-BODY COLOR,W/O(PASSENGER KEY CYLINDER)&POWER WINDOW-WITH(DRIVER ONE TOUCH DOWN)
- Position: Passenger Side


Toyota Lock Actuator, Rear Part Number: 69110-35090
$287.39 MSRP: $410.33You Save: $122.94 (30%)Ships in 1 Business DayProduct Specifications- Other Name: Lock Assembly, With Motor Back Door; Liftgate Latch, Rear; Door Lock Actuator Motor; Door Lock Actuator; Door Lock; Lock
- Position: Rear
- Replaces: 69110-35060, 69110-35062


Toyota Lock Assembly, Rear Part Number: 64610-33080
$56.51 MSRP: $78.66You Save: $22.15 (29%)Ships in 1-3 Business DaysProduct Specifications- Other Name: Lock Assembly, Luggage Compartment Door; Deck Lid Latch, Rear; Door Lock Actuator; Trunk Latch; Door Lock; Lock
- Position: Rear


Toyota Lock Actuator, Driver Side Part Number: 69040-0C050
$255.24 MSRP: $364.43You Save: $109.19 (30%)Product Specifications- Other Name: Lock Assembly, Front Door W; Door Lock Actuator Motor, Front Left; Door Latch Assembly, Front Left; Lock Assembly; Front Door W/Motor, Driver Side; Door Lock Actuator Motor.
- Position: Driver Side
- Replaces: 69040-06180


Toyota Lock Assembly, Rear Door, Driver Side Part Number: 69060-60062
$288.56 MSRP: $412.00You Save: $123.44 (30%)Ships in 1-3 Business DaysProduct Specifications- Other Name: Lock Assembly, Rear Door W; Door Latch Assembly; Door Lock Actuator; Door Lock
- Position: Driver Side
- Replaces: 69060-60060, 69060-60061


Toyota Lock, Passenger Side Part Number: 69050-60062
$297.30 MSRP: $424.47You Save: $127.17 (30%)Ships in 1-3 Business DaysProduct Specifications- Other Name: Lock Assembly, Rear Door W; Door Latch Assembly, Rear Right; Door Lock Actuator; Door Lock; Lock Assembly, Rear Door, Passenger Side; Door Latch Assembly
- Position: Passenger Side
- Replaces: 69050-60060, 69050-60061


Toyota Lock Actuator, Passenger Side Part Number: 69030-02380
$265.14 MSRP: $378.57You Save: $113.43 (30%)Ships in 1-2 Business DaysProduct Specifications- Other Name: Lock Assembly, Front Door; Latch Assembly, Front/Rear Right; Lock Actuator Motor; Door Lock; Lock Assembly; Lock; Lock Assembly, Front Door W/Motor, Passenger Side
- Position: Passenger Side


Toyota Lock, Driver Side Part Number: 69306-0C020
$173.07 MSRP: $245.00You Save: $71.93 (30%)Ships in 1-3 Business DaysProduct Specifications- Other Name: Lock Sub-Assembly, Rear Door; Door Latch Assembly, Rear Left; Door Lock Actuator Motor; Door Lock Actuator; Door Lock; Latch; Lock Assembly, Rear Door, Driver Side; Door Latch Assembly
- Position: Driver Side


Toyota Lock Assembly, Front Door, Driver Side Part Number: 69040-60191
$297.30 MSRP: $424.47You Save: $127.17 (30%)Ships in 1-3 Business DaysProduct Specifications- Other Name: Lock Assembly, Front Door W; Door Lock Actuator; Door Lock
- Position: Driver Side
- Replaces: 69040-60190


Toyota Lock, Rear Part Number: 69301-0C010
$112.33 MSRP: $157.67You Save: $45.34 (29%)Product Specifications- Other Name: Lock Sub-Assembly, Back; Liftgate Latch, Rear; Door Lock Actuator; Door Lock; Lock Assembly, Back Door
- Position: Rear


Toyota Lock Assembly, Driver Side Part Number: 69320-35500
$161.79 MSRP: $229.03You Save: $67.24 (30%)Ships in 1-2 Business DaysProduct Specifications- Other Name: Lock Assembly, Front Door; Door Latch Assembly, Front Left; Door Lock Actuator; Door Lock; Lock; Lock Assembly, Front Door, Driver Side
- Manufacturer Note: W(ELECTROMAGNETIC LOCK)
- Position: Driver Side


Toyota Lock Actuator, Passenger Side Part Number: 69030-52470
$261.65 MSRP: $373.57You Save: $111.92 (30%)Ships in 1-3 Business DaysProduct Specifications- Other Name: Lock Assembly, Front Door W; Door Lock Actuator Motor, Front Right; Door Latch Assembly, Front Right; Lock Assembly; Front Door W/Motor, Passenger Side; Door Lock Actuator Motor.
- Position: Passenger Side


Toyota Lock Assembly, Front Door W/Motor, Passenger Side Part Number: 69030-0C050
$267.82 MSRP: $382.39You Save: $114.57 (30%)Product Specifications- Other Name: Lock Assembly, Front Door W; Passenger Side; Door Lock Actuator Motor; Actuator; Lock
- Position: Passenger Side
- Replaces: 69030-06200


Toyota Lock Assembly, Passenger Side Part Number: 69200-08011
$599.16 MSRP: $878.07You Save: $278.91 (32%)Ships in 1-3 Business DaysProduct Specifications- Other Name: Lock Assembly, Power Slide Door; Sliding Door Latch, Rear Right; Door Lock Actuator; Door Lock; Lock; Lock Assembly, Slide Door, Passenger Side
- Position: Passenger Side
- Replaces: 69200-08010


Toyota Lock Assembly, Rear Part Number: 69350-52261
$122.66 MSRP: $173.64You Save: $50.98 (30%)Ships in 1-3 Business DaysProduct Specifications- Other Name: Lock Assembly, Back Door; Liftgate Latch, Rear; Door Lock Actuator; Door Lock; Lock; Lock Assembly, Back Door, W/Courtesy Lamp Switch
- Position: Rear
- Replaces: 69350-52260


Toyota Lock Assembly, Rear Part Number: 64600-02031
$168.60 MSRP: $238.68You Save: $70.08 (30%)Ships in 1-3 Business DaysProduct Specifications- Other Name: Lock Assembly, Luggage Compartment Door; Deck Lid Latch, Rear; Door Lock Actuator; Trunk Latch; Door Lock; Lock
- Position: Rear
- Replaces: 64600-02030


Toyota Lock Assembly, Driver Side Part Number: 69040-0C010
$281.80 MSRP: $402.35You Save: $120.55 (30%)Product Specifications- Other Name: Lock Assembly, Front Door W; Door Latch Assembly, Front Left; Door Lock Actuator; Door Lock; Lock; Lock Assembly, Front Door, Driver Side
- Manufacturer Note: W(POWER DOOR LOCK)
- Position: Driver Side
| Page 1 of 47 |Next >
1-20 of 939 Results
Toyota Door Lock
OEM parts deliver unmatched quality you can rely on. They pass extensive quality control inspections. Toyota produces them to the official factory specifications. This process helps prevent defects and imperfections. So you can get exceptional lifespan and a flawless fit. Need new OEM Toyota Door Lock? You'll love our wide selection of genuine options. Shop in minutes and skip the hunt. Our prices are unbeatable, you'll save time and money. It's easy to shop and find the right piece. Our committed customer service team gives professional help from start to finish. Every part includes a manufacturer's warranty. We ship quickly, your parts will arrive fast at your door.
Toyota Door Lock ensures that all doors are locked firmly in place so that rides can be secure until you decide otherwise. In 1937, of Japanese origin, Toyota has become the master of the roads, having eliminated waste, empowered line workers, and produced hybrids, plug-ins, and durable crossovers that last decades. Toyota invests experience of TNGA chassis on lighter frames, superior crash absorption, quicker steering, and those types of powertrains that consume less fuel and make daily commuting more affordable and less noisy. Those unremitting upgrade cycles ensure that owners have an easier ride in cabins, high value, and reduced visits to pump or charger despite the fact that the fleet has been expanded. The defects are eliminated at the early stages by constant feedback loops, and the trust, which has drawn millions to the badge every year, is established. Toyota integrates the Door Lock circuitry to the centralized controls, which allow one thumb to operate all the latches without searching where the switches are located. Door Lock modules are made of durable latch-and-clasp metals that shake off slams and potholes, snow, and a million school-run openings. Toyota cabins contain Door Lock motors which burn quickly and then switch off immediately to conserve battery power and eliminate irritating hum. Door Lock auto-locks at velocity locking out invaders and squeaks as your keyless fob awaits to greet you back home.
Toyota Door Lock Parts and Q&A
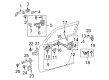
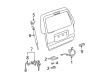
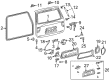
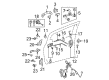
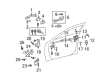
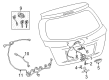
- Q: How to install the rear door lock assembly on Toyota Camry?A:You must replace the door lock wiring harness seal with a new one when reusing the removed assembly to prevent water intrusion by avoiding contact between any grease or dust and the attachment areas. The installation of rear door inside locking cable begins with fixing the 3 claws followed by the installation of rear door lock remote control cable assembly with engagement of the claw. Before installation place new seal material for door lock wiring harness and cover the parts of rear door lock assembly with MP grease. Secure the rear door lock assembly within the outside handle release plate of the door panel by fastening it to the outside handle frame release plate. Use a "torx" socket wrench (T30) to mount the assembly with 3 screws while applying torque of 5.0 Nm (51 kgf-cm, 44 in-lbf) and establish the connector. Then follow the order to install the rear door service hole cover before placing the rear door inner glass Weather Strip and the rear door inside handle sub-assembly along with the rear door trim board sub-assembly and door assist grip cover and finally insert the rear door inside handle bezel plug.
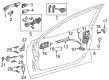
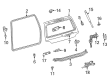
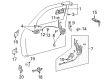
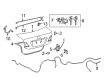
- Q: How to install the front door lock on Toyota FJ Cruiser?A:Before installing the front door lock start by changing the packing material in the connecting section with new parts. Also eliminate all traces of grease and dirt from packing surfaces. Connect the front door lock remote control cable and the front door inside locking cable after applying MP grease to all sliding and rotating front door lock points. Secure the door lock open rod into the front door lock before setting it to the door panel with a confirmation of proper outside handle link engagement with the door lock. Use Toyota Genuine Adhesive 1324 or Three Bond 1324 or equivalent adhesive before assembling the front door lock with its three screws by applying a "Torx" socket wrench T30 with torque set to 5.0 Nm (51 kgf-cm, 44 in-lbf). A "Torx" socket wrench T30 should be used to install the front door lock cylinder with a torque of 5.5 Nm (56 kgf-cm, 49 in-lbf) after inserting the door lock key cylinder rod and then installing the hole plug. Proceed to install the front door glass sub-assembly, front door window frame rear lower, front door lower frame bracket garnish, front door frame sub-assembly front lower, front door glass run, front door Weather Strip, front door check assembly, front door inside panel plate, front door service hole cover, front No. 1 speaker, front door glass outer Weather Strip assembly, outer rear view mirror, front No. 2 door service hole cover, front door trim board sub-assembly, and front armrest base upper panel. Use the cable to connect the negative battery terminal while applying 3.9 Nm (40 kgf-cm, 35 in-lbf) torque.


Related Toyota Parts
 Toyota Emblem
 Toyota Seat Covers
 Toyota Windshield Wiper
 Toyota Car Speakers
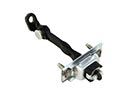 Toyota Door Check
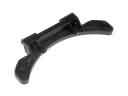 Toyota Fuel Door Hinge
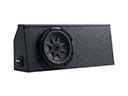 Toyota Subwoofer
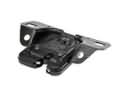 Toyota Trunk Latch
 Toyota Window Regulator
 Toyota Windshield Washer Nozzle
 Toyota Wiper Motor
 Toyota Window Run
Browse Toyota Door Lock by Models
Tacoma 4Runner Camry Tundra Corolla RAV4 Highlander Prius Sienna Land Cruiser Pickup FJ Cruiser 86 Sequoia T100 Avalon Celica Supra Yaris Matrix MR2 Solara Venza GR86 Echo C-HR Cressida Grand Highlander Paseo Previa Prius C Prius Prime bZ4X Corolla Cross Corolla iM Crown Crown Signia GR Corolla Mirai MR2 Spyder Prius V Starlet Tercel Van Yaris iA Prius Plug-In GR Supra Prius AWD-e RAV4 Prime