×
ToyotaParts- Hello
- Login or Register
- Quick Links
- Live Chat
- Track Order
- Parts Availability
- RMA
- Help Center
- Contact Us
- Shop for
- Toyota Parts
- Scion Parts
My Garage
My Account
Cart
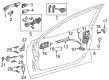
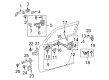
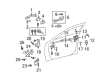
OEM Toyota Camry Door Lock
Power Door Lock Actuator- Select Vehicle by Model
- Select Vehicle by VIN
Select Vehicle by Model
orMake
Model
Year
Select Vehicle by VIN
For the most accurate results, select vehicle by your VIN (Vehicle Identification Number).
111 Door Locks found


Toyota Camry Lock Actuator, Driver Side Part Number: 69040-02440
$255.24 MSRP: $364.43You Save: $109.19 (30%)


Toyota Camry Lock Actuator, Passenger Side Part Number: 69030-42230
$267.82 MSRP: $382.39You Save: $114.57 (30%)Ships in 1-2 Business Days


Toyota Camry Lock Assembly, Rear Part Number: 64610-33080
$56.51 MSRP: $78.66You Save: $22.15 (29%)Ships in 1-3 Business Days

Toyota Camry Lock Actuator, Driver Side Part Number: 69040-0C050
$255.24 MSRP: $364.43You Save: $109.19 (30%)

Toyota Camry Lock Actuator, Passenger Side Part Number: 69030-02380
$265.14 MSRP: $378.57You Save: $113.43 (30%)Ships in 1-2 Business Days


Toyota Camry Lock Assembly, Front Door W/Motor, Passenger Side Part Number: 69030-0C050
$267.82 MSRP: $382.39You Save: $114.57 (30%)


Toyota Camry Lock Actuator, Driver Side Part Number: 69060-06100
$264.21 MSRP: $377.23You Save: $113.02 (30%)Ships in 1-3 Business Days


Toyota Camry Lock Assembly, Front Door W/Motor, Passenger Side Part Number: 69030-33261
$279.12 MSRP: $398.52You Save: $119.40 (30%)Ships in 1 Business Day

Toyota Camry Lock, Passenger Side Part Number: 69305-AA010
$161.79 MSRP: $229.03You Save: $67.24 (30%)

Toyota Camry Lock Actuator, Rear Part Number: 64600-06070
$179.17 MSRP: $255.81You Save: $76.64 (30%)Ships in 1-2 Business Days

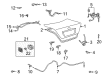
Toyota Camry Lock Assembly, Rear Part Number: 64610-AA070
$57.59 MSRP: $80.16You Save: $22.57 (29%)Ships in 1-3 Business Days


Toyota Camry Lock, Passenger Side Part Number: 69303-AA010
$177.30 MSRP: $253.15You Save: $75.85 (30%)Ships in 1-2 Business Days


Toyota Camry Lock Assembly, Rear Part Number: 64600-06041
$181.15 MSRP: $258.64You Save: $77.49 (30%)Ships in 1 Business Day
Toyota Camry Lock, Driver Side Part Number: 69304-AA010
$191.28 MSRP: $273.11You Save: $81.83 (30%)Ships in 1 Business Day

Toyota Camry Lock Assembly, Rear Part Number: 64600-33120
$223.78 MSRP: $319.51You Save: $95.73 (30%)Ships in 1 Business Day


Toyota Camry Lock Assembly, Rear Part Number: 64600-AA020
$235.20 MSRP: $335.81You Save: $100.61 (30%)Ships in 1-3 Business Days

Toyota Camry Lock Actuator, Passenger Side Part Number: 69050-06100
$266.42 MSRP: $380.40You Save: $113.98 (30%)Ships in 1-2 Business Days

Toyota Camry Lock Actuator, Passenger Side Part Number: 69030-0C060
$276.56 MSRP: $394.86You Save: $118.30 (30%)Ships in 1-3 Business Days


Toyota Camry Lock Assembly Part Number: 64610-33040
$54.00 MSRP: $75.17You Save: $21.17 (29%)
Toyota Camry Lock Assembly, Rear Part Number: 64610-33061
| Page 1 of 6 |Next >
1-20 of 111 Results
Toyota Camry Door Lock
Choose genuine Door Lock that pass strict quality control tests. You can trust the top quality and lasting durability. Shopping for OEM Door Lock for your Toyota Camry? Our website is your one-stop destination. We stock an extensive selection of genuine Toyota Camry parts. The price is affordable so you can save more. It only takes minutes to browse and find the exact fit. Easily add to cart and check out fast. Our hassle-free return policy will keep you stress-free. We process orders quickly for swift delivery. Your parts will arrive faster, so you can get back on the road sooner.
Toyota Camry Door Lock Parts and Q&A
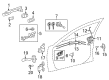
- Q: How to install the front door lock assembly on Toyota Camry?A:The installation process for front door lock assembly begins by using a new door lock wiring harness seal if the removed assembly is reused because grease and dust onto the seal attach surface can cause water intrusion and system failure. Start installation of the front door inside locking cable assembly until you fully engage its three claws before moving onto the front door lock remote control cable assembly. Before setting the new door lock wiring harness seal, use MP grease on all sliding components of the front door lock assembly. Set the front door outside handle frame as a starting point for inserting the front door lock open rod which needs to create a tight connection. Install the front door lock assembly through using a "torx" socket wrench (T30) with 5.0 Nm (51 kgf-cm, 44 in-lbf) applied torque on 3 screws and connect the connector. After installing the front door outside handle cover, the next sequence of installation includes the front door rear lower frame sub-assembly, front door glass sub-assembly, front door service hole cover, front No. 1 speaker assembly, front door inner glass Weather Strip, front door inside handle sub-assembly, front door trim board sub-assembly, courtesy light assembly, assist grip cover, front door inside handle bezel plug, and front door lower frame bracket garnish.
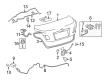
- Q: How to install the rear door lock assembly on Toyota Camry?A:Before installing the rear door lock assembly it is essential to install a new door lock wiring harness seal when using the recovered assembly because any dust or grease needs to avoid the attachment surface to stop water damage and prevent system breakdown. Start with the installation of the rear door inside locking cable assembly while activating three claws then move on to the rear door lock remote control cable assembly and use the claw to engage it. Place MP grease on the movable elements of the rear door lock assembly before putting in the new door lock wiring harness seal. Attach the rear door lock assembly into the rear door outside handle release plate before fixing it to the rear door panel while ensuring a strong connection between the outside handle frame release plate. Put the "torx" socket wrench (T30) to the rear door lock assembly installation through its 3 screws while applying 5.0 Nm (51 kgf-cm, 44 in-lbf) of torque before attaching the connector. Follow this step by adding the rear door service hole cover, rear door inside handle sub-assembly, rear door inner glass Weather Strip, rear door trim board sub-assembly and door assist grip cover and rear door inside handle bezel plug.


Related Toyota Camry Parts
 Toyota Camry Emblem
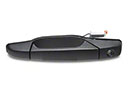 Toyota Camry Exterior Door Handle
 Toyota Camry Windshield Wiper
 Toyota Camry Armrest
 Toyota Camry Ashtray
 Toyota Camry Windshield Washer Nozzle
 Toyota Camry Wiper Arm
 Toyota Camry Car Mirror
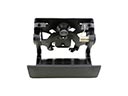 Toyota Camry Tailgate Handle
 Toyota Camry Weather Strip
 Toyota Camry Window Run
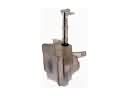 Toyota Camry Windshield Washer Fluid Reservoir