×
ToyotaParts- Hello
- Login or Register
- Quick Links
- Live Chat
- Track Order
- Parts Availability
- RMA
- Help Center
- Contact Us
- Shop for
- Toyota Parts
- Scion Parts
My Garage
My Account
Cart
OEM Toyota Corolla Brake Master Cylinder
- Select Vehicle by Model
- Select Vehicle by VIN
Select Vehicle by Model
orMake
Model
Year
Select Vehicle by VIN
For the most accurate results, select vehicle by your VIN (Vehicle Identification Number).
29 Brake Master Cylinders found


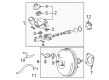
Toyota Corolla Master Cylinder Part Number: 47201-02320
$237.07 MSRP: $338.48You Save: $101.41 (30%)Ships in 1-3 Business Days


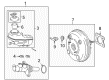
Toyota Corolla Master Cylinder Part Number: 47201-12B63
$274.46 MSRP: $391.87You Save: $117.41 (30%)Ships in 1-3 Business Days
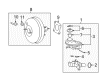
Toyota Corolla Master Cylinder Part Number: 47201-02593
$261.76 MSRP: $373.74You Save: $111.98 (30%)Ships in 1-3 Business Days

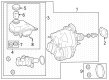
Toyota Corolla Brake Booster Part Number: 47050-12C40
$1259.73 MSRP: $1846.14You Save: $586.41 (32%)Ships in 1-3 Business Days
Toyota Corolla Master Cylinder Reservoir Part Number: 47201-19105
$147.57 MSRP: $208.90You Save: $61.33 (30%)Ships in 1-2 Business Days
Toyota Corolla Master Cylinder Part Number: 47201-02870
$183.59 MSRP: $262.13You Save: $78.54 (30%)Ships in 1-3 Business DaysToyota Corolla Master Cylinder Part Number: 47201-02860
$189.18 MSRP: $270.11You Save: $80.93 (30%)Ships in 1-3 Business Days
Toyota Corolla Master Cylinder Part Number: 47201-02670
$189.18 MSRP: $270.11You Save: $80.93 (30%)Ships in 1-3 Business DaysToyota Corolla Master Cylinder Part Number: 47201-02660
$189.18 MSRP: $270.11You Save: $80.93 (30%)Ships in 1 Business DayToyota Corolla Master Cylinder Part Number: 47201-02491
$203.63 MSRP: $290.73You Save: $87.10 (30%)Ships in 1-3 Business Days
Toyota Corolla Master Cylinder Part Number: 47201-02030
$203.63 MSRP: $290.73You Save: $87.10 (30%)Ships in 1-3 Business DaysToyota Corolla Master Cylinder Part Number: 47201-02310
$234.62 MSRP: $334.98You Save: $100.36 (30%)Ships in 1-3 Business DaysToyota Corolla Master Cylinder Part Number: 47201-02300
$237.07 MSRP: $338.48You Save: $101.41 (30%)Ships in 1-3 Business DaysToyota Corolla Master Cylinder Part Number: 47201-02020
$260.13 MSRP: $371.41You Save: $111.28 (30%)Toyota Corolla Master Cylinder Part Number: 47201-02483
$281.92 MSRP: $402.52You Save: $120.60 (30%)Ships in 1-3 Business DaysToyota Corolla Master Cylinder Part Number: 47201-02340
$293.29 MSRP: $418.75You Save: $125.46 (30%)Ships in 1-3 Business Days

Toyota Corolla Master Cylinder Part Number: 47201-12761
$184.87 MSRP: $263.96You Save: $79.09 (30%)Ships in 1-3 Business DaysToyota Corolla Master Cylinder Part Number: 47201-02290
$221.11 MSRP: $315.69You Save: $94.58 (30%)Toyota Corolla Master Cylinder Part Number: 47201-1A080
Toyota Corolla Master Cylinder Part Number: 47201-16081
| Page 1 of 2 |Next >
1-20 of 29 Results
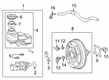
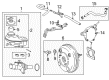
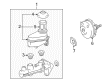
Toyota Corolla Brake Master Cylinder
Choose genuine Brake Master Cylinder that pass strict quality control tests. You can trust the top quality and lasting durability. Shopping for OEM Brake Master Cylinder for your Toyota Corolla? Our website is your one-stop destination. We stock an extensive selection of genuine Toyota Corolla parts. The price is affordable so you can save more. It only takes minutes to browse and find the exact fit. Easily add to cart and check out fast. Our hassle-free return policy will keep you stress-free. We process orders quickly for swift delivery. Your parts will arrive faster, so you can get back on the road sooner.
Brake Master Cylinder is an important part of the braking mechanism in Toyota Corolla cars: this device translates the pressure applied by the foot to hydraulic pressure. This mechanism works in a way that it forces the fluid through the system to push the slave cylinders which further enables the brakes and sets the friction required to halt the vehicle from operation. In most cases, it is fitted on the front of the vacuum power booster and may either be an integral or have an external reservoir. Through the years, years, toyota corolla models have employed dual circuit master cylinders whereby, in the case of one circuit having a failure of providing braking pressure, the other circuit is still available to supply the pressure. As it affords control even when the hydraulics system is out of service, this design averts the potential of mishaps. Some of the problems associated with the Brake Master Cylinder include fluid leakage and internal damages that compromises the braking system. Moisture and corrosion need also be prevented in a cylinder in order to allow longer period between the required maintenance check.
Toyota Corolla Brake Master Cylinder Parts and Q&A
- Q: How to remove the Brake Master Cylinder on Toyota Corolla?A:The first action before Brake Master Cylinder removal should include draining brake fluid followed by immediate clean-up of fluid that adheres to painted areas. You must take off the air cleaner cap sub-assembly. Remove the connector of the brake fluid level switch which attaches to the reservoir sub-assembly. Users of vehicles with a manual transmission should slide the clip and remove tubing from clutch reservoir No. 1 at the reservoir sub-assembly. The 2 brake tubes connecting the master cylinder sub-assembly require removal through Special Service Tool: 09023-00101 and then disconnect the 2 or 3 brake tubes entering the No. 1 way using the same tool. The valve bracket can be checked by removing the 2 nuts followed by master cylinder sub-assembly and No. 1 way pullout and valve bracket inspection.
- Q: How to install the brake master cylinder on Toyota Corolla?A:Before installation of the brake master cylinder inspect the Brake Booster push rod and perform required adjustments. Install a new O-ring inside the brake master cylinder sub-assembly and couples it with the brake tube way to the brake booster assembly using 2 nuts tightened to 13 Nm (132 kgf-cm, 10 ft-lbf). Use extreme caution while handling the master cylinder to maintain the piston in an elevated position or a horizontal state before installation because a dropoff of the piston can occur if it is below this orientation position. The piston needs cleaning of foreign materials using a cloth while receiving a uniform layer of lithium soap base glycol grease spread around its circumference. Use a union nut wrench (10 mm) to connect the 4 Brake Lines to the brake master cylinder sub-assembly while maintaining the wrench in a parallel position to the union nut wrench and torque it to 15 Nm (155 kgf-cm, 11 ft-lbf) when without the wrench and 14 Nm (143 kgf-cm, 10 ft-lbf) with the wrench. First fasten the clamp unit then link the connector before connecting the clutch tube to the brake master cylinder reservoir assembly employing the clip. You should begin by filling the brake reservoir before performing C59 and E351 clutch line bleeding then moving to the master cylinder bleeding and follow with brake line bleeding and brake actuator bleeding by using VSC. Become diligent in inspecting for brake fluid leaks while checking the fluid level in the reservoir. The suspension tower damper assembly should then receive the front strut bar before the installation of the outer cowl top panel with 12 bolts torqued to 8.8 Nm (90 kgf-cm, 78 in-lbf) and clamp engagement. Install the outer cowl top panel on all models except TMC Made followed by a bending and clamping procedure of the water guard plate RH according to the illustration. You should install the windshield Wiper Motor together with its link assembly followed by the left and center No. 1 cowl top ventilator louvers, the hood to cowl top seal and the wiper arm and blade assemblies for both sides. The last steps involve attaching the front wiper arm head cap and air cleaner case with cap subassembly for 2ZR-FE and 2AZ-FE engines together with the 2ZR-FE specific No.2 cylinder head cover. Make sure all installation components remain tightly in place.


Related Toyota Corolla Parts
 Toyota Corolla Wheel Bearing
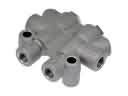 Toyota Corolla Brake Proportioning Valve
 Toyota Corolla Wheel Cylinder
 Toyota Corolla Wheel Stud
 Toyota Corolla Brake Booster Vacuum Hose
 Toyota Corolla Brake Fluid Pump
 Toyota Corolla Brake Line
 Toyota Corolla Hydraulic Hose
 Toyota Corolla Master Cylinder Repair Kit
 Toyota Corolla Parking Brake Shoes
 Toyota Corolla Spindle Nut
 Toyota Corolla Yaw Sensor