×
ToyotaParts- Hello
- Login or Register
- Quick Links
- Live Chat
- Track Order
- Parts Availability
- RMA
- Help Center
- Contact Us
- Shop for
- Toyota Parts
- Scion Parts
My Garage
My Account
Cart
OEM Toyota Camry Parking Brake Shoe
Emergency Parking Brake Shoe- Select Vehicle by Model
- Select Vehicle by VIN
Select Vehicle by Model
orMake
Model
Year
Select Vehicle by VIN
For the most accurate results, select vehicle by your VIN (Vehicle Identification Number).
12 Parking Brake Shoes found


Toyota Camry Parking Brake, Driver Side
Part Number: 46590-33020$38.59 MSRP: $53.71You Save: $15.12 (29%)Ships in 1-2 Business Days

Toyota Camry Parking Brake Shoes, Driver Side
Part Number: 46590-06020$39.30 MSRP: $54.71You Save: $15.41 (29%)Ships in 1-3 Business Days
Toyota Camry Parking Brake, Passenger Side Or Center
Part Number: 46550-33020$34.64 MSRP: $48.22You Save: $13.58 (29%)Ships in 1-2 Business Days
Toyota Camry Parking Brake Shoes, Passenger Side Or Center
Part Number: 46550-06020$39.30 MSRP: $54.71You Save: $15.41 (29%)Ships in 1-3 Business Days


Toyota Camry Shoe Assembly, Parking Brake, Passenger Side Or Center, Rear
Part Number: 46540-42010$28.91 MSRP: $40.24You Save: $11.33 (29%)Ships in 1-2 Business Days

Toyota Camry Shoe Assembly, Parking Brake, Passenger Side Or Center
Part Number: 46540-20070$34.64 MSRP: $48.22You Save: $13.58 (29%)Ships in 1-2 Business Days

Toyota Camry Parking Brake Shoes, Rear
Part Number: 46540-06030$31.30 MSRP: $43.57You Save: $12.27 (29%)Ships in 1-3 Business Days

Toyota Camry Brake Shoes, Rear
Part Number: 04495-33030$57.23 MSRP: $79.65You Save: $22.42 (29%)Ships in 1 Business Day

Toyota Camry Brake Shoes, Rear
Part Number: 04495-33010$57.23 MSRP: $79.65You Save: $22.42 (29%)Ships in 1-2 Business Days
Toyota Camry Brake Shoes, Rear
Part Number: 04495-06040$62.44 MSRP: $87.64You Save: $25.20 (29%)Ships in 1-2 Business Days

Toyota Camry Parking Brake Shoe
Choose genuine Parking Brake Shoe that pass strict quality control tests. You can trust the top quality and lasting durability. Shopping for OEM Parking Brake Shoe for your Toyota Camry? Our website is your one-stop destination. We stock an extensive selection of genuine Toyota Camry parts. The price is affordable so you can save more. It only takes minutes to browse and find the exact fit. Easily add to cart and check out fast. Our hassle-free return policy will keep you stress-free. We process orders quickly for swift delivery. Your parts will arrive faster, so you can get back on the road sooner.
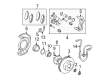
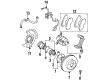
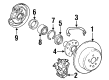
The Parking Brake Shoe is significantly used in Toyota Camry cars to hold the wheels whenever the car is parked. Its main purpose is to push the brake lining against the drum wall so as to create friction in an effort to lock the wheels when the parking break is engaged. This mechanism helps to lock the wheels and hence keep it in a stationary position which makes it safe. In the course of the Camry production, different styles of Parking Brake Shoe have probably been used, but specific types are unknown. It is basic function stays the same, namely effective wheel locking by means of friction. Thus, it is crucial to learn how the Parking Brake Shoe is built and how it works in a vehicle system.
Toyota Camry Parking Brake Shoe Parts and Q&A
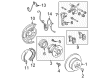
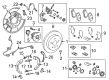
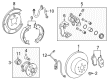
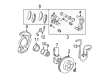
- Q: How to service and repair the parking brake shoe on Toyota Camry?A:Service and maintenance of the parking brake shoe starts by uninstalling the rear wheel at 103 Nm (1.050 kgf-cm, 76 ft. lbs.) torque followed by removing the rear disc brake assembly by dissembling 2 bolts with 47 Nm (475 kgf-cm, 34 ft. lbs.) torque and securely suspending the assembly without damaging the hose. Pull the parking brake lever while pulling off the disc. Adjust the shoe when disc removal is challenging to keep the wheel wheel spinning freely. You should use needle-nose pliers to remove shoe return springs before you pull out the front shoe so you can access the shoe adjuster and shoe strut with spring along with the shoe hold-down spring cups, spring, and pin before you disconnect the tension spring to remove the front shoe. Start by pulling out the rear shoe and then take off the tension spring followed by shoe hold-down spring cups along with spring and pin and finally detach the Parking Brake Cable from the parking brake shoe lever with needle-nose pliers. Examine all removed parts for signs of wear or rust as well as damage before measuring brake shoe lining thickness that must be between 1.0 mm and 2.0 mm and checking the disc inside diameter against the 170-171 mm standard. Also ensure a proper lining-disc contact. Use a feeler gauge to check the parking brake shoe lever clearance which should be below 0.35 mm (0.0138 inch). In order to make adjustments, replace the shim by removing the C-washer and shim with a screwdriver and installing a new C-washer with the correct shim followed by another clearance measurement. High-temperature grease should be applied to designated parts during reassembly according to the reverse sequence of disassembly. The proper parking brake shoe clearance adjustment requires temporary hub nut installation followed by unplugging the hole until the adjuster expands the shoes against the locked disc after which the adjuster should be rewound 8 notches and the hole plug reinstalled. The procedure requires drawing the lever against a force of 98 N (10 kgf, 22 lbs.) when pressing the parking brake release button to settle brakes and disc. This process needs two or three repetitions while driving at 50 km/h (31 mph) for 400 meters (0.25 mile). The last step requires another check and adjustment of the parking brake lever travel.
- Q: How to overhaul the parking brake shoe on Toyota Camry?A:Start the parking brake shoe overhaul by dismantling the rear wheel while keeping the flexible hose attached and removing the 2 caliper bolts of the rear disc Brake Caliper assembly LH. When removing the rear disc proceed to mark disk and axle hub corresponding points. If the disc is stubborn to remove adjust the shoe until the wheel moves freely without resistance. The parking brake shoe inspection requires measuring the disc inside diameter with a brake drum gauge while the manufacturer standard measures 170 mm (6.69 inch) and the maximum size reaches 171 mm (6.73 inch). You can remove the compression spring by pulling out the front shoe after using needle-nose pliers to get rid of the 2 return tension springs. The worker should follow these steps to remove the parking brake shoe strut LH and brake shoe by releasing the cup claw then disconnecting the Parking Brake Cable from the shoe lever and taking off the tension spring and shoe adjuster screw set from both shoes. After removing the 2 shoe hold-down springs and 4 cups and 2 pins you can detach the C-washer using a screwdriver to pull out the shim and shoe lever from the parking brake shoe. Follow the ruler to measure the lining thickness and ensure it reaches at least 1.0 mm (0.039 inch). New brake shoes should replace any lining that shows this minimum condition or significant wear. Use chalk to check disc and shoe lining contact by applying it to the disc before grinding the lining as needed. The service technician must apply high temperature grease to the shoe attached surface of the backing plate before adding the parking brake shoe, shoe lever and shim onto the rear shoe with a new C-washer. Use a feeler gauge to check the clearance and it should be no more than 0.35 mm (0.0138 inch); replace the shim if this measurement is above the limit. We must grease the adjusting bolt followed by the shoe adjusting screw set with tension spring and then add the 2 pins, 4 cups alongside 2 shoe hold-down springs before looping the parking brake cable through the shoe lever and finally placing the front and rear parking brake shoe. Use needle-nose pliers for installing the parking brake shoe strut LH together with compression spring and return tension springs. Make sure each part is tightly installed while verifying that oil and grease stays off the surfaces that produce friction. Place the rear disc in position followed by a temporary fastening of hub nuts then erase the hole plug to adjust shoes until the disc locks properly before the shoe adjuster reaches a smooth disc rotation point where it should return 8 notches without brake drag. Before completion install the hole plug followed by connecting the rear disc brake caliper assembly LH with 2 bolts torqued to 47 Nm (480 kgf-cm, 35 ft. lbs.) and torque the rear wheel to 103 Nm (1,050 kgf-cm, 76 ft. lbs.) and perform required inspection then adjustment of the parking brake pedal travel for pedal or lever type parking brake.


Related Toyota Camry Parts
 Toyota Camry Speed Sensor
 Toyota Camry Brake Booster
 Toyota Camry Brake Master Cylinder
 Toyota Camry Wheel Stud
 Toyota Camry Brake Pad Set
 Toyota Camry ABS Pump And Motor Assembly
 Toyota Camry Brake Disc
 Toyota Camry Brake Master Cylinder Reservoir
 Toyota Camry Brake Proportioning Valve
 Toyota Camry Spindle Nut
 Toyota Camry Wheel Cylinder Repair Kit
 Toyota Camry Yaw Sensor