×
ToyotaParts- Hello
- Login or Register
- Quick Links
- Live Chat
- Track Order
- Parts Availability
- RMA
- Help Center
- Contact Us
- Shop for
- Toyota Parts
- Scion Parts
My Garage
My Account
Cart
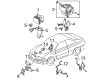
OEM Toyota Camry Yaw Sensor
Yaw Rate Sensor- Select Vehicle by Model
- Select Vehicle by VIN
Select Vehicle by Model
orMake
Model
Year
Select Vehicle by VIN
For the most accurate results, select vehicle by your VIN (Vehicle Identification Number).
7 Yaw Sensors found


Toyota Camry Yaw Rate Sensor Part Number: 89183-48030
$296.01 MSRP: $422.64You Save: $126.63 (30%)Ships in 1-3 Business Days


Toyota Camry Yaw Rate Sensor Part Number: 89183-0T010
$306.97 MSRP: $438.28You Save: $131.31 (30%)Ships in 1-3 Business Days
Toyota Camry Yaw Rate Sensor Part Number: 89180-33060
$538.77 MSRP: $789.58You Save: $250.81 (32%)Ships in 1-3 Business Days
Toyota Camry Sensor, Yawrate Part Number: 89180-33020
$544.68 MSRP: $798.22You Save: $253.54 (32%)Ships in 1-3 Business Days
Toyota Camry Sensor Assembly, Yawrate Part Number: 89180-33030
$1027.05 MSRP: $1505.15You Save: $478.10 (32%)Ships in 1-3 Business Days
Toyota Camry Yaw Rate Sensor Part Number: 89180-33050
$1264.86 MSRP: $1853.67You Save: $588.81 (32%)Ships in 1-3 Business DaysToyota Camry Yaw Rate Sensor Part Number: 89183-06010
$379.24 MSRP: $477.39You Save: $98.15 (21%)Ships in 1-3 Business Days
Toyota Camry Yaw Sensor
Choose genuine Yaw Sensor that pass strict quality control tests. You can trust the top quality and lasting durability. Shopping for OEM Yaw Sensor for your Toyota Camry? Our website is your one-stop destination. We stock an extensive selection of genuine Toyota Camry parts. The price is affordable so you can save more. It only takes minutes to browse and find the exact fit. Easily add to cart and check out fast. Our hassle-free return policy will keep you stress-free. We process orders quickly for swift delivery. Your parts will arrive faster, so you can get back on the road sooner.
Toyota Camry Yaw Sensor Parts and Q&A
- Q: How to install a Yaw Sensor and its associated components on Toyota Camry?A:The installation process involves bolting down the yaw rate together with the acceleration sensor by tightening 2 bolts up to 13 Nm (133 kgf-cm, 10 ft-lbf). Make sure to avoid sensor damage while ensuring proper installation. After that, insert the sensor connector. Next, install the No. 1 console box duct, No. 1 console box insert front, No. 2 console box insert front, console box assembly, console box carpet, console box pocket, upper console panel sub-assembly, upper console rear panel sub-assembly, lower instrument panel sub-assembly, instrument panel No. 2 under cover sub-assembly, lower instrument panel finish panel LH, cowl side trim sub-assembly RH, front door scuff plate RH, cowl side trim sub-assembly LH, front door scuff plate LH, floor shift position indicator housing sub-assembly, No. 2 instrument cluster finish panel garnish, No. 1 instrument cluster finish panel garnish, and shift lever knob sub-assembly. Complete installation by attaching the cable to the negative battery terminal and performing yaw rate sensor zero point calibration and signal inspection followed by initialization steps while understanding that a few systems need initialization when reconnecting to the negative battery terminal.
- Q: How to effectively remove the Yaw Sensor on Toyota Camry?A:The removal of yaw rate and acceleration sensor requires preliminary step of detaching the shift lever knob sub-assembly for automatic or manual transaxle and removing the No. 1 and No. 2 instrument cluster finish panel garnish. Begin by taking out floor shift position indicator housing sub-assembly for automatic transaxle and then move to automatic transaxle upper console panel and upper rear console panel sub-assembly. The automatic transaxle requires removal of the upper rear console panel sub-assembly as well. Vehicle owners with automatic air conditioning must remove the console box pocket before moving on to the console box carpet and console box assembly and then the No. 1 console box duct. End the procedure by disconnecting the yaw rate sensor connector before taking out the two bolts which attach the sensor to its bracket while keeping the sensor intact. The Bosch-made sensors need two nuts removal for removing the yaw rate sensor from its bracket.

Related Toyota Camry Parts
 Toyota Camry Brake Booster
 Toyota Camry Brake Line
 Toyota Camry Brake Master Cylinder
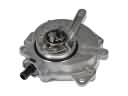 Toyota Camry Vacuum Pump
 Toyota Camry Wheel Stud
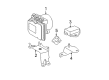
 Toyota Camry ABS Pump And Motor Assembly
 Toyota Camry Backing Plate
 Toyota Camry Brake Fluid Pump
 Toyota Camry Brake Master Cylinder Reservoir
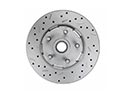 Toyota Camry Brake Rotor
 Toyota Camry Master Cylinder Repair Kit
 Toyota Camry Spindle Nut