×
ToyotaParts- Hello
- Login or Register
- Quick Links
- Live Chat
- Track Order
- Parts Availability
- RMA
- Help Center
- Contact Us
- Shop for
- Toyota Parts
- Scion Parts
My Garage
My Account
Cart
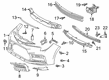
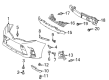
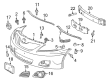
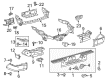
OEM Toyota Bumper
Bumper Fascia- Select Vehicle by Model
- Select Vehicle by VIN
Select Vehicle by Model
orMake
Model
Year
Select Vehicle by VIN
For the most accurate results, select vehicle by your VIN (Vehicle Identification Number).
Filter by Part Type
Filter by Part Type
727 Bumpers found


Toyota Bumper Cover, Front Driver Side Part Number: 52119-0R919
$155.32 MSRP: $219.88You Save: $64.56 (30%)Ships in 1-3 Business DaysProduct Specifications- Other Name: Cover, Front Bumper L/P; Bumper Cover, Front Upper; Cover, Front Bumper
- Position: Front Driver Side
- Replaces: 52119-4A916


Toyota Bumper Cover, Gray, Rear Part Number: 52159-0R160
$162.14 MSRP: $229.53You Save: $67.39 (30%)Product Specifications- Other Name: Cover, Rear Bumper; Bumper Cover, Rear
- Manufacturer Note: NO PAINT REQ.
- Position: Rear
- Replaces: 52159-42220


Toyota Bumper Cover, Front Part Number: 52119-35071
$180.56 MSRP: $257.80You Save: $77.24 (30%)Ships in 1-3 Business DaysProduct Specifications- Other Name: Cover, Front Bumper; Bumper Cover, Front
- Manufacturer Note: NO PAINT REQ.
- Position: Front
- Replaces: 52119-35070


Toyota Bumper Cover, Front Part Number: 52119-04090
$200.37 MSRP: $286.08You Save: $85.71 (30%)Ships in 1-3 Business DaysProduct Specifications- Other Name: Cover, Front Bumper; Bumper Cover, Front
- Position: Front


Toyota Bumper Cover, Front Part Number: 52119-06974
$239.51 MSRP: $341.97You Save: $102.46 (30%)Ships in 1-3 Business DaysProduct Specifications- Other Name: Cover, Front Bumper, Le; Bumper Cover, Front; Cover, Front Bumper
- Manufacturer Note: PAINT REQ.
- Position: Front


Toyota Bumper Cover, Front Driver Side Part Number: 52119-F2922
$150.62 MSRP: $213.23You Save: $62.61 (30%)Ships in 1-2 Business DaysProduct Specifications- Other Name: Cover, Front Bumper. L/; Bumper Cover, Front; Cover, Front Bumper
- Manufacturer Note: PAINT REQ.
- Position: Front Driver Side


Toyota Bumper Cover, Front Driver Side Part Number: 52119-08905
$241.84 MSRP: $345.30You Save: $103.46 (30%)Ships in 1-3 Business DaysProduct Specifications- Other Name: Cover, Front Bumper L/P; Bumper Cover, Front; Cover, Front Bumper
- Position: Front Driver Side


Toyota Bumper Cover, Front Driver Side Part Number: 52119-06958
$250.81 MSRP: $358.10You Save: $107.29 (30%)Ships in 1-3 Business DaysProduct Specifications- Other Name: Cover, Front Bumper L/ P; Bumper Cover, Front; Cover, Front Bumper
- Manufacturer Note: PAINT REQ.
- Position: Front Driver Side


Toyota End Cap, Passenger Side Part Number: 52155-0C903
$146.63 MSRP: $207.57You Save: $60.94 (30%)Ships in 1-3 Business DaysProduct Specifications- Other Name: Insert, Rear Bumper Extension; Bumper Corner Cover, Rear Right Lower; Bar, Rear Bumper, Passenger Side
- Position: Passenger Side


Toyota Bumper Cover, Front Driver Side Part Number: 52119-12994
$154.27 MSRP: $218.38You Save: $64.11 (30%)Ships in 1-3 Business DaysProduct Specifications- Other Name: Cover, Front Bumper L/P; Bumper Cover, Front; Cover, Front Bumper
- Position: Front Driver Side


Toyota Bumper Cover, Front Driver Side Part Number: 52119-0X936
$191.28 MSRP: $273.11You Save: $81.83 (30%)Ships in 1-3 Business DaysProduct Specifications- Other Name: Cover, Front Bumper L/C; Bumper Cover, Front; Cover, Front Bumper
- Position: Front Driver Side
- Replaces: 52119-3T930


Toyota Bumper Cover, Front Driver Side Part Number: 52119-35918
$215.51 MSRP: $307.70You Save: $92.19 (30%)Ships in 1-3 Business DaysProduct Specifications- Other Name: Cover, Front Bumper L/P; Bumper Cover, Front; Cover, Front Bumper
- Manufacturer Note: PAINT REQ.
- Position: Front Driver Side
- Replaces: 52119-35915, 52119-35912

Toyota Bumper Cover, Front Driver Side Part Number: 52119-0X937
$191.28 MSRP: $273.11You Save: $81.83 (30%)Ships in 1-3 Business DaysProduct Specifications- Other Name: Cover, Front Bumper L/C; Bumper Cover, Front; Cover, Front Bumper
- Position: Front Driver Side


Toyota Bumper Cover, Rear Part Number: 52150-0R110
$196.87 MSRP: $281.09You Save: $84.22 (30%)Ships in 1-2 Business DaysProduct Specifications- Other Name: Bumper Assembly, Rear; Bumper Cover, Rear; Cover, Rear Bumper
- Manufacturer Note: NO PAINT REQ.
- Position: Rear
- Replaces: 52159-0R070, 52150-42830

Toyota Bumper Cover, Front Part Number: 52119-04060
$200.37 MSRP: $286.08You Save: $85.71 (30%)Ships in 1-3 Business DaysProduct Specifications- Other Name: Cover, Front Bumper; Bumper Cover, Front
- Manufacturer Note: NO PAINT REQ.
- Position: Front


Toyota Bumper Cover, Front Part Number: 52119-04040
$222.04 MSRP: $317.02You Save: $94.98 (30%)Ships in 1-3 Business DaysProduct Specifications- Other Name: Cover, Front Bumper; Bumper Cover, Front
- Position: Front


Toyota Bumper Cover, Rear Driver Side Part Number: 52159-0X915
$248.83 MSRP: $355.28You Save: $106.45 (30%)Ships in 1-3 Business DaysProduct Specifications- Other Name: Cover, Rear Bumper L/C; Bumper Cover, Rear; Cover, Rear Bumper
- Position: Rear Driver Side
- Replaces: 52159-33962


Toyota Bumper Cover, Rear Part Number: 52159-35190
$284.02 MSRP: $405.51You Save: $121.49 (30%)Ships in 1-3 Business DaysProduct Specifications- Other Name: Cover, Rear Bumper; Bumper Cover, Rear
- Manufacturer Note: NO PAINT REQ.
- Position: Rear


Toyota Bumper Cover, Front Part Number: 52119-02989
$243.59 MSRP: $347.79You Save: $104.20 (30%)Ships in 1-3 Business DaysProduct Specifications- Other Name: Cover, Front Bumper; Bumper Cover, Front
- Position: Front


Toyota Upper Cover, Front Part Number: 52119-35911
$125.60 MSRP: $177.80You Save: $52.20 (30%)Ships in 1-3 Business DaysProduct Specifications- Other Name: Cover, Front Bumper, Up; Valance Panel, Front
- Position: Front
- Replaces: 52119-35020
| Page 1 of 37 |Next >
1-20 of 727 Results
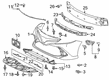
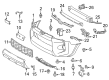
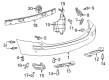
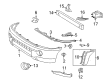
Toyota Bumper
OEM parts deliver unmatched quality you can rely on. They pass extensive quality control inspections. Toyota produces them to the official factory specifications. This process helps prevent defects and imperfections. So you can get exceptional lifespan and a flawless fit. Need new OEM Toyota Bumper? You'll love our wide selection of genuine options. Shop in minutes and skip the hunt. Our prices are unbeatable, you'll save time and money. It's easy to shop and find the right piece. Our committed customer service team gives professional help from start to finish. Every part includes a manufacturer's warranty. We ship quickly, your parts will arrive fast at your door.
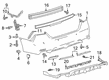
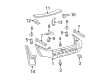
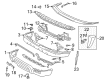
Hits are first absorbed by the Toyota Bumper which leaves the rest of the car safe and drivable. However, Toyota had created its reputation by cutting waste off factory floors, allowing employees to identify problems quickly, and transforming that discipline into vehicles that run longer and consume less fuel than competitors. The Hybrid Synergy Drive continues to be fine-tuned, the TNGA platform reduces the weight and stiffens bodies, and new plug-in systems are making electric range longer, while long-range commutes usually exclude gasoline altogether. Toyota demonstrates this development in the RAV4 and Prius upgrades and evidence that a wide hybrid option can co-exist with surefooted handling and safety in the cabin without consumers being compelled to pay high prices. At the front end, Bumper duty begins as the multi-layered shell will direct the crash energy into foam and honeycomb inserts rather than your steering column. The construction of the Bumpers combines aluminum and carbon steel to reduce the bulk but remain hard such that the impact absorber is able to withstand the scrapes in the parking lot and surprises on highways without sagging or rattling as it gets older. Toyota retails this Bumper with intelligent mounting points that dissipate force over the frame system and cushion lights, sensors, and cooling equipment against damage and keep the repair bills under control when minor knocks occur. Bumper panels are also compliant with the pedestrian impact regulations, applying a flex zone which is bent away from the leg and then rebounds, allowing the same part to hand safety to all persons outside the cabin. Toyota continues to perfect these concepts to ensure that each new model has a front guard which works harder and is lighter.
Related Toyota Parts
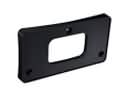 Toyota License Plate
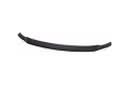 Toyota Spoiler
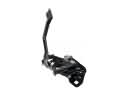 Toyota Hood Latch
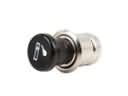 Toyota Cigarette Lighter
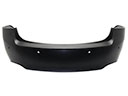 Toyota Bumper Cover
 Toyota Mirror Cover
 Toyota Wiper Arm
 Toyota A/C Switch
 Toyota Air Deflector
 Toyota Seat Switch
 Toyota Side Marker Light
 Toyota Wheelhouse
Browse Toyota Bumper by Models
Tacoma 4Runner Camry Tundra Corolla RAV4 Highlander Prius Sienna Land Cruiser Pickup FJ Cruiser 86 Sequoia Avalon Celica Supra Yaris Matrix MR2 Solara Venza GR86 Echo C-HR Cressida Grand Highlander Paseo Previa Prius C Prius Prime bZ4X Corolla Cross Corolla iM Crown Crown Signia GR Corolla Mirai MR2 Spyder Prius V Starlet Tercel Van Yaris iA Prius Plug-In GR Supra Prius AWD-e RAV4 Prime