×
ToyotaParts- Hello
- Login or Register
- Quick Links
- Live Chat
- Track Order
- Parts Availability
- RMA
- Help Center
- Contact Us
- Shop for
- Toyota Parts
- Scion Parts
My Garage
My Account
Cart
OEM Toyota MR2 Bumper
Bumper Fascia- Select Vehicle by Model
- Select Vehicle by VIN
Select Vehicle by Model
orMake
Model
Year
Select Vehicle by VIN
For the most accurate results, select vehicle by your VIN (Vehicle Identification Number).
Part Type
Select Part Type
8 Bumpers found


Toyota MR2 Reinforcement Beam Part Number: 52021-17030

Toyota MR2 Bumper Cover, Rear Driver Side Part Number: 52159-17903

Toyota MR2 Cover, Front Driver Side Part Number: 52119-17900

Toyota MR2 Reinforcement, Front Part Number: 52021-17021
Toyota MR2 Reinforcement Part Number: 52021-17020

Toyota MR2 Bumper Cover, Rear Driver Side Part Number: 52159-17900
Toyota MR2 Bumper Cover, Front Driver Side Part Number: 52119-17901
Toyota MR2 Cover, Front Driver Side Part Number: 52119-17904
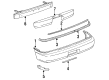
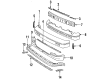
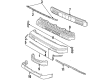
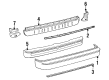
Toyota MR2 Bumper
Choose genuine Bumper that pass strict quality control tests. You can trust the top quality and lasting durability. Shopping for OEM Bumper for your Toyota MR2? Our website is your one-stop destination. We stock an extensive selection of genuine Toyota MR2 parts. The price is affordable so you can save more. It only takes minutes to browse and find the exact fit. Easily add to cart and check out fast. Our hassle-free return policy will keep you stress-free. We process orders quickly for swift delivery. Your parts will arrive faster, so you can get back on the road sooner.
Part of a sports car legend is only worth knowing Toyota MR2 Bumper. The Toyota MR2 fascinated with the combination of mid engine design, light weight and razor handling. The inline four was installed at the rear of the seats by Toyota engineers, which gave the MR2 equal distribution of weights, quick response in steering, and satisfying grip on corners. Decades later Toyota revised power, suspension fine-tuning and interior comfort, but the MR2 retained its small size to allow teenage drivers to have track days without having to deal with a huge chassis. Authentic factory components, enthusiastically made by Toyota to high quality standards, keep each MR2 reliable when spirited and keep their values with stalkers. The Bumper of this model is a robust shield that takes in parking lot taps and low-speed collisions, protects delicate body parts, headlights and cooling equipment. The new Bumper is made using a plastic fascia that has hidden reinforcement instead of heavy beams of the older design and yet remains as protective. Moulded lines continue the same sporty shape to ensure that the Bumper of the car curves into the side skirts and spoilers, and the mounts are built-in, to provide the customer with the option of adding fog lamps or sensors anytime he wishes. The Bumper should be able to withstand corrosion and should make a fit flush so as to maintain an aerodynamic efficiency using real materials. To fit, take off the battery, un-clip/unbolt, take off brackets and sensors, place it in the seat then hand start the fasteners then evenly screwed, lastly powered-on.
Related Toyota MR2 Parts
 Toyota MR2 Emblem
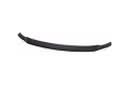 Toyota MR2 Spoiler
 Toyota MR2 Air Deflector
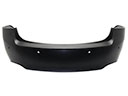 Toyota MR2 Bumper Cover
 Toyota MR2 Dash Panel Vent Portion Covers
 Toyota MR2 Exterior Door Handle
 Toyota MR2 Hood Hinge
 Toyota MR2 License Plate
 Toyota MR2 Sun Visor
 Toyota MR2 Wiper Blade
 Toyota MR2 Wiper Linkage
 Toyota MR2 Wiper Motor
Browse Toyota MR2 Bumper by Years
1995
1994
1993
1992
1991
1989
1988
1987
1986
1985