×
ToyotaParts- Hello
- Login or Register
- Quick Links
- Live Chat
- Track Order
- Parts Availability
- RMA
- Help Center
- Contact Us
- Shop for
- Toyota Parts
- Scion Parts
My Garage
My Account
Cart
OEM Scion Windshield
Glass Windshield- Select Vehicle by Model
- Select Vehicle by VIN
Select Vehicle by Model
orMake
Model
Year
Select Vehicle by VIN
For the most accurate results, select vehicle by your VIN (Vehicle Identification Number).
10 Windshields found


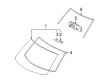
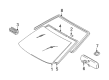
Scion Windshield, Front Part Number: 56101-WB006
$336.75 MSRP: $480.82You Save: $144.07 (30%)Ships in 1-3 Business DaysProduct Specifications- Other Name: Glass Sub-Assembly, Windshield; Windshield Glass, Front; Windshield, Front; Glass, Windshield
- Position: Front
- Replaces: 56101-WB002

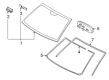
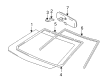
Scion Windshield, Front Part Number: 56101-52191
$482.93 MSRP: $707.75You Save: $224.82 (32%)Ships in 1-3 Business DaysProduct Specifications- Other Name: Glass Sub-Assembly, Windshield; Windshield, Front; Glass, Windshield
- Manufacturer Note: *LAM,T=4.56,GREEN
- Position: Front
- Replaces: 56101-52190

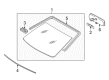
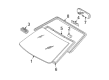
Scion Windshield, Front Part Number: SU003-G0006
$364.21 MSRP: $533.75You Save: $169.54 (32%)Ships in 1-3 Business DaysProduct Specifications- Other Name: Windshield Glass Assembly; Windshield Glass, Front; Windshield, Front; Glass, Windshield
- Position: Front

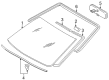
Scion Windshield, Front Part Number: 56101-12490
$377.49 MSRP: $553.21You Save: $175.72 (32%)Ships in 1-3 Business DaysProduct Specifications- Other Name: Glass Sub-Assembly, Windshield; Windshield, Front; Glass, Windshield
- Manufacturer Note: *LAM,T=4.76,GREEN
- Position: Front

Scion Windshield, Front Part Number: 56101-52370
$379.99 MSRP: $556.87You Save: $176.88 (32%)Ships in 1-3 Business DaysProduct Specifications- Other Name: Glass Sub-Assembly, Windshield; Windshield, Front; Glass, Windshield
- Manufacturer Note: *LAM,T=4.56,GREEN
- Position: Front

Scion Windshield, Front Part Number: 56101-74100
$403.82 MSRP: $591.81You Save: $187.99 (32%)Ships in 1-3 Business DaysProduct Specifications- Other Name: Glass Sub-Assembly, Windshield; Windshield, Front; Glass, Windshield
- Manufacturer Note: *LAM,T=4.56,GREEN
- Position: Front

Scion Windshield, Front Part Number: 56101-21040
$419.48 MSRP: $614.75You Save: $195.27 (32%)Ships in 1-3 Business DaysProduct Specifications- Other Name: Glass Sub-Assembly, Windshield; Windshield, Front; Glass, Windshield
- Position: Front

Scion Windshield, Front Part Number: 56111-52150-8N
$428.56 MSRP: $628.07You Save: $199.51 (32%)Ships in 1-3 Business DaysProduct Specifications- Other Name: Glass Sub-Assembly, Windshield; Windshield, Front
- Position: Front
- Replaces: 56111-52150

Scion Windshield, Front Part Number: 56101-12021
$495.30 MSRP: $725.87You Save: $230.57 (32%)Ships in 1-3 Business DaysProduct Specifications- Other Name: Glass Sub-Assembly, Windshield; Windshield Glass, Front; Windshield, Front; Glass, Windshield
- Manufacturer Note: *LAM,T=4.7,GREEN
- Position: Front
- Replaces: 56101-12020

Scion Windshield, Front Part Number: 56111-21190
$553.64 MSRP: $811.37You Save: $257.73 (32%)Product Specifications- Other Name: Glass, Windshield; Windshield, Front
- Manufacturer Note: *LAM,T=4.56,GREEN
- Position: Front
- Replaces: 56111-21150, 56111-21151
Scion Windshield
OEM parts deliver unmatched quality you can rely on. They pass extensive quality control inspections. Scion produces them to the official factory specifications. This process helps prevent defects and imperfections. So you can get exceptional lifespan and a flawless fit. Need new OEM Scion Windshield? You'll love our wide selection of genuine options. Shop in minutes and skip the hunt. Our prices are unbeatable, you'll save time and money. It's easy to shop and find the right piece. Our committed customer service team gives professional help from start to finish. Every part includes a manufacturer's warranty. We ship quickly, your parts will arrive fast at your door.
Windshield protects the occupants of the vehicle against debris and weather and provides a clear view in all drives. Scion established its identity in 2003 with small cars that were sold at no haggle and in a range of outrageous paints that allowed young customers to impress a personality on every car. Crowds flocked to the model through limited run series editions and digital playgrounds such as the virtual Scion City. Scion was the petri dish laboratory of Toyota, where new retail gimmicks and trims were tested, which became the parent lineup down the line, hence it was akin to acquiring tomorrow's gadget today. The badge has continued to resonate in present-day small cars, with Scion attracting over a million first-time buyers into the family before it was retired in 2016, although its spirit of rebellion will persist. Scion remains in memory as evidence that a car can be cheap, personalized, and entertaining without submerging the drivers in corporate lingo. The Windshield is a laminated product that consists of two layers of curved glass, bonded with a soft sheet of plastic to prevent the passage of flying gravel, shush wind roar, and remain intact even when broken without being distorted to offer the user clear viewing at highway speed. A clear Windshield enables motorists to read road signs earlier and see dangers quicker, increasing real-world safety with every minute the wheels turn. This Windshield streamlines airflow across the roofline and reduces drag, and every gallon is squeezed without any gadgets or extra weight. In cases where chips are deployed, replacement of a new Windshield is nothing to look at in comparison to blurred vision or a ticket-worthy crack.
Scion Windshield Parts and Q&A
- Q: How to remove and install a windshield on Scion tC?A:A successful windshield removal begins with disconnecting the negative cable from the battery and waiting for at least 90 seconds until proceeding with windshield removal. The replacement process begins by taking out the inner rear view mirror assembly followed by cutting the front door scuff plates (LH and RH), cowl side trim sub-assemblies (LH and RH), front door opening trim Weather Strips (LH and RH), front pillar garnishes (LH and RH), assist grip cover and sub-assembly, both visor assemblies and holders, map light assembly, and a slight lowering of the roof headlining assembly which remains uncompletely detached. The next step includes the removal of front wiper arm head caps followed by front wiper arms and hood to cowl top seals and cowl top ventilator louvers that exist on both left-hand and right-hand sides. Start by removing the outside windshield molding with caution so as not to harm the body of the vehicle before using protective tape for the outer glass surface and inserting a piano wire between the glass and body while securing handles to the wire ends to cut through the adhesive while protecting paint and ornaments. Use a scraper to remove all damaged stoppers and dams together with adhesive from the windshield glass while using white gasoline to clean the outer edges. Remove excessive adhesive from the vehicle body contact areas using tools that also apply cleaning solutions. Users should apply Primer G to the installation portion of No. 2 windshield glass stopper before installing two new stoppers on the glass. Place the No.1 windshield glass stopper onto the vehicle body and follow this step by adding Primer G to the glass contact areas and removing adhesive part peeling paper from the department. To properly install the windshield glass apply suction cups that produce even contact and mark both edges when replacing damaged glass. After applying Primer M to the exposed vehicle body area and Primer G to the glass contact region mirror the glass surface with adhesive (Part No. 08850-00801 or equivalent) while managing to finish using all adhesive contents before its designated expiration. Press the glass into proper position against the vehicle body while aligning matchmarks before secure it with tape until the adhesive dries fully. Place the windshield moulding outside by putting Primer G onto the contact area then line up moulding marks with glass notches before the adhesive hardens. The installation process requires front wiper arms, cowl top ventilator louvers (each side), hood to cowl top seal, roof headlining assembly, map light assembly, both visor holders and assemblies, assist grip sub-assembly with cover, front pillar garnishes (both sides) and Weather Strips (each side), and front door scuff plates (each side) along with the inner rear view mirror assembly. Check for leaks before fixing them with auto glass sealer while reconnecting the negative battery terminal cable then begin system initialization procedures that need battery connection for certain systems.
- Q: How to remove the windshield on Scion xB?A:Before removing the windshield it is necessary to disconnect the negative battery cable along with a minimum 90-second wait time to stop the Air Bag from activating. Begin by taking out the windshield wiper cover and then move on to uninstall the front wiper arms equipped with blades from both left and right sides. The next step requires removing the hood to cowl top seal and cowl top ventilator louver from both sides and both front door scuff plates. The service process requires technicians to take away the cowl side trim boards followed by the front door opening trim Weather Strips and assist grip before handling the visor assemblies and visor holder and personal light assembly together with room light assembly and front pillar garnishes on both sides. The headlining can stay in place while the front part receives a minor lowering adjustment. Cut the windshield outside moulding while taking care not to damage the car body before removing the inner rear view mirror assembly and exterior windshield moulding. Take care to retain the windshield glass safety by using suction cups while disconnecting its stoppers. Installation area tape goes on the windshield glass before a piano wire passes from interior through the body to wooden blocks at both points. The procedure includes pulling the piano wire while it circles the windshield glass but maintaining a safe distance from painted surfaces and decorations. A plastic sheet should then be inserted between the wire and safety pad to minimize scratching during application. Match two points between windshield glass and car body prior to removal if you plan to reuse the glass before safely extracting the windshield glass with suction cups while keeping maximum adhesive residue on the vehicle body. Scrape away the window glass adhesive dam from the windshield glass using caution while placing a fresh piece over it. Complete the process by taking out all current No. 2 and 1 windshield glass stoppers from the 2-piece variety and install fresh replacements.