×
ToyotaParts- Hello
- Login or Register
- Quick Links
- Live Chat
- Track Order
- Parts Availability
- RMA
- Help Center
- Contact Us
- Shop for
- Toyota Parts
- Scion Parts
My Garage
My Account
Cart
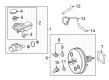
OEM Scion Brake Booster
Brake Power Booster- Select Vehicle by Model
- Select Vehicle by VIN
Select Vehicle by Model
orMake
Model
Year
Select Vehicle by VIN
For the most accurate results, select vehicle by your VIN (Vehicle Identification Number).
11 Brake Boosters found

Scion Brake Booster Part Number: 44610-52620
$551.27 MSRP: $807.90You Save: $256.63 (32%)Ships in 1-3 Business DaysProduct Specifications- Other Name: Booster Assembly, Brake; Power Brake Booster; Booster Assembly


Scion Brake Booster Part Number: 44610-74030
$554.80 MSRP: $813.07You Save: $258.27 (32%)Ships in 1-3 Business DaysProduct Specifications- Other Name: Booster Assembly, Brake; Power Brake Booster; Booster Assembly

Scion Brake Booster Part Number: 44610-12D81
$593.48 MSRP: $869.75You Save: $276.27 (32%)Ships in 1-3 Business DaysProduct Specifications- Other Name: Booster Assembly, Brake; Power Brake Booster; Booster Assembly
- Replaces: 44610-12D80

Scion Brake Booster Part Number: 44610-21180
$624.92 MSRP: $915.82You Save: $290.90 (32%)Ships in 1-3 Business DaysProduct Specifications- Other Name: Booster Assembly, Brake; Power Brake Booster; Booster Assembly
- Replaces: 44610-21170

Scion Brake Booster Part Number: 44610-52331
$629.71 MSRP: $922.85You Save: $293.14 (32%)Ships in 1-3 Business DaysProduct Specifications- Other Name: Booster Assembly, Brake; Power Brake Booster; Booster Assembly
- Replaces: 44610-52330
Scion Brake Booster Part Number: 44610-52630
$640.56 MSRP: $938.74You Save: $298.18 (32%)Ships in 1-3 Business DaysProduct Specifications- Other Name: Booster Assembly, Brake; Power Brake Booster; Booster Assembly
- Manufacturer Note: VEHICLE STABILITY CONT-WITH PUMP UP BA

Scion Brake Booster Part Number: 44610-21160
$735.92 MSRP: $1078.50You Save: $342.58 (32%)Ships in 1-3 Business DaysProduct Specifications- Other Name: Booster Assembly, Brake; Power Brake Booster; Booster Assembly

Scion Brake Booster Part Number: 44610-09C80
$823.32 MSRP: $1206.58You Save: $383.26 (32%)Ships in 1-3 Business DaysProduct Specifications- Other Name: Booster Set, Brake; Power Brake Booster; Booster Assembly; Booster Assembly, Brake

Scion Brake Booster Part Number: 44610-WB002
$112.99 MSRP: $158.60You Save: $45.61 (29%)Ships in 1-3 Business DaysProduct Specifications- Other Name: Booster Assembly, Brake; Power Brake Booster; Booster
Scion Brake Booster Part Number: 44610-52D40
$610.62 MSRP: $894.87You Save: $284.25 (32%)Product Specifications- Other Name: Booster Assembly, Brake; Power Brake Booster; Booster Assembly
Scion Brake Booster Part Number: 44610-52341
Product Specifications- Other Name: Booster Assembly, Brake; Power Brake Booster; Booster Assembly
- Replaces: 44610-52340
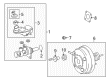
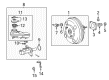
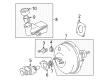
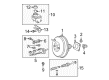
Scion Brake Booster
OEM parts deliver unmatched quality you can rely on. They pass extensive quality control inspections. Scion produces them to the official factory specifications. This process helps prevent defects and imperfections. So you can get exceptional lifespan and a flawless fit. Need new OEM Scion Brake Booster? You'll love our wide selection of genuine options. Shop in minutes and skip the hunt. Our prices are unbeatable, you'll save time and money. It's easy to shop and find the right piece. Our committed customer service team gives professional help from start to finish. Every part includes a manufacturer's warranty. We ship quickly, your parts will arrive fast at your door.
Scion Brake Booster is a multiplier that increases pedal force, which gives drivers good stopping power with little effort. In 2003, Scion inspired young buyers by abandoning haggling, providing loud paint, and introducing digital hangouts such as a virtual city so that shopping would become more of a game than paperwork. Limited release series models also kept the list current and allowed the first to own cars on wheels to boast, selling the company over 1,000,000 and bringing a range of first-time drivers into the Toyota family. Scion was always an experiment lab, making attempts at daring body styles and cabin technology without hesitation, and it turned out that experimentation could be sold at a showroom price. Although Scion was frozen out in 2016, creative paint codes, simple pricing, and fan customization all directly trace back to Scion and continue to be reflected in the current compact car playbook. Brake Booster is placed between the pedal and master cylinder, and it acts on a diaphragm by expanding the engine vacuum to enhance the pressure that the leg is applying. In hard stops, the sealed chamber makes a pushrod move forward within milliseconds, maintaining the hydraulic fluid firm, reducing stopping distances, and eliminating degradability in long downhill runs, qualities that give the Brake Booster daily respect. A healthy Brake Booster translates to less effort on the pedal, and commuters have not lost their energy but still receive crisp deceleration on the road. As the vacuum decreases, an internal check valve allows an internal reservoir of force to be held by the Brake Booster to allow final reliable system pressure, enabling the driving team to avoid danger.
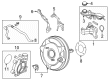
Scion Brake Booster Parts and Q&A
- Q: How to remove the Vacuum Brake Booster on Scion tC?A:The first step for Vacuum Brake Booster removal requires draining brake fluid followed by immediate washing of contaminated paint surfaces with fluid. First detach the front wiper arm head cap from its position after which remove the windshield wiper arm assemblies and blades from both left and right sides of the vehicle. You must remove the hood before taking away the left side cowl top seal and cowl top ventilator louver. Remove the windshield wiper motor and link together with the outer cowl top panel sub-assembly followed by the No. 1 cowl water extract hose. The technician should then remove the left lower cowl body mounting bracket and air cleaner cap sub-assembly and brake master cylinder sub-assembly. After separating the brake push rod clevis from the brake master cylinder disconnect the front left wheel followed by removing Special Service Tool 09023-00101 from the No. 5 front brake tube. Take off the brake tube clamps and unlock the three tubes for subsequent removal of the clamps themselves. The brake booster assembly removal process begins by loosening the clevis lock nut followed by clevis detachment from the brake booster then using a clip to disconnect the vacuum hose and completing the removal by unscrewing four nuts from the brake booster. First remove the check valve as well as the grommet from the brake booster while extracting the brake booster gasket.
- Q: How to remove the Vacuum Brake Booster on Scion xB?A:The first step for vacuum brake booster removal requires the draining of brake fluid before washing all fluid which contacts painted areas. The first step requires the removal of windshield wiper arm covers and subsequent disassembly of front wiper arms and blades from both the left and right sides. The installer should now proceed to remove first the hood to cowl top seal and then both right and left cowl top ventilator louvers. The work procedure includes elimination of the front wiper motor together with link and also the outer cowl top panel and the air cleaner assembly. The service procedure starts by disconnecting the clutch reservoir tube used for manual transaxle systems followed by removing the brake master cylinder sub-assembly together with the brake actuator assembly. The procedure requires removal of the instrument panel finish lower panel sub-assembly followed by separation of the brake master cylinder push rod clevis. Remove the brake booster assembly after detaching the vacuum hose from the check valve using the clip then unfastening four nuts to safely retrieve the assembly without harming brake tubes. Detach the brake booster assembly gasket before slowly loosing the push rod lock nut to remove the push rod clevis. The brake vacuum check valve assembly must be removed after separating it from the brake booster assembly and removing the grommet from the brake booster assembly.