×
ToyotaParts- Hello
- Login or Register
- Quick Links
- Live Chat
- Track Order
- Parts Availability
- RMA
- Help Center
- Contact Us
- Shop for
- Toyota Parts
- Scion Parts
My Garage
My Account
Cart
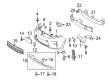
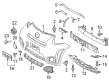
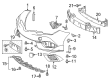
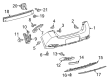
OEM Scion Bumper
Bumper Fascia- Select Vehicle by Model
- Select Vehicle by VIN
Select Vehicle by Model
orMake
Model
Year
Select Vehicle by VIN
For the most accurate results, select vehicle by your VIN (Vehicle Identification Number).
Part Type
Select Part Type
34 Bumpers found


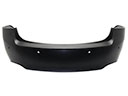
Scion Bumper Cover, Rear Part Number: SU003-01494
$242.88 MSRP: $322.50You Save: $79.62 (25%)Product Specifications- Other Name: Cover, Rear Bumper
- Manufacturer Note: PAINT REQ
- Position: Rear


Scion Bumper Cover, Front Driver Side Part Number: 52119-12959
$182.31 MSRP: $260.30You Save: $77.99 (30%)Ships in 1-3 Business DaysProduct Specifications- Other Name: Cover, Front Bumper L/P; Bumper Cover, Front; Cover, Front Bumper
- Manufacturer Note: PAINT REQ.
- Position: Front Driver Side


Scion Bumper Cover, Front Driver Side Part Number: 52119-74901
$148.39 MSRP: $210.07You Save: $61.68 (30%)Product Specifications- Other Name: Cover, Front Bumper, L/; Bumper Cover, Front; Cover, Front Bumper
- Manufacturer Note: PAINT REQ.
- Position: Front Driver Side


Scion Bumper Cover, Front Driver Side Part Number: 52119-12990
$194.89 MSRP: $278.26You Save: $83.37 (30%)Ships in 1-3 Business DaysProduct Specifications- Other Name: Cover, Front Bumper L/C; Bumper Cover, Front; Cover, Front Bumper
- Manufacturer Note: PAINT REQ.
- Position: Front Driver Side
- Replaces: 52119-12982


Scion Bumper Cover, Rear Driver Side Part Number: 52159-12950
$202.47 MSRP: $289.07You Save: $86.60 (30%)Ships in 1-3 Business DaysProduct Specifications- Other Name: Cover, Rear Bumper L/C; Bumper Cover, Rear; Cover, Rear Bumper
- Manufacturer Note: PAINT REQ.
- Position: Rear Driver Side


Scion Bumper Cover, Rear Driver Side Part Number: 52159-74901
$142.28 MSRP: $201.42You Save: $59.14 (30%)Ships in 1-3 Business DaysProduct Specifications- Other Name: Cover, Rear Bumper, L/; Bumper Cover, Rear; Cover, Rear Bumper
- Manufacturer Note: PAINT REQ.
- Position: Rear Driver Side


Scion Bumper Cover, Rear Driver Side Part Number: 52159-52913
$163.78 MSRP: $231.86You Save: $68.08 (30%)Ships in 1-3 Business DaysProduct Specifications- Other Name: Cover, Rear Bumper L/Co; Bumper Cover, Rear; Cover, Rear Bumper
- Manufacturer Note: PAINT REQ.
- Position: Rear Driver Side


Scion Bumper Cover, Rear Driver Side Part Number: 52159-12946
$187.55 MSRP: $267.78You Save: $80.23 (30%)Ships in 1-3 Business DaysProduct Specifications- Other Name: Cover, Rear Bumper L/C; Bumper Cover, Rear; Cover, Rear Bumper
- Manufacturer Note: PAINT REQ.
- Position: Rear Driver Side


Scion Bumper Cover, Front Driver Side Part Number: 52119-52915
$194.54 MSRP: $277.76You Save: $83.22 (30%)Ships in 1-3 Business DaysProduct Specifications- Other Name: Cover, Front Bumper L/Co; Bumper Cover, Front; Cover, Front Bumper
- Manufacturer Note: PAINT REQ.
- Position: Front Driver Side


Scion Bumper Cover, Rear Driver Side Part Number: 52159-52927
$194.31 MSRP: $277.43You Save: $83.12 (30%)Ships in 1-3 Business DaysProduct Specifications- Other Name: Cover, Rear Bumper, L/; Bumper Cover, Rear; Cover, Rear Bumper
- Manufacturer Note: PAINT REQ.
- Position: Rear Driver Side


Scion Bumper Cover, Rear Driver Side Part Number: 52159-21914
$217.26 MSRP: $310.20You Save: $92.94 (30%)Ships in 1-3 Business DaysProduct Specifications- Other Name: Cover, Rear Bumper L/P; Bumper Cover, Rear; Cover, Rear Bumper
- Manufacturer Note: PAINT REQ.
- Position: Rear Driver Side


Scion Bumper Cover, Front Driver Side Part Number: 52119-21915
$237.30 MSRP: $338.81You Save: $101.51 (30%)Ships in 1-3 Business DaysProduct Specifications- Other Name: Cover, Front Bumper, L/C; Bumper Cover, Front; Cover, Front Bumper
- Manufacturer Note: PAINT REQ.
- Position: Front Driver Side


Scion Bumper Cover, Front Part Number: 52119-WB005
$237.08 MSRP: $338.49You Save: $101.41 (30%)Ships in 1-2 Business DaysProduct Specifications- Other Name: Cover, Front Bumper; Bumper Cover, Front
- Manufacturer Note: WITH(R-DOT LABEL)
- Position: Front
- Replaces: 52119-WB003, 52119-WB004, 52119-WB002


Scion Bumper Cover, Front Part Number: 52119-21906
$256.29 MSRP: $365.93You Save: $109.64 (30%)Ships in 1-3 Business DaysProduct Specifications- Other Name: Cover, Front Bumper; Bumper Cover, Front
- Manufacturer Note: PAINT REQ.
- Position: Front


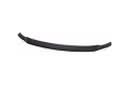
Scion Impact Bar, Front Part Number: 52021-12311
$160.38 MSRP: $227.03You Save: $66.65 (30%)Ships in 1-3 Business DaysProduct Specifications- Other Name: Reinforcement Sub-Assembly; Bumper Impact Bar, Front; Reinforcement Sub-Assembly, Front Bumper
- Position: Front
- Replaces: 52021-12310

Scion Impact Bar, Front Part Number: 52021-74021
$123.95 MSRP: $175.47You Save: $51.52 (30%)Ships in 1-3 Business DaysProduct Specifications- Other Name: Reinforcement Sub-Assembly; Bumper Impact Bar, Front; Reinforcement Sub-Assembly, Front Bumper
- Position: Front
- Replaces: 52021-74020


Scion Impact Bar, Front Part Number: 52021-21070
$168.13 MSRP: $238.01You Save: $69.88 (30%)Ships in 1-3 Business DaysProduct Specifications- Other Name: Reinforcement Sub-Assembly; Bumper Impact Bar, Front; Reinforcement Sub-Assembly, Front Bumper
- Position: Front
- Replaces: 52021-21060

Scion Impact Bar, Front Part Number: 52021-12360
$173.54 MSRP: $245.66You Save: $72.12 (30%)Ships in 1-3 Business DaysProduct Specifications- Other Name: Reinforcement Sub-Assembly; Bumper Impact Bar, Front; Reinforcement Sub-Assembly, Front Bumper
- Position: Front

Scion Impact Bar, Front Part Number: 52021-21040
$176.72 MSRP: $252.31You Save: $75.59 (30%)Ships in 1-3 Business DaysProduct Specifications- Other Name: Reinforcement Sub-Assembly; Bumper Impact Bar, Front; Reinforcement Sub-Assembly, Front Bumper
- Position: Front
- Replaces: 52021-21030

Scion Reinforcement Beam Part Number: 52021-52020
$176.95 MSRP: $252.65You Save: $75.70 (30%)Ships in 1-2 Business DaysProduct Specifications- Other Name: Reinforcement Sub-Assembly; Bumper Cover Reinforcement Beam, Front; Reinforcement, Front Bumper
| Page 1 of 2 |Next >
1-20 of 34 Results
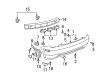
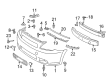
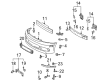
Scion Bumper
OEM parts deliver unmatched quality you can rely on. They pass extensive quality control inspections. Scion produces them to the official factory specifications. This process helps prevent defects and imperfections. So you can get exceptional lifespan and a flawless fit. Need new OEM Scion Bumper? You'll love our wide selection of genuine options. Shop in minutes and skip the hunt. Our prices are unbeatable, you'll save time and money. It's easy to shop and find the right piece. Our committed customer service team gives professional help from start to finish. Every part includes a manufacturer's warranty. We ship quickly, your parts will arrive fast at your door.
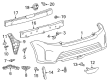
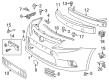
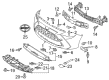
The Scion Bumper is shielding the sporty compact against scrapes in the parking spots as well as providing style that relates to the youthful spirit of the brand. In 2003, Scion came into the scene with the promise of simple pricing, non-shy color options, and exclusive Release Series models at any purchase to make it feel exclusive. Customers were fond of the fact that Scion was offering the car as a blank canvas so that they could customize the car using factory supported parts and online experiences such as a virtual city. This bold approach gained the company more than one million first time customers of Toyota as it demonstrated that Scion was capable of being both affordable and personality, and serve as a live research lab to test new concepts many of which were later carried over to the rest of the Toyota brand when it ended in 2016. The Scion Bumper is in itself a molded exterior guard absorbing light hits, securing sheet metal and ensuring that crucial elements like grilles, sensors, and lamps are in their correct location. There are clear steps in installing a new unit at home. Make sure that you are on flat ground, disconnect the battery, and then hold the front fascia up with a padded stand to prevent falling. Take off screws, bolts and plastic clips in areas of the wheel wells and undertray, remove any sensor wiring, and take off the old Bumper. Take the transfer metal brackets, foam absorbers, and wiring and attach them to the new part, match them by the mounting points, install each fastener manually, lock the clips and tighten everything to the same degree. Attach the battery again, close the gaps, test lights and sensors and now enjoy the improved look of the Bumper.