My Garage
Cart
Make sure this part fits

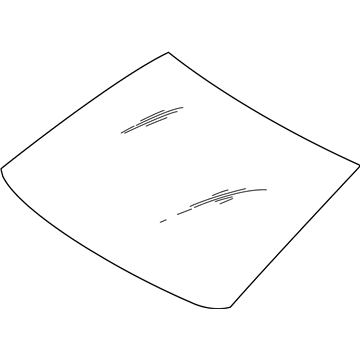
Toyota 56101-52191
Windshield, Front

2004-2006 Scion xA 5610152191

Customer Questions & Expert Answers (4)
Toyota 56101-52191 Windshield, Front
  • Part Description
    Glass Sub-Assembly, Windshield; Windshield, Front
  • Part Name Code
    56111
  • Position
    Front
  • Replaces
    56101-52190
  • Manufacturer
    Toyota
Make sure this part fits
$482.93 MSRP: $707.75
You Save: $224.82 (32%)
Ships in 1-3 Business Days
1
ADD TO CART
  • Related Parts
  • Product Specifications
  • Vehicle Fitment
  • Customer Questions & Expert Answers
  • Product Specifications

    BrandGenuine Toyota
    Part Name Code56111
    Manufacturer Part Number56101-52191
    Part DescriptionGlass Sub-Assembly, Windshield; Windshield, Front
    Other NamesGlass, Windshield
    Manufacturer Note*LAM,T=4.56,GREEN
    PositionFront
    ConditionNew
    Fitment TypeDirect Replacement
    Replaces56101-52190
    ManufacturerToyota
    SKU56101-52191
    WarrantyThis genuine Toyota part is guaranteed by Toyota's factory warranty.
    Shipping & ReturnShipping Policy Return Policy
    Warning: California's Proposition 65
  • Vehicle Fitment

    Year Make Model Trim Engine
    2004-2006 Scion xABase4 Cyl 1.5 L GAS
  • Customer Questions & Expert Answers

    Q:
    Will this 56101-52191 work for my car? Posted by ToyotaPartsNow Specialist
    A:
    Find out if part number 56101-52191 is the right fit for your car by Selecting Your Vehicle model.
    Posted by ToyotaPartsNow Specialist
    Q:
    How to remove and install a windshield on Scion xA? Posted by Customer
    A:
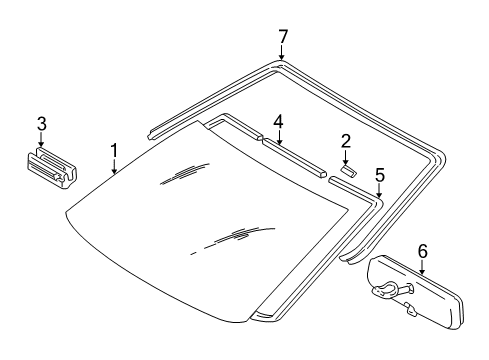
    You should disconnect the negative battery cable followed by waiting for at least ninety seconds to keep the Air Bags along with seat belt pretensioners from activating. First detach the front door opening trim Weather Strip LH and RH along with front pillar garnish LH and RH, visor assembly LH and RH, assist grip sub-assembly, visor holder LH and RH, map light assembly, and roof headlining assembly by slightly lowering their installation areas rather than complete removal. Warming the installations surfaces for seals with a heat light will allow you to remove the inner rear view mirror assembly along with the front wiper arm head cap and front wiper arms LH and RH together with the cowl top ventilator louver LH and RH and hood to cowl top seal and front fender to cowl side seals LH and RH. Carefully cut the windshield molding from the outside with a knife while protecting the vehicle body before removing the glass through piano wire installation followed by exterior surface tape placement and matchmarking if using the glass again and adhesive cutting and stoppers disengaging before using suction cups. Start by cleaning the instrument panel and installing a new No. 1 instrument panel cushion before cleaning the windshield glass together with the vehicle body while leaving maximum adhesive on the vehicle body. The installation process starts with new windshield glass stoppers of type No. 2 and No. 1 followed by application of Primer G to installation components and placement of the windshield glass adhesive dam. The installation process calls for windscreen glass to receive Primer G application before receiving a new windshield moulding. Use suction cups to position the glass correctly with matchmarks aligned before applying Primer M to the visible part of the body and applying Part No. 08850-00801 adhesive or its equivalent to the glass for installation to the body ensuring proper fitting and cleaning away excess adhesive. Finally, reinstall the front fender to cowl side seals LH and RH, cowl top ventilator louvers LH and RH, hood to cowl top seal, front wiper arms LH and RH, front wiper arm head cap, roof headlining assembly, visor holders LH and RH, visor assemblies LH and RH, front pillar garnishes LH and RH, map light assembly, assist grip sub-assembly, front door opening trim Weather Strips LH and RH, and inner rear view mirror assembly, check for leaks and repair as necessary, reconnect the cable to the negative battery terminal, and perform initialization for certain systems.
    Posted by ToyotaPartsNow Specialist
    Q:
    How to replace the windshield glass on Scion xA? Posted by Customer
    A:
    The procedure for windshield glass replacement starts with the removal of the roof headlining assembly through a series of steps consisting of taking off front door opening trim from both sides (LH and RH), front pillar garnish (LH and RH), visors, assist grip, visor holders (RH and LH), map lamp lens cover, and the map lamp followed by a partial removal of headlining for windshield accessibility. The cowl top ventilator louver and inner rear view mirror assembly can be reached after you remove the wiper arm covers (RH and LH). Follow this step with the removal of the front wiper arms (LH and RH) before you take off the louver. Heat the installation areas of front fender to cowl side seals (LH and RH) to 20 - 30 degrees Celsius (68 - 86 degrees Fahrenheit) before undertaking any removal process. To protect the body remove windshield moulding outside with a knife before extracting the windshield glass through piano wire insertion between body and glass while tying handles to wire ends and applying protective tape for scratch prevention. Disengage stoppers after cutting glass with piano wire then use a suction cup to extract the glass while keeping as much adhesive on the body of the vehicle. First clean the instrument panel before placing the instrument panel cushion No.1 and move to cleaning the windshield glass by removing all damaged stoppers and adhesive plus scraping off the dam by using white gasoline to clean the outer border. Apply the Primer G coating on Windshield Glass Stopper No.2 before allowing it to dry for a minimum three minutes then tossing unused primer. Install the first windshield glass stopper to the vehicle body then apply Primer G on the installation areas of the window glass adhesive dam which needs to dry before applying double-sided tape to the glass. Apply Primer G to both the glass edges and contact surface before mounting the windshield moulding and leaving the maximum adhesive possible on the surface of the vehicle body. First height the glass by suction then examine the contact area and note reference points before taking down the glass. Apply Primer M to the vehicle body contact surface before both coatings dry. After that you will apply Primer G to the glass edge then contact surface and wipe away extra material. You need to apply adhesive (Part No. 08850-00801 or equivalent) with a sealer gun by using reference marks for alignment before pressing it gently along the rim to check for a proper fit and stopper attachment. The technician should eliminate extra adhesive deposits using a scraper before allowing the required waiting period to elapse. Perform a leak inspection when adhesive cures to identify and fix any air seepage by using auto glass sealer.
    Posted by ToyotaPartsNow Specialist
    Q:
    What should be done before installing the windshield moulding outside for the 2005 Scion xA? Posted by Customer
    A:
    Coat the edge of the glass and contact surface with Primer G, clean and shape the contact surface of the vehicle body, position the glass using a suction cup, and check the contact surface for evenness before removing the glass.
    Posted by ToyotaPartsNow Specialist
    See expert answers on similar Windshield
    If you have any questions about this product, please don't hesitate to ask us. We will be happy to help you!

OEM Toyota 56101-52191, Excellent Performance and Perfect Fitment

To ensure reliability, purchase Toyota part # 56101-52191 Windshield, Front. It is sometimes referred to as Toyota Windshield. OEM parts are unrivaled in terms of quality. They go through extensive quality control inspections and are produced in accordance with Toyota's official factory specifications. All of these remove defects and imperfections. So you can relax knowing they promise exceptional lifespan and flawless fitment.

ToyotaPartsNow.com is a leading supplier of genuine Toyota parts such as Toyota 5610152191 Windshield, Front. At ToyotaPartsNow.com, we have a wide variety of OEM Toyota parts available at competitive prices. Our comprehensive range of genuine Toyota parts come with a manufacturer's warranty for peace of mind. We also prioritize customer satisfaction, providing a hassle-free return policy and expedited delivery for all our parts. For detailed Scion parts information, click here.
Choose ToyotaPartsNow for discounted prices, exceptional service and fast delivery