×
ToyotaParts- Hello
- Login or Register
- Quick Links
- Live Chat
- Track Order
- Parts Availability
- RMA
- Help Center
- Contact Us
- Shop for
- Toyota Parts
- Scion Parts
My Garage
My Account
Cart
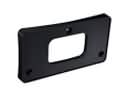
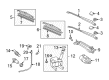
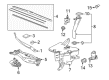
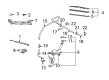
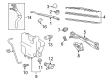
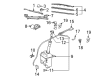
OEM Scion Wiper Linkage
Wiper Blade- Select Vehicle by Model
- Select Vehicle by VIN
Select Vehicle by Model
orMake
Model
Year
Select Vehicle by VIN
For the most accurate results, select vehicle by your VIN (Vehicle Identification Number).
8 Wiper Linkages found

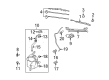
Scion Wiper Transmission, Front Part Number: 85150-12A90
$185.11 MSRP: $264.29You Save: $79.18 (30%)Ships in 1-3 Business DaysProduct Specifications- Other Name: Link Assembly, Front Wiper; Windshield Wiper Linkage; Linkage Assembly; Link Assembly, Windshield Wiper; Wiper Linkage
- Position: Front

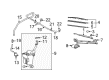
Scion Wiper Transmission, Front Part Number: 85150-52190
$185.69 MSRP: $265.12You Save: $79.43 (30%)Ships in 1-3 Business DaysProduct Specifications- Other Name: Link Assembly, Front Wiper; Windshield Wiper Linkage; Linkage Assembly; Link Assembly, Windshield Wiper; Wiper Linkage
- Position: Front

Scion Wiper Transmission, Front Part Number: 85150-52370
$187.67 MSRP: $267.95You Save: $80.28 (30%)Ships in 1-3 Business DaysProduct Specifications- Other Name: Link Assembly, Front Wiper; Windshield Wiper Linkage; Linkage Assembly; Link Assembly, Windshield Wiper; Wiper Linkage
- Position: Front

Scion Linkage Assembly, Front Part Number: 85150-21070
$199.32 MSRP: $284.59You Save: $85.27 (30%)Ships in 1-3 Business DaysProduct Specifications- Other Name: Link Assembly, Front Wiper; Windshield Wiper Linkage; Front Transmission; Link Assembly, Wiper; Wiper Linkage
- Position: Front

Scion Wiper Transmission, Front Part Number: 85150-12B50
$202.93 MSRP: $289.74You Save: $86.81 (30%)Ships in 1-3 Business DaysProduct Specifications- Other Name: Link Assembly, Front Wiper; Windshield Wiper Linkage; Linkage Assembly; Link Assembly, Windshield Wiper; Wiper Linkage
- Position: Front

Scion Wiper Transmission, Front Part Number: 85150-52171
$209.46 MSRP: $299.05You Save: $89.59 (30%)Ships in 1-3 Business DaysProduct Specifications- Other Name: Link Assembly, Front Wiper; Windshield Wiper Linkage; Linkage Assembly; Link Assembly, Windshield Wiper; Wiper Linkage
- Position: Front
- Replaces: 85150-52170

Scion Wiper Transmission, Front Part Number: 85150-74040
$223.32 MSRP: $318.85You Save: $95.53 (30%)Ships in 1-3 Business DaysProduct Specifications- Other Name: Link Assembly, Front Wiper; Windshield Wiper Linkage; Linkage Assembly; Link Assembly, Windshield Wiper; Wiper Linkage
- Position: Front

Scion Wiper Transmission, Front Part Number: 85150-21060
Product Specifications- Other Name: Link Assembly, Front Wiper; Windshield Wiper Linkage; Linkage Assembly; Link Assembly, Wiper; Wiper Linkage
- Position: Front
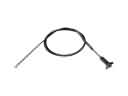
Scion Wiper Linkage
OEM parts deliver unmatched quality you can rely on. They pass extensive quality control inspections. Scion produces them to the official factory specifications. This process helps prevent defects and imperfections. So you can get exceptional lifespan and a flawless fit. Need new OEM Scion Wiper Linkage? You'll love our wide selection of genuine options. Shop in minutes and skip the hunt. Our prices are unbeatable, you'll save time and money. It's easy to shop and find the right piece. Our committed customer service team gives professional help from start to finish. Every part includes a manufacturer's warranty. We ship quickly, your parts will arrive fast at your door.
Scion Wiper Linkage wipes out rain with precision that is motor operated, ensuring drivers do not lose sight of the road. In 2003, Scion came into the scene with small cars and straightforward language that gave dealer games the boot. Scion welcomed young drivers to the showrooms with single-price stickers, bright paint, and small Release Series that were a sneaker drop. Scion also operated virtual hangouts and college parties promoting an air of customization rather than conformity. First-time owners leaped in millions, and it proved to be an easy concept: get hand buyers to control, and they will pay back. The experiment lives on, relying on Scion bows out in 2016, but parent companies are encouraged to test decadent trims, playful technology, and brash prices. Showrooms were closer to pop-up stores than retail areas, and that vibe continues to reverberate in the culture of cars. Within the cowl, a Wiper Linkage swivels on bushings, converting the spinning shaft of the motor into a synchronized push-pull action and propelling both arms in opposite directions in less than a millisecond of the downpour, clearing a view of the road. Wiper Linkage is applicable together with the dash switch to make one finger jump-start this sweep at intermittent, low, or high speed with no hesitation. Forged steel Wiper Linkage eliminates play in joints to prevent chattering blades and maintain a clear view years after being in the salt. The mini installers such as the press-fit ends and straight bolt pattern since Wiper Linkage can be installed in a few minutes with just the use of basic hand tools.
Scion Wiper Linkage Parts and Q&A
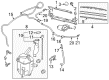
- Q: How to service and repair the wiper linkage on Scion xB?A:A proper wiper motor and linkage service starts with disconnecting the cable from the negative battery terminal and allowing at least 90 seconds of sit time to deactivate the seat belt pretensioner and Air Bag. First separate the head cap of the front wiper arm then detach the wiper arm assembly with its blade on both right and left sides. The hood to cowl top seal requires a clip remover to separate its 5 fasteners and one retaining seal. Both sides require removing four clips and detaching five claws to remove the cowl top ventilator louver. Unplug the connector before taking out three bolts to remove the windshield wiper motor and link assembly. To remove the windshield wiper motor assembly utilize a screwdriver to disconnect the 2 rods at the crank arm pivot while taping the screwdriver tip to prevent damage and afterward decline the 3 bolts. To assemble the windshield wiper motor link use 3 bolts to connect wiper link to motor assembly at 5.4 Nm torque (55 kgf-cm / 47 in.-lbf) while applying grease to the crank arm pivot before reattaching 2 rods. The windshield wiper motor and link assembly requires installation using 3 bolts which should have their torque set at 5.4 Nm (55 kgf-cm, 47 in.-lbf) and the connector needs to be reconnected. Install the cowl top ventilator louvers by fastening the 5 claws to each side using four clips for both sides before applying the hood to cowl top seal which receives 5 clips. The left front wiper arm and blade assembly installation process requires operating the wiper to automatic stop position then scraping the arm serration part before cleaning the wiper pivot serration. The arm should be installed with a 20 Nm (205 kgf-cm, 15 ft.-lbf) nut torque while maintaining the installation position mark between 25 to 40 mm (0.98 to 1.57 in.). The installation position mark for the right side needs to lie between 29 to 44 mm (1.14 to 1.73 in.). Let the head cap of the wiper arm go on last before reconnecting the negativity charged battery cable.
- Q: How to service and repair the Wiper Linkage on Scion xA?A:The wiper motor linkage repair and servicing process starts by disconnecting the negative battery cable terminal for at least 90 seconds to avoid activating Air Bags and seat belt pretensioners. Function the wiper to reach the automatic stop position and then detach the front wiper arm head cap followed by both left and right wiper arm and blade assemblies. The removal of the hood to cowl top seal requires a clip remover to detach its 8 clips and associated seal. Both left and right side cowl top ventilator louvers require unfastening their clips and bolts and detaching their five claws. Detach the windshield wiper motor while disconnecting its connector then removing two bolts followed by sliding the wiper link toward the passenger side to free the rubber pin. Start by detaching the windshield wiper motor assembly with a screwdriver which removes the meshing of the 2 rods at the crank arm pivot followed by "torx" bolt removal. Install the windshield wiper motor assembly onto the wiper link by tightening two "torx" screws to 7.5 N.m (76 kgf.cm, 66 in.lbf) neither losing nor gaining a pre-established tolerance. After application of grease to the crank arm pivot, insert both rods. Installing the windshield wiper motor and its link component requires applying 5.4 N.m of torque (55 kgf.cm, 47 in.lbf) to 2 bolts. Finally, resume the connector. Both sides of the cowl top ventilator louvers need five claws to attach for bolt and clip installation. After fitting the 8 clips to attach the hood to cowl top seal you must install the front wiper assemblies on both sides while scratching off the wiper arm serrations and wiping clean the wiper pivot prior to torquing the retaining nut to 26 N.m (265 kgf.cm, 19 ft.lbf). After reconnecting the battery negative cable you must perform initialization because selected systems need this process.