×
ToyotaParts- Hello
- Login or Register
- Quick Links
- Live Chat
- Track Order
- Parts Availability
- RMA
- Help Center
- Contact Us
- Shop for
- Toyota Parts
- Scion Parts
My Garage
My Account
Cart
OEM Scion Weather Strip
Door Weatherstripping- Select Vehicle by Model
- Select Vehicle by VIN
Select Vehicle by Model
orMake
Model
Year
Select Vehicle by VIN
For the most accurate results, select vehicle by your VIN (Vehicle Identification Number).
133 Weather Strips found


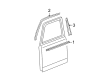
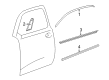
Scion Belt Molding, Outer Driver Side Part Number: 68230-52140
$23.29 MSRP: $32.42You Save: $9.13 (29%)Ships in 1-3 Business DaysProduct Specifications- Other Name: Weatherstrip Assembly, Rear Door Glass; Door Window Belt Weatherstrip, Rear Left Outer; Weatherstrip Assembly, Rear Door Glass, Outer Driver Side
- Position: Outer Driver Side


Scion Belt Molding, Outer Passenger Side Part Number: 68160-52160
$33.93 MSRP: $47.22You Save: $13.29 (29%)Ships in 1-3 Business DaysProduct Specifications- Other Name: Weatherstrip Assembly, Front Door Glass; Door Window Belt Weatherstrip, Front Right Outer; Weatherstrip Assembly, Front Door Glass, Outer Passenger Side
- Position: Outer Passenger Side

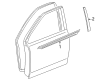
Scion Belt Molding, Outer Driver Side Part Number: 68210-52160
$33.93 MSRP: $47.22You Save: $13.29 (29%)Ships in 1-3 Business DaysProduct Specifications- Other Name: Weatherstrip Assembly, Front Door Glass; Door Window Belt Weatherstrip, Front Left Outer; Weatherstrip Assembly, Front Door Glass, Outer Driver Side
- Position: Outer Driver Side


Scion Belt Weatherstrip, Inner Driver Side Part Number: 68172-21040
$48.39 MSRP: $67.35You Save: $18.96 (29%)Product Specifications- Other Name: Weatherstrip, Front Door; Door Window Belt Weatherstrip, Left; Door Seal; Weatherstrip, Front Door Glass, Inner Driver Side; Weatherstrip
- Position: Inner Driver Side


Scion Belt Weatherstrip, Outer Driver Side Part Number: 68210-52040
$55.56 MSRP: $77.33You Save: $21.77 (29%)Ships in 1-3 Business DaysProduct Specifications- Other Name: Weatherstrip Assembly, Front Door Glass; Door Window Belt Weatherstrip, Front Left; Weatherstrip Assembly, Front Door Glass, Outer Driver Side
- Position: Outer Driver Side


Scion Belt Weatherstrip, Outer Passenger Side Part Number: 68180-52030
$55.56 MSRP: $77.33You Save: $21.77 (29%)Product Specifications- Other Name: Weatherstrip Assembly, Rear Door Glass; Door Window Belt Weatherstrip, Rear Right; Door Seal; Weatherstrip Assembly, Rear Door Glass, Outer Passenger Side; Weatherstrip
- Position: Outer Passenger Side

Scion Belt Weatherstrip, Outer Passenger Side Part Number: 68160-52040
$55.56 MSRP: $77.33You Save: $21.77 (29%)Ships in 1-3 Business DaysProduct Specifications- Other Name: Weatherstrip Assembly, Front Door Glass; Door Window Belt Weatherstrip, Front Right; Weatherstrip Assembly, Front Door Glass, Outer Passenger Side
- Position: Outer Passenger Side


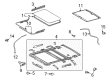
Scion Glass Weatherstrip Part Number: 63251-12190
$47.91 MSRP: $66.68You Save: $18.77 (29%)Ships in 1-2 Business DaysProduct Specifications- Other Name: Weatherstrip, Remova; Sunroof Seal; Glass Assembly Weatherstrip; Weatherstrip; Weatherstrip, Sliding Roof
- Replaces: 63251-60050


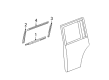
Scion Belt Weatherstrip, Outer Passenger Side Part Number: 68180-52070
$28.55 MSRP: $39.74You Save: $11.19 (29%)Ships in 1-3 Business DaysProduct Specifications- Other Name: Weatherstrip Assembly, Rear Door Glass; Door Window Belt Weatherstrip, Rear Right Outer; Door Seal; Weatherstrip Assembly, Rear Door Glass, Outer Passenger Side; Weatherstrip
- Position: Outer Passenger Side


Scion Belt Weatherstrip, Outer Driver Side Part Number: 68210-52080
$41.57 MSRP: $57.86You Save: $16.29 (29%)Ships in 1-3 Business DaysProduct Specifications- Other Name: Weatherstrip Assembly, Front Door Glass; Door Window Belt Weatherstrip, Front Left Outer; Weatherstrip Assembly, Front Door Glass, Outer Driver Side
- Position: Outer Driver Side

Scion Belt Weatherstrip, Outer Passenger Side Part Number: 68160-52080
$41.57 MSRP: $57.86You Save: $16.29 (29%)Ships in 1-3 Business DaysProduct Specifications- Other Name: Weatherstrip Assembly, Front Door Glass; Door Window Belt Weatherstrip, Front Right Outer; Weatherstrip Assembly, Front Door Glass, Outer Passenger Side
- Position: Outer Passenger Side

Scion Belt Molding, Outer Passenger Side Part Number: 68180-52140
$23.29 MSRP: $32.42You Save: $9.13 (29%)Ships in 1-3 Business DaysProduct Specifications- Other Name: Weatherstrip Assembly, Rear Door Glass; Door Window Belt Weatherstrip, Rear Right Outer; Weatherstrip Assembly, Rear Door Glass, Outer Passenger Side
- Position: Outer Passenger Side


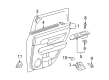
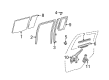
Scion Belt Weatherstrip, Inner Driver Side Part Number: 68174-12190
$30.22 MSRP: $42.07You Save: $11.85 (29%)Ships in 1 Business DayProduct Specifications- Other Name: Weatherstrip, Rear Door; Door Window Belt Weatherstrip, Rear Left; Weatherstrip, Rear Door Glass, Inner Driver Side; Weatherstrip
- Position: Inner Driver Side

Scion Belt Weatherstrip, Inner Passenger Side Part Number: 68173-12330
$31.78 MSRP: $44.23You Save: $12.45 (29%)Ships in 1 Business DayProduct Specifications- Other Name: Weatherstrip, Rear Door; Door Window Belt Weatherstrip, Rear Right; Weatherstrip, Rear Door Glass, Inner Passenger Side; Weatherstrip
- Position: Inner Passenger Side


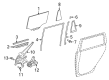
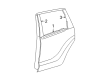
Scion Weatherstrip, Driver Side Part Number: 68189-12350
$33.21 MSRP: $46.22You Save: $13.01 (29%)Ships in 1-3 Business DaysProduct Specifications- Other Name: Weatherstrip, Rear Door; Door Glass Seal, Left; Weatherstrip, Rear Door Quarter Window, Driver Side
- Position: Driver Side


Scion Belt Weatherstrip, Inner Driver Side Part Number: 68174-52140
$33.81 MSRP: $47.06You Save: $13.25 (29%)Ships in 1-3 Business DaysProduct Specifications- Other Name: Weatherstrip, Rear Door; Door Window Belt Weatherstrip, Rear Left Inner; Weatherstrip, Rear Door Glass, Inner Driver Side; Weatherstrip
- Position: Inner Driver Side


Scion Belt Molding, Outer Passenger Side Part Number: 68160-74031
$36.79 MSRP: $51.21You Save: $14.42 (29%)Ships in 1-3 Business DaysProduct Specifications- Other Name: Weatherstrip Assembly, Front Door Glass; Door Belt Molding, Front Right; Weatherstrip Assembly, Front Door Glass, Outer Passenger Side
- Position: Outer Passenger Side
- Replaces: 68160-74030

Scion Belt Molding, Outer Driver Side Part Number: 68210-74031
$38.59 MSRP: $53.71You Save: $15.12 (29%)Ships in 1-2 Business DaysProduct Specifications- Other Name: Weatherstrip Assembly, Front Door Glass; Door Belt Molding, Front Left; Weatherstrip Assembly, Front Door Glass, Outer Driver Side
- Position: Outer Driver Side
- Replaces: 68210-74030


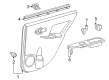
Scion Weatherstrip, Passenger Side Part Number: 68188-52020
$38.59 MSRP: $53.71You Save: $15.12 (29%)Ships in 1-3 Business DaysProduct Specifications- Other Name: Weatherstrip, Rear Door; Side Panel Glass Seal, Right; Weatherstrip, Rear Door Quarter Window, Passenger Side
- Position: Passenger Side


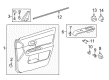
Scion Belt Weatherstrip, Inner Driver Side Part Number: 68172-12280
$40.86 MSRP: $56.87You Save: $16.01 (29%)Ships in 1 Business DayProduct Specifications- Other Name: Weatherstrip, Front Door; Door Window Belt Weatherstrip, Front Left; Door Seal; Weatherstrip, Front Door Glass, Inner Driver Side; Weatherstrip
- Position: Inner Driver Side
| Page 1 of 7 |Next >
1-20 of 133 Results
Scion Weather Strip
OEM parts deliver unmatched quality you can rely on. They pass extensive quality control inspections. Scion produces them to the official factory specifications. This process helps prevent defects and imperfections. So you can get exceptional lifespan and a flawless fit. Need new OEM Scion Weather Strip? You'll love our wide selection of genuine options. Shop in minutes and skip the hunt. Our prices are unbeatable, you'll save time and money. It's easy to shop and find the right piece. Our committed customer service team gives professional help from start to finish. Every part includes a manufacturer's warranty. We ship quickly, your parts will arrive fast at your door.
Scion Weather Strip keeps wind, rain, and noise out of the car, keeping all the drives quiet and dry. The small cars were sprayed loudly, the prices were straight, and Scion hit the road like a thunderbolt in 2003 and it kept the buzz going by dropping Release Series every few months, virtual hangouts, and an attitude that allowed the brand to make every ride feel like a personal statement. Consumers favored the fact that a Weather Strip that was factory-ready made the doors of Scion completely airtight after all the customizations that made Scion know it could play around with the looks without losing its knowledge of how to keep the car as comfortable as it was on a daily basis. By retiring the badge in 2016, it had surpassed a million sales and demonstrated to Toyota the power of new thinking in bringing first-time purchasers on board. The Weather Strip seals all the doors and edges of the glass with a tough rubber that snarfs off hot sun, biting frost, and continuous gritty road dirt. In any Scion, the Weather Strip folds along the body contour to ensure openings remain sealed continuously, reducing cabin noise as well as preventing drizzles on seat cloths. Change a worn Weather Strip as soon as it cracks to ensure your car runs quiet and avoids fuel-sucking drag that finds its way in through sloppy seals.
Scion Weather Strip Parts and Q&A
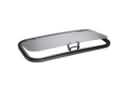
- Q: How to replace the front door glass Weather Strip assembly outer LH on Scion xA?A:The first step to replace the outer front door glass weather strip assembly requires removing the front door lower frame bracket garnish LH followed by the power window regulator switch assembly and then the front door trim board sub-assembly LH. The following order to perform the replacement begins with removing the front door service hole cover LH alongside the front n0.2 speaker assembly (w/ tweeter), followed by the outer rear view mirror assembly LH. Use a moulding remover to remove the front door glass weather strip assembly outer LH from the LH side of the front door that has a protective tape positioned under it to prevent damage followed by taping the remover tip before use. Procedures for installing the parts follow the opposite order of removal steps and apply equally to the RH side.
- Q: How to replace the front door glass Weather Strip assembly outer LH on Scion xB?A:The installation process for the front door glass weather strip assembly outer LH demands initial removal of front door lower frame bracket garnish LH after which users must detach door pull handle, power window regulator master switch assembly, front door trim board sub-assembly LH, front door inside handle sub-assembly LH, front door service hole cover LH, and outer rear view mirror assembly LH. You can extract the front door glass weather strip assembly outer LH through protective tape placement under the weather strip combined with a moulding remover tool that requires tip taping before application. The installation possesses inverted procedures that mirror those of removal while operating identically on the RH side.