×
ToyotaParts- Hello
- Login or Register
- Quick Links
- Live Chat
- Track Order
- Parts Availability
- RMA
- Help Center
- Contact Us
- Shop for
- Toyota Parts
- Scion Parts
My Garage
My Account
Cart
OEM Scion Window Regulator
Electric Power Window Regulator- Select Vehicle by Model
- Select Vehicle by VIN
Select Vehicle by Model
orMake
Model
Year
Select Vehicle by VIN
For the most accurate results, select vehicle by your VIN (Vehicle Identification Number).
30 Window Regulators found


Scion Window Regulator, Passenger Side Part Number: SU003-01606
$49.32 MSRP: $63.84You Save: $14.52 (23%)Ships in 1-2 Business DaysProduct Specifications- Other Name: Regulator Complete Front Right-Hand; Window Regulator, Front Right, Right; Regulator; Regulator Sub-Assembly, Front Door Window, Passenger Side
- Position: Passenger Side


Scion Window Regulator, Driver Side Part Number: 69802-21010
$84.36 MSRP: $118.41You Save: $34.05 (29%)Ships in 1-3 Business DaysProduct Specifications- Other Name: Regulator Sub-Assembly; Window Regulator, Front Left, Left, Rear Left; Regulator; Regulator Sub-Assembly, Front Door Window, Driver Side; Regulator Sub-Assembly, Rear Door Window, Driver Side
- Position: Driver Side


Scion Window Regulator, Driver Side Part Number: 69802-52070
$84.00 MSRP: $117.92You Save: $33.92 (29%)Ships in 1-3 Business DaysProduct Specifications- Other Name: Regulator Sub-Assembly; Window Regulator, Front Left, Rear Left; Regulator; Regulator Sub-Assembly, Front Door Window, Driver Side; Regulator Sub-Assembly, Rear Door Window, Driver Side
- Manufacturer Note: POWER WINDOW-WITH
- Position: Driver Side

Scion Window Regulator, Passenger Side Part Number: 69801-52070
$84.00 MSRP: $117.92You Save: $33.92 (29%)Ships in 1-3 Business DaysProduct Specifications- Other Name: Regulator Sub-Assembly; Window Regulator, Front Right, Rear Right; Regulator; Front Door Window, Passenger Side; Rear Door Window, Passenger Side
- Manufacturer Note: POWER WINDOW-WITH
- Position: Passenger Side

Scion Window Regulator, Driver Side Part Number: 69802-52130
$82.58 MSRP: $115.92You Save: $33.34 (29%)Ships in 1-3 Business DaysProduct Specifications- Other Name: Regulator Sub-Assembly; Window Regulator, Front Left, Rear Left; Regulator; Regulator Sub-Assembly, Front Door Window, Driver Side; Regulator Sub-Assembly, Rear Door Window, Driver Side
- Position: Driver Side

Scion Window Regulator, Driver Side Part Number: 69802-WB002
$56.97 MSRP: $79.29You Save: $22.32 (29%)Ships in 1-3 Business DaysProduct Specifications- Other Name: Regulator Sub-Assembly; Window Regulator, Front Left; Regulator Sub-Assembly, Front Door Window, Driver Side
- Position: Driver Side
- Replaces: 69802-WB001

Scion Window Regulator, Driver Side Part Number: 69820-74012
$381.12 MSRP: $558.54You Save: $177.42 (32%)Ships in 1-3 Business DaysProduct Specifications- Other Name: Regulator Assembly, Front Door Window; Window Regulator, Front Left; Regulator Assembly, Front Door Window, Driver Side
- Position: Driver Side
- Replaces: 69820-74011, 69820-74010

Scion Window Regulator, Driver Side Part Number: 69802-52080
$81.52 MSRP: $114.42You Save: $32.90 (29%)Ships in 1-3 Business DaysProduct Specifications- Other Name: Regulator Sub-Assembly; Window Regulator, Front Left; Regulator; Regulator Sub-Assembly, Front Door Window, Driver Side
- Position: Driver Side

Scion Window Regulator, Driver Side Part Number: 69804-12180
$128.06 MSRP: $181.29You Save: $53.23 (30%)Ships in 1-3 Business DaysProduct Specifications- Other Name: Regulator Sub-Assembly; Window Regulator, Rear Left; Regulator; Regulator Sub-Assembly, Rear Door Window, Driver Side
- Manufacturer Note: POWER WINDOW-WITH(DRIVER ONE TOUCH DOWN)
- Position: Driver Side
Scion Window Regulator, Passenger Side Part Number: 69803-12180
$128.06 MSRP: $181.29You Save: $53.23 (30%)Ships in 1-3 Business DaysProduct Specifications- Other Name: Regulator Sub-Assembly; Window Regulator, Rear Right; Regulator; Regulator Sub-Assembly, Rear Door Window, Passenger Side
- Manufacturer Note: POWER WINDOW-WITH(DRIVER ONE TOUCH DOWN)
- Position: Passenger Side

Scion Window Regulator, Driver Side Part Number: 69804-12200
$65.52 MSRP: $91.97You Save: $26.45 (29%)Ships in 1-3 Business DaysProduct Specifications- Other Name: Regulator Sub-Assembly; Window Regulator, Rear Left; Regulator Sub-Assembly, Rear Door Window, Driver Side
- Position: Driver Side
Scion Window Regulator, Passenger Side Part Number: 69803-12200
$67.77 MSRP: $95.13You Save: $27.36 (29%)Ships in 1-3 Business DaysProduct Specifications- Other Name: Regulator Sub-Assembly; Window Regulator, Rear Right; Regulator Sub-Assembly, Rear Door Window, Passenger Side
- Position: Passenger Side

Scion Window Regulator, Rear Passenger Side Part Number: 69803-52040
$77.96 MSRP: $109.43You Save: $31.47 (29%)Ships in 1-3 Business DaysProduct Specifications- Other Name: Regulator Sub-Assembly; Window Regulator, Rear Right; Power Regulator; Regulator
- Position: Rear Passenger Side
- Replaces: 69803-52070, 69803-52020, 69803-12080

Scion Window Regulator, Driver Side Part Number: 69804-0R010
$80.57 MSRP: $113.09You Save: $32.52 (29%)Ships in 1-3 Business DaysProduct Specifications- Other Name: Regulator Sub-Assembly; Window Regulator, Rear Left; Regulator Sub-Assembly, Rear Door Window, Driver Side
- Position: Driver Side
- Replaces: 69804-42030, 69804-42040
Scion Window Regulator, Passenger Side Part Number: 69803-0R010
$80.57 MSRP: $113.09You Save: $32.52 (29%)Ships in 1-3 Business DaysProduct Specifications- Other Name: Regulator Sub-Assembly; Window Regulator, Rear Right; Regulator Sub-Assembly, Rear Door Window, Passenger Side
- Position: Passenger Side
- Replaces: 69803-42030, 69803-42040
Scion Window Regulator, Rear Driver Side Part Number: 69804-52040
$81.16 MSRP: $113.92You Save: $32.76 (29%)Ships in 1-3 Business DaysProduct Specifications- Other Name: Regulator Sub-Assembly; Window Regulator, Rear Left; Power Regulator; Regulator
- Position: Rear Driver Side
- Replaces: 69804-52070, 69804-12080, 69804-02020, 69804-52020
Scion Window Regulator, Passenger Side Part Number: 69801-52080
$81.52 MSRP: $114.42You Save: $32.90 (29%)Ships in 1-3 Business DaysProduct Specifications- Other Name: Regulator Sub-Assembly; Window Regulator, Front Right; Regulator; Regulator Sub-Assembly, Front Door Window, Passenger Side
- Position: Passenger Side

Scion Window Regulator, Driver Side Part Number: 69802-12220
$84.36 MSRP: $118.41You Save: $34.05 (29%)Ships in 1-3 Business DaysProduct Specifications- Other Name: Regulator Sub-Assembly; Window Regulator, Front Left; Regulator Sub-Assembly, Front Door Window, Driver Side
- Manufacturer Note: POWER WINDOW-WITH(DRIVER ONE TOUCH DOWN)
- Position: Driver Side
Scion Regulator Sub-Assembly, Front Door Window, Passenger Side Part Number: 69801-21020
$84.36 MSRP: $118.41You Save: $34.05 (29%)Ships in 1-3 Business DaysProduct Specifications- Other Name: Regulator Sub-Assembly; Regulator Sub-Assembly, Rear Door Window, Passenger Side; Window Regulator
- Position: Passenger Side
Scion Window Regulator, Passenger Side Part Number: 69801-12220
$81.87 MSRP: $114.92You Save: $33.05 (29%)Ships in 1-3 Business DaysProduct Specifications- Other Name: Regulator Sub-Assembly; Window Regulator, Front Right; Regulator Sub-Assembly, Front Door Window, Passenger Side
- Manufacturer Note: POWER WINDOW-WITH(DRIVER ONE TOUCH DOWN)
- Position: Passenger Side
| Page 1 of 2 |Next >
1-20 of 30 Results
Scion Window Regulator
OEM parts deliver unmatched quality you can rely on. They pass extensive quality control inspections. Scion produces them to the official factory specifications. This process helps prevent defects and imperfections. So you can get exceptional lifespan and a flawless fit. Need new OEM Scion Window Regulator? You'll love our wide selection of genuine options. Shop in minutes and skip the hunt. Our prices are unbeatable, you'll save time and money. It's easy to shop and find the right piece. Our committed customer service team gives professional help from start to finish. Every part includes a manufacturer's warranty. We ship quickly, your parts will arrive fast at your door.
Scion Window Regulator ensures the smooth movement of windows to ensure airflow and security is under your control. Since the first day of 2003, Scion avoided dealer gloom through direct-to-younger buyers and artist-focused communication, overly compact rides in loud color, fixed pricing, and Release Series drops that are more of a limited-edition drop than a sedan, allowing customers to bolt on body kits, thump-heavy stereos, or neon body trim without voiding the warranty, and that feedback loop, which was not filtered, sold more than a million vehicles before the logo has gone away in 20. Scion is still short-hand in easy-going fun, easy-mod and a purchasing experience that never submerged customers in jargon and lengthy option lists. The Window Regulator features a powerful scissor or cable design powered by a powerful motor to slide glass along its metal tracks, squeeze it into the seal to prevent leakages and rattles, and comes with slotted mounts so that Window Regulator can fit into factory holes without drilling. Even after the Scion drivers who fit coilovers and wheels switch them around, they still want the window switch to respond immediately, and a healthy Window Regulator will provide cabin quietness on the highway and ensure alarm sensors are not unhappy when leaving the car overnight. A new Window Regulator will reconnect that clean click-to-glass feel and Scion enthusiasts will know that reliability is as exciting as horsepower when it is time to go to the road.
Scion Window Regulator Parts and Q&A
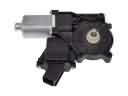
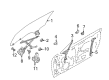
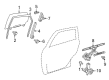
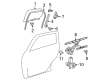
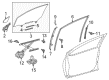
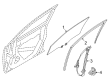
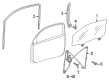
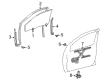
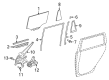
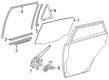
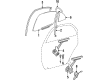
- Q: What are the steps involved in reassembling the front door, including installing Weather Strips, door handles, window regulators, and ensuring proper torque, wiring, and system initialization on Scion tC?A:Begin front door reassembly by fixing the front door weather strip LH through the attachment of its 17 clips with special attention to the marked 2 clips. Moving forward with this procedure requires users to install the front door check assembly LH with applied grease to its sliding areas then attach two nuts (Torque: 5.5 Nm) before applying adhesive (Part No. 08833-00070, Three Bond 1324 or equivalent) to the bolt and tightening it against the body panel (Torque: 30 Nm). Affix two claws to each piece of the front door outside handle pad throughout its front and rear sections. Install the front door lock open rod to the frame sub-assembly LH outside handle then apply MP grease followed by fastening with a T30 "Torx" socket wrench while setting the torque to 4.0 Nm. You should maintain your grip on the bellcrank lever as you put together the front door handle assembly outside LH to stop it from getting any harm. After applying MP grease to the door lock assembly LH install new packing then secure the control rod before connecting the door lock connector while screwing in 3 fasteners (Torque: 5.0 Nm). Use a T30 "Torx" socket wrench to install front door outside handle cover LH along with its hole plug while applying a torque force of 4.0 Nm. First install rear lower LH part of front door frame sub-assembly using a bolt that requires 8.5 Nm torque. Then attach the power window regulator motor assembly in front of LH using a T25 "Torx" socket wrench and torque this assembly at 5.4 Nm. Link the regulator to bolt A using MP grease then insert the regulator into the door panel followed by tightly screwing in the 5 bolts to a torque of 8.0 Nm. Secure the front door glass sub-assembly LH by inserting its glass run into position while fitting 2 bolts that require 8.0 Nm torque. Mount the front door No. 1 stiffener cushion using 2 bolts as well as the side air bag sensor assembly LH if equipped and a new front door service hole cover while ensuring everything remains smooth and fold-free. Connect the connectors then put in the front door inside handle sub-assembly LH before connecting its two cables. The service procedure includes installing the front door glass weather strip inner LH followed by the front No. 2 speaker assembly and front No. 1 speaker assembly. The installation process includes mounting the front door inside handle bezel plug accompanied by the outer rear view mirror assembly LH and front door trim board sub-assembly LH with its 4 clips and 2 screws. The window regulator master switch demands installation to the front armrest base panel upper LH by use of 3 screws followed by connection of the switch connector after which a clip and 5 claws should be engaged. The passenger side requires you to install the power window regulator switch by using two screws then link its connector before applying the clip with five claws. Affix the 11-claw assist grip cover LH together with the front door lower frame bracket garnish LH through its clip. You should connect the cable to the negative battery terminal before examining the SRS warning light and conducting initialization procedures because some systems need it after reapplying the battery.