×
ToyotaParts- Hello
- Login or Register
- Quick Links
- Live Chat
- Track Order
- Parts Availability
- RMA
- Help Center
- Contact Us
- Shop for
- Toyota Parts
- Scion Parts
My Garage
My Account
Cart
OEM Scion tC Window Regulator
Electric Power Window Regulator- Select Vehicle by Model
- Select Vehicle by VIN
Select Vehicle by Model
orMake
Model
Year
Select Vehicle by VIN
For the most accurate results, select vehicle by your VIN (Vehicle Identification Number).
4 Window Regulators found


Scion tC Window Regulator, Driver Side Part Number: 69802-21010
$84.36 MSRP: $118.41You Save: $34.05 (29%)Ships in 1-3 Business Days

Scion tC Window Regulator, Driver Side Part Number: 69802-52070
$84.00 MSRP: $117.92You Save: $33.92 (29%)Ships in 1-3 Business Days
Scion tC Window Regulator, Passenger Side Part Number: 69801-52070
$84.00 MSRP: $117.92You Save: $33.92 (29%)Ships in 1-3 Business DaysScion tC Regulator Sub-Assembly, Front Door Window, Passenger Side Part Number: 69801-21020
$84.36 MSRP: $118.41You Save: $34.05 (29%)Ships in 1-3 Business Days
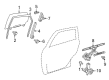
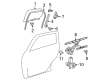
Scion tC Window Regulator
Choose genuine Window Regulator that pass strict quality control tests. You can trust the top quality and lasting durability. Shopping for OEM Window Regulator for your Scion tC? Our website is your one-stop destination. We stock an extensive selection of genuine Scion tC parts. The price is affordable so you can save more. It only takes minutes to browse and find the exact fit. Easily add to cart and check out fast. Our hassle-free return policy will keep you stress-free. We process orders quickly for swift delivery. Your parts will arrive faster, so you can get back on the road sooner.
The Window Regulator is among the essential car models in the Scion tC series well-known for its efficiency in window regulation. This vital gadget is tasked with lifting and lowering the windows besides fixing the window glass into position in a manner that safeguards the drivers and the passengers. A number of Window Regulators have been applied in the Scion tC models, for example, scissor and cable types, they are all developed according to the strict requirement for perfect compatibility and easy to install. Since the efficiency of the window regulators may decline over time and can be accompanied by vibrations and Loud noises, Secondly, by getting and installing new Window Regulators, the window system will become more convenient to use. Scion tC is one of the sedans recognized for being affordable and stylish particularly among the youth accompanied by an outstanding performance. In particular, the Window Regulator is distinguished by its rather complex structure that has no clear analogs in the automotive industry; at the same time, it requires little interference and has virtually no risk of failure during its use. Being a part of Scion tC - the car with the rich history of innovations and style, Window Regulator is the essential component of the car's framework that cannot be overlooked by any driver. All in all, the Window Regulator is an excellent example of the brand's adherence to quality and satisfaction which is evidenced in the fondness of tC fans.
Scion tC Window Regulator Parts and Q&A
- Q: What are the steps involved in reassembling the front door, including installing Weather Strips, door handles, window regulators, and ensuring proper torque, wiring, and system initialization on Scion tC?A:Begin front door reassembly by fixing the front door weather strip LH through the attachment of its 17 clips with special attention to the marked 2 clips. Moving forward with this procedure requires users to install the front door check assembly LH with applied grease to its sliding areas then attach two nuts (Torque: 5.5 Nm) before applying adhesive (Part No. 08833-00070, Three Bond 1324 or equivalent) to the bolt and tightening it against the body panel (Torque: 30 Nm). Affix two claws to each piece of the front door outside handle pad throughout its front and rear sections. Install the front door lock open rod to the frame sub-assembly LH outside handle then apply MP grease followed by fastening with a T30 "Torx" socket wrench while setting the torque to 4.0 Nm. You should maintain your grip on the bellcrank lever as you put together the front door handle assembly outside LH to stop it from getting any harm. After applying MP grease to the door lock assembly LH install new packing then secure the control rod before connecting the door lock connector while screwing in 3 fasteners (Torque: 5.0 Nm). Use a T30 "Torx" socket wrench to install front door outside handle cover LH along with its hole plug while applying a torque force of 4.0 Nm. First install rear lower LH part of front door frame sub-assembly using a bolt that requires 8.5 Nm torque. Then attach the power window regulator motor assembly in front of LH using a T25 "Torx" socket wrench and torque this assembly at 5.4 Nm. Link the regulator to bolt A using MP grease then insert the regulator into the door panel followed by tightly screwing in the 5 bolts to a torque of 8.0 Nm. Secure the front door glass sub-assembly LH by inserting its glass run into position while fitting 2 bolts that require 8.0 Nm torque. Mount the front door No. 1 stiffener cushion using 2 bolts as well as the side air bag sensor assembly LH if equipped and a new front door service hole cover while ensuring everything remains smooth and fold-free. Connect the connectors then put in the front door inside handle sub-assembly LH before connecting its two cables. The service procedure includes installing the front door glass weather strip inner LH followed by the front No. 2 speaker assembly and front No. 1 speaker assembly. The installation process includes mounting the front door inside handle bezel plug accompanied by the outer rear view mirror assembly LH and front door trim board sub-assembly LH with its 4 clips and 2 screws. The window regulator master switch demands installation to the front armrest base panel upper LH by use of 3 screws followed by connection of the switch connector after which a clip and 5 claws should be engaged. The passenger side requires you to install the power window regulator switch by using two screws then link its connector before applying the clip with five claws. Affix the 11-claw assist grip cover LH together with the front door lower frame bracket garnish LH through its clip. You should connect the cable to the negative battery terminal before examining the SRS warning light and conducting initialization procedures because some systems need it after reapplying the battery.
- Q: How to disassemble the front door window regulator on the LH side on Scion tC?A:Removing the negative battery cable for 90 seconds before working on a window regulator helps prevent the Air Bag from activating. Detach the LH front door lower frame bracket garnish through its clip and claw with a screwdriver shielded by tape. To disassemble the LH side front door window regulator you must first detach its assist grip cover through 11 claws then take off the front armrest base panel upper LH which calls for removing a clip and 5 claws plus disconnecting the switch connector before slowly extracting the window regulator master switch. You can detach the front door handle bezel plug after eliminating its claw and then unscrew and pull out the front door trim board sub-assembly LH when you apply protection tape, remove the 3 screws, detach the 9 clips, and carefully move the trim horizontally to avoid damaging its pins. To access the front door components you must detach the claw holding the outer rear view mirror LH, take apart the front No. 1 and No. 2 speaker assemblies also detach and disconnect the front door belt moulding LH. To expose the front door hardware you must uninstall 2 bolts from the side Air Bag sensor, front door service hole cover, and front door No. 1 stiffener cushion. Before starting disable the window switch and move forward the glass panel to reveal two bolts for extraction. The front door window regulator sub-assembly LH disconnects when bolt A loosens from its socket after unplugging the connector. Apply standard marks on the power window regulator motor assembly LH front before removing its three T25 "TORX" screws with tool. Remove lower rear support of the front door frame assembly by unscrewing one bolt while taking off the front door outside handle cover LH component using a T30 "TORX" socket. Use a T30 torque socket wrench to take out 3 screws and remove the front door lock assembly LH. Then pull and slide the front door handle assembly outside LH from its position. Remove the front door outside handle frame sub-assembly LH by loosening its T25 TORX screw with a wrench then using pliers to compress the clip and pulling out the lock control rod. To disconnect the exterior pads of the front door handle you must pry off their 2 claw fasteners and unbolt the front door check assembly using 1 bolt plus 2 nuts. After detaching all 19 clips use a clip remover to remove Weather Strip from the front door LH side. Reset the Weather Strip if damaged during installation.


Related Scion tC Parts
 Scion tC Seat Covers
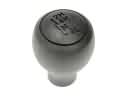 Scion tC Shift Knob
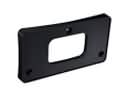 Scion tC License Plate
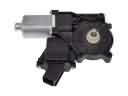 Scion tC Window Motor
 Scion tC Door Hinge
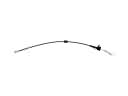 Scion tC Door Latch Cable
 Scion tC Door Lock Cylinder
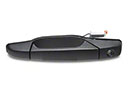 Scion tC Exterior Door Handle
 Scion tC Interior Door Handle
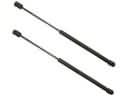 Scion tC Liftgate Lift Support
 Scion tC Power Window Switch
 Scion tC Window Run
Browse Scion tC Window Regulator by Years
2016 2015 2014 2013 2012 2011 2010 2009 2008 2007 2006 2005