×
ToyotaParts- Hello
- Login or Register
- Quick Links
- Live Chat
- Track Order
- Parts Availability
- RMA
- Help Center
- Contact Us
- Shop for
- Toyota Parts
- Scion Parts
My Garage
My Account
Cart
OEM Scion tC Window Motor
Window Lift Motor- Select Vehicle by Model
- Select Vehicle by VIN
Select Vehicle by Model
orMake
Model
Year
Select Vehicle by VIN
For the most accurate results, select vehicle by your VIN (Vehicle Identification Number).
5 Window Motors found


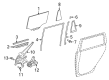
Scion tC Window Motor Part Number: 85720-AE010
$316.64 MSRP: $452.09You Save: $135.45 (30%)Ships in 1-2 Business Days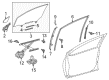
Scion tC Window Motor Part Number: 85710-AE010
$316.64 MSRP: $452.09You Save: $135.45 (30%)Ships in 1-2 Business Days
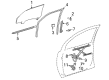
Scion tC Window Motor Part Number: 85720-AE020
$357.85 MSRP: $524.44You Save: $166.59 (32%)Ships in 1-3 Business Days
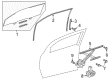
Scion tC Window Motor, Driver Side Part Number: 85720-21050
$407.34 MSRP: $596.96You Save: $189.62 (32%)Ships in 1-3 Business Days
Scion tC Motor Assembly, Power Window Regulator, Passenger Side Part Number: 85710-0E010
$408.36 MSRP: $598.46You Save: $190.10 (32%)Ships in 1-3 Business Days
Scion tC Window Motor
Choose genuine Window Motor that pass strict quality control tests. You can trust the top quality and lasting durability. Shopping for OEM Window Motor for your Scion tC? Our website is your one-stop destination. We stock an extensive selection of genuine Scion tC parts. The price is affordable so you can save more. It only takes minutes to browse and find the exact fit. Easily add to cart and check out fast. Our hassle-free return policy will keep you stress-free. We process orders quickly for swift delivery. Your parts will arrive faster, so you can get back on the road sooner.
The Window Motor is a crucial part and the reason behind the improvements of the Scion tC vehicles as far as operation and security are identified. This window motor makes management of windows possible thus making it possible for drivers and other passengers to have fresh air, while, at the same time, guarding them against harsh weather conditions. Window Motor is compatible with the numerous Scion tC models for proper functioning, and hence compatibility. Through the use of durable ergonomically designed parts, the Scion tC is built to guarantee durability and performance by any driver. The window motor works with the help of the current sent by the window switch and it powers the window regulator for the easy and systematic movement of the window. It is very important to constantly service or especially change the Window Motor if it is worn out as it may lead to the window motor running slowly or not at all. The timely change with superior quality parts allows Scion tC to remain a safe and pleasure to drive a vehicle on the road. However, there is one product that can be noted among the others in the automotive market that is Window Motor which shared the reliability, ease of usage, and compatibility at the same time with tC series of this automobile company. Thus, it is instrumental in increasing the effectiveness and safety of the Scion tC and confirms its status as a car popular among the younger generation, which Scion is targeting.
Scion tC Window Motor Parts and Q&A
- Q: How to reassemble the front door, including installing handles,Window Motor and ensuring proper torque specifications and system initialization on Scion tC?A:Install the front door weather strip LH while you attach 17 clips to it including the two indicated with arrow marks. The door check installation requires first applying MP grease to its sliding areas and securing it to the door panel with two nuts tightened to 5.5 Nm torque and 30 Nm torque after using adhesive (Part No. 08833-00070 or equivalent Three Bond 1324). The rear and front outside handle pad receives its 2 claws first then the outside handle frame sub-assembly LH gets installed after applying MP grease as well as the front door lock open rod although the frame needs a torque of 4.0 Nm (41 kgf-cm, 35 in-lbf) using a T30 "Torx" socket wrench. Before attaching the outside handle have one hand on the bellcrank lever in order to protect it from damage. The door lock assembly requires application of MP grease on sliding and rotating areas followed by new wire harness packing installation and a control rod check before securing it with three adhesive-installed screws using Part No. 08833-00070, Three Bond 1324 or equivalent adhesive with 5.0 Nm (51 kgf-cm, 44 in-lbf) torque. The door lock connector should be connected first before adding the outside handle cover LH with 4.0 Nm (41 kgf-cm, 35 in-lbf) torque and then installing the hole plug. Install the rear lower frame sub-assembly LH with 8.5 Nm (87 kgf-cm, 75 in-lbf) torque after which you should install the power Window Regulator motor assembly LH front with a T25 "Torx" socket wrench adjusted to 5.4 Nm (55 kgf-cm, 48 in-lbf). First apply MP grease to the areas where the window regulator slides and rotates then loosely attach bolt A onto the window regulator followed by its insertion into the door panel while securing it with 5 bolts with bolt A torqued to 8.0 Nm (82 kgf-cm, 71 in-lbf). Attach the front door glass sub-assembly LH to the window regulator using 2 bolts with 8.0 Nm (82 kgf-cm, 71 in-lbf). Properly install the front door No. 1 stiffener cushion using more 2 bolts. The side air bag sensor assembly requires installation if equipped followed by a new service hole cover which must be smooth without wrinkles before final connector connections. Implement the inner front door glass weather strip by fitting the inside handle while connecting two cables to complete the installation. Install speakers according to need using the front No. 2 speaker assembly and the front No. 1 speaker assembly. To install the LH side mirror assembly you should complete its installation before fixing the LH front door trim board using 4 clips and 2 screws. The installation of the front door inside handle bezel plug should be followed by application of the front armrest base panel upper LH or RH according to selected side while maintaining correct attachments for all switches and connectors. Conclude the procedure by installing the assist grip cover LH, front door lower frame bracket garnish LH, reconnecting the negative battery terminal while checking the SRS warning light then completing system initialization since some components need this step after reconnecting the battery.
- Q: How to reset the power Window Motor on Scion tC?A:The power Window Regulator motor needs resetting in the following conditions: disconnecting the battery terminal and changing or removing the power window regulator master switch, power window regulator switch, wire harness, power window regulator or power window motor and replacing the gauge fuse as well as the am1 fuse, fl door fuse and fr door fuse. When motors are not reset these components will not utilize their auto operation function, jam protection function and remote operation function properly. Power window regulator motors require reset using switches found on each door panel because remote operation through the master switch cannot perform the reset. The simultaneous reset of multiple power window regulator motors should be avoided to stop excessive current flow. Long-term continuous use of the Power Window Switch will stop the motor to avoid excessive power usage until the switch blinking limits both auto up/down and remote up/down operation until the motor is reset for a few minutes. First switch on the ignition and use a tap of the power window switch to bring the window halfway up. Pull and maintain pressure on the switch until the window reaches its complete seal for around 1 second after termination of closure. The reset procedure is completed when you test for normal auto up/down functionality. To continue the process disconnect the negative (-) battery terminal for 10 seconds, reinstall it afterward and execute the first four steps a second time. Open the Ignition Switch to on and slowly raise the power window while fully operating the switch for window closure. Maintain pressure on the switch for about 12 seconds before checking for the auto up/down function's operation.

Related Scion tC Parts
 Scion tC Seat Covers
 Scion tC License Plate
 Scion tC Window Regulator
 Scion tC Wiper Arm
 Scion tC Center Console Latch
 Scion tC Door Hinge
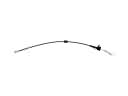 Scion tC Door Latch Cable
 Scion tC Door Lock Cylinder
 Scion tC Exterior Door Handle
 Scion tC Interior Door Handle
 Scion tC Power Window Switch
 Scion tC Window Run