My Garage
Cart
Make sure this part fits

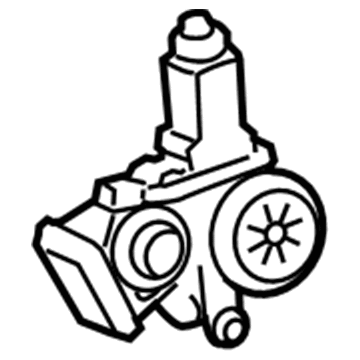
Toyota 85710-AE010
Window Motor

2003-2022 Toyota 85710AE010

Customer Questions & Expert Answers (34)
Toyota 85710-AE010 Window Motor
  • Part Description
    Motor Assembly, Power Window Regulator; Center Right, Front Right, Rear Left, Rear Right, Right
  • Replaces
    85710-35180
  • Manufacturer
    Toyota
Make sure this part fits
$316.54 MSRP: $451.95
You Save: $135.41 (30%)
Ships in 1-2 Business Days
1
ADD TO CART
  • Related Parts
  • Product Specifications
  • Vehicle Fitment
  • Customer Questions & Expert Answers
  • Product Specifications

    BrandGenuine Toyota
    Manufacturer Part Number85710-AE010
    Part DescriptionMotor Assembly, Power Window Regulator; Center Right, Front Right, Rear Left, Rear Right, Right
    Other NamesMotor; Power Window Regulator Assembly for Front Passenger, Driver, and Passenger Side.
    Item Dimensions7.7 x 4.7 x 4.4 inches
    Item Weight1.30 Pounds
    ConditionNew
    Fitment TypeDirect Replacement
    Replaces85710-35180
    ManufacturerToyota
    SKU85710-AE010
    WarrantyThis genuine Toyota part is guaranteed by Toyota's factory warranty.
    Shipping & ReturnShipping Policy Return Policy
    Warning: California's Proposition 65
  • Vehicle Fitment

    Year Make Model Trim Engine
    2016 Scion iMBase4 Cyl 1.8 L GAS
    2011-2016, 2007-2008 Scion tCBase, Spec4 Cyl 2.4 L GAS, 4 Cyl 2.5 L GAS
    2008-2015 Scion xBBase4 Cyl 2.4 L GAS
    2008-2014 Scion xDBase4 Cyl 1.8 L GAS
    2003-2009 Toyota 4RunnerLimited, Sport, SR56 Cyl 4.0 L GAS, 8 Cyl 4.7 L GAS
    2005-2010 Toyota AvalonLimited, Touring, XL, XLS6 Cyl 3.5 L GAS
    2012-2017, 2007-2009 Toyota CamryBase, CE, Hybrid, Hybrid LE, Hybrid SE, Hybrid XLE, L, LE, SE, SE Sport, Special Edition, XLE, XSE4 Cyl 2.4 L FULL HYBRID EV-GAS (FHEV), 4 Cyl 2.4 L GAS, 4 Cyl 2.5 L FULL HYBRID EV-GAS (FHEV), 4 Cyl 2.5 L GAS, 6 Cyl 3.5 L GAS
    2009-2019 Toyota Corolla50th Anniversary Special Edition, Base, L, LE, LE Eco, Le Eco Plus, S, SE, Special Edition, XLE, XRS, XSE4 Cyl 1.8 L GAS, 4 Cyl 2.4 L GAS
    2017-2018 Toyota Corolla iMBase4 Cyl 1.8 L GAS
    2007-2014 Toyota FJ CruiserBase, Trail Teams Special Edition, TRD Special Edition6 Cyl 4.0 L GAS
    View More
  • Customer Questions & Expert Answers

    Q:
    Can you provide the right 85710-AE010 for my car? Posted by ToyotaPartsNow Specialist
    A:
    Find out if part number 85710-AE010 is the right fit for your car by Selecting Your Vehicle model.
    Posted by ToyotaPartsNow Specialist
    Q:
    How do you remove the Window Motor on Scion xB? Posted by Customer
    A:
    The first step before removing the power window regulator motor is to disconnect the negative battery cable from its terminal. All components necessary for RH side removal include the front armrest base upper panel together with front door lower frame bracket garnish, front door inside handle bezel, front door trim board sub-assembly, front door trim bracket, front door service hole cover, front door glass sub-assembly and front door window regulator sub-assembly. You must use the "TORX" socket wrench T25 for removing the 3 screws on the front power window regulator motor assembly. For the back door replacement start by taking off the rear door armrest base upper panel and the rear door inside handle bezel as well as the rear door trim board sub-assembly and rear door trim bracket and rear door service hole cover and rear door glass run. Position the rear window Weather Strip off to reach the upper rear door window division bar screw and then remove the two bolts and screw along with the division bar hardware gently. The technician must remove the rear door quarter window Weather Strip, rear door glass sub-assembly together with the rear door window regulator sub-assembly. The third step involves removing three screws from the rear power window regulator motor assembly by using a "TORX" socket wrench T25.
    Posted by ToyotaPartsNow Specialist
    Q:
    How to install the rear Window Motor assembly on Toyota Corolla? Posted by Customer
    A:
    You should begin with the rear door window regulator sub-assembly installation and proceed to install the rear door glass run. The installation sequence involves putting the rear door glass sub-assembly followed by the rear door quarter window glass. Afterwards install the rear door window division bar sub-assembly followed by the rear door Weather Strip. The next operations involve the installation of the rear door service hole cover followed by the rear door trim bracket. Install the rear door inner glass Weather Strip as the second step before adding the rear door inside handle sub-assembly followed by the rear door trim board sub-assembly. As the final step install the rear door armrest upper base panel and the rear door inside handle bezel then connect the cable to the negative battery terminal.
    Posted by ToyotaPartsNow Specialist
    Q:
    How do you secure the motor assembly front for the 2008 Scion xB? Posted by Customer
    A:
    Use a "TORX" socket wrench T25 to secure the motor assembly front with 3 screws, torqued to 5.4 Nm (55 kgf-cm, 48 in-lbf).
    Posted by ToyotaPartsNow Specialist
    See expert answers on similar Window Motor
    Q:
    What is the torque specification for the screws securing the front power window regulator motor assembly for the 2009 Scion xD? Posted by Customer
    A:
    5.4 Nm (55 kgf-cm, 48 in-lbf).
    Posted by ToyotaPartsNow Specialist
    See expert answers on similar Window Motor
    Q:
    What components are installed after the front power window regulator motor assembly for the 2009 Scion xB? Posted by Customer
    A:
    Install the front door window regulator sub-assembly, the front door glass sub-assembly, the front door service hole cover, the front door trim bracket, the front door trim board sub-assembly, the front door inside handle bezel, the front door lower frame bracket garnish, and the front armrest base upper panel.
    Posted by ToyotaPartsNow Specialist
    See expert answers on similar Window Motor
    Q:
    What is the final step in removing the rear power window regulator motor assembly for the 2008 Scion xB? Posted by Customer
    A:
    Use the same "TORX" socket wrench T25 to remove the 3 screws after removing the rear door quarter window weatherstrip, rear door glass sub-assembly, and rear door window regulator sub-assembly.
    Posted by ToyotaPartsNow Specialist
    See expert answers on similar Window Motor
    Q:
    What should be done to access the screw on the upper section of the rear door window division bar for the 2010 Scion xD? Posted by Customer
    A:
    Detach the rear window weatherstrip.
    Posted by ToyotaPartsNow Specialist
    See expert answers on similar Window Motor
    Q:
    What components follow the installation of the front power window regulator motor assembly for the 2008 Scion xD? Posted by Customer
    A:
    Install the front door window regulator sub-assembly, front door glass sub-assembly, service hole cover, trim bracket, trim board sub-assembly, inside handle bezel, lower frame bracket garnish, and armrest base upper panel.
    Posted by ToyotaPartsNow Specialist
    See expert answers on similar Window Motor
    Q:
    What is the next component to install after the front power window regulator motor assembly for the 2010 Scion xB? Posted by Customer
    A:
    Install the front door window regulator sub-assembly.
    Posted by ToyotaPartsNow Specialist
    See expert answers on similar Window Motor
    Q:
    What should be done to access the screw at the upper section of the rear door window division bar for the 2008 Scion xD? Posted by Customer
    A:
    Detach the rear window weatherstrip.
    Posted by ToyotaPartsNow Specialist
    See expert answers on similar Window Motor
    Q:
    What should be installed after the front door inside handle sub-assembly for the 2009 Toyota Corolla? Posted by Customer
    A:
    Install the FRONT DOOR TRIM BOARD SUB-ASSEMBLY (Special Service Tool: 12354).
    Posted by ToyotaPartsNow Specialist
    See expert answers on similar Window Motor
    Q:
    How do you secure the rear power window regulator motor assembly for the 2009 Scion xD? Posted by Customer
    A:
    Use a "TORX" socket wrench T25 to remove the 3 screws securing the assembly.
    Posted by ToyotaPartsNow Specialist
    See expert answers on similar Window Motor
    Q:
    What components need to be removed from the rear door for the 2009 Toyota Highlander? Posted by Customer
    A:
    Inside handle bezel plug, armrest upper base panel, assist grip cover, trim board sub-assembly, inner glass weatherstrip, service hole cover, and upper part of the weatherstrip.
    Posted by ToyotaPartsNow Specialist
    See expert answers on similar Window Motor
    Q:
    What components follow the installation of the front door window regulator sub-assembly for the 2008 Toyota FJ Cruiser? Posted by Customer
    A:
    The front door glass sub-assembly, the front door window frame rear lower, and the front door lower frame bracket garnish.
    Posted by ToyotaPartsNow Specialist
    See expert answers on similar Window Motor
    Q:
    What follows after removing the upper weatherstrip for the 2009 Toyota Corolla? Posted by Customer
    A:
    Remove the rear door glass run.
    Posted by ToyotaPartsNow Specialist
    See expert answers on similar Window Motor
    Q:
    What is the final step in the installation process for the front door for the 2009 Toyota Camry? Posted by Customer
    A:
    Install the front door lower frame bracket garnish and initialize the power window control system.
    Posted by ToyotaPartsNow Specialist
    See expert answers on similar Window Motor
    Q:
    What components follow the installation of the front door window regulator sub-assembly for the 2009 Toyota FJ Cruiser? Posted by Customer
    A:
    The front door glass sub-assembly, the front door window frame rear lower, and the front door lower frame bracket garnish.
    Posted by ToyotaPartsNow Specialist
    See expert answers on similar Window Motor
    Q:
    What is the final step in the removal process for the 2008 Toyota FJ Cruiser? Posted by Customer
    A:
    Remove the front door window regulator sub-assembly and then the power window regulator motor assembly.
    Posted by ToyotaPartsNow Specialist
    See expert answers on similar Window Motor
    Q:
    What additional components are installed after the initial set for the 2009 Toyota Matrix? Posted by Customer
    A:
    Rear door service hole cover (with power door lock), rear door inner glass weatherstrip, rear door inside handle sub-assembly, rear door trim board sub-assembly, rear door armrest upper base panel, and rear door inside handle bezel.
    Posted by ToyotaPartsNow Specialist
    See expert answers on similar Window Motor
    Q:
    What components are removed after the rear door guide seal for the 2009 Toyota Matrix? Posted by Customer
    A:
    Proceed to remove the rear door glass sub-assembly and the rear door window regulator sub-assembly.
    Posted by ToyotaPartsNow Specialist
    See expert answers on similar Window Motor
    Q:
    How do you remove the front power window regulator motor assembly for the 2008 Toyota Highlander? Posted by Customer
    A:
    Use a "TORX" driver (T25) to take out the 3 screws.
    Posted by ToyotaPartsNow Specialist
    See expert answers on similar Window Motor
    Q:
    What is the final step in the installation process for the 2008 Toyota Sequoia? Posted by Customer
    A:
    Install the back door trim board assembly, back door pull strap, back door strap cover, back door side garnish on both the left and right sides, and the back door center garnish.
    Posted by ToyotaPartsNow Specialist
    See expert answers on similar Window Motor
    Q:
    What is the procedure for installing the rear power window regulator motor assembly for the 2009 Toyota Highlander? Posted by Customer
    A:
    Ensure the regulator arm is below the intermediate position and use a "TORX" driver (T25) to secure it with 3 screws, torqued to 5.4 Nm (55 kgf-cm, 48 in-lbf).
    Posted by ToyotaPartsNow Specialist
    See expert answers on similar Window Motor
    Q:
    Does 2009 Toyota Tundra follow the same installation steps? Posted by Customer
    A:
    Yes, follow the same installation steps for the respective components.
    Posted by ToyotaPartsNow Specialist
    See expert answers on similar Window Motor
    Q:
    How many screws are used to install the motor and what is the torque specification for the 2009 Toyota Tundra? Posted by Customer
    A:
    Use 3 screws, torquing them to 5.4 Nm (55 kgf-cm, 48 in-lbf).
    Posted by ToyotaPartsNow Specialist
    See expert answers on similar Window Motor
    Q:
    What is the first step to install the power window regulator motor assembly for the hatchback front side for the 2008 Toyota Yaris? Posted by Customer
    A:
    Apply MP grease to the sliding and rotating areas of the regulator motor.
    Posted by ToyotaPartsNow Specialist
    See expert answers on similar Window Motor
    Q:
    What is the next step after removing the outside mouldings for the 2009 Toyota Sequoia? Posted by Customer
    A:
    Take off the back door glass outer weatherstrip assembly, the back door glass run, and the back door glass itself.
    Posted by ToyotaPartsNow Specialist
    See expert answers on similar Window Motor
    Q:
    What is the next step after removing the rear door inside handle bezel plug LH for the 2009 Toyota Tundra? Posted by Customer
    A:
    Remove the rear upper door armrest base panel LH.
    Posted by ToyotaPartsNow Specialist
    See expert answers on similar Window Motor
    Q:
    What tool is needed to secure the power window regulator motor for the 2010 Toyota Yaris? Posted by Customer
    A:
    A "Torx" socket wrench T25.
    Posted by ToyotaPartsNow Specialist
    See expert answers on similar Window Motor
    Q:
    What is the first step to install the power window regulator motor assembly for the hatchback front side for the 2009 Toyota Yaris? Posted by Customer
    A:
    First, apply MP grease to the sliding and rotating areas of the regulator motor.
    Posted by ToyotaPartsNow Specialist
    See expert answers on similar Window Motor
    Q:
    What is the final step in removing the back door power window motor for the 2008 Toyota Sequoia? Posted by Customer
    A:
    Remove the back door power window regulator assembly, followed by the power window regulator motor assembly on the right-hand side by removing the 3 nuts and the motor, then the 2 screws and the power window regulator base plate, and using needle nose pliers to remove the drum and wire guide from the motor, ensuring not to use a screwdriver or similar tool during this process.
    Posted by ToyotaPartsNow Specialist
    See expert answers on similar Window Motor
    Q:
    What is the next component to install after the front door window regulator sub-assembly LH for the 2008 Toyota Tundra? Posted by Customer
    A:
    The front door glass sub-assembly LH.
    Posted by ToyotaPartsNow Specialist
    See expert answers on similar Window Motor
    Q:
    What is installed after the rear door glass sub-assembly for the 2009 Toyota Yaris? Posted by Customer
    A:
    The rear door quarter window weatherstrip.
    Posted by ToyotaPartsNow Specialist
    See expert answers on similar Window Motor
    If you have any questions about this product, please don't hesitate to ask us. We will be happy to help you!

OEM Toyota 85710-AE010, Excellent Performance and Perfect Fitment

To ensure reliability, purchase Toyota part # 85710-AE010 Window Motor. It is sometimes referred to as Toyota Window Motor. OEM parts are unrivaled in terms of quality. They go through extensive quality control inspections and are produced in accordance with Toyota's official factory specifications. All of these remove defects and imperfections. So you can relax knowing they promise exceptional lifespan and flawless fitment.

ToyotaPartsNow.com is a leading supplier of genuine Toyota parts such as Toyota 85710AE010 Window Motor. At ToyotaPartsNow.com, we have a wide variety of OEM Toyota parts available at competitive prices. Our comprehensive range of genuine Toyota parts come with a manufacturer's warranty for peace of mind. We also prioritize customer satisfaction, providing a hassle-free return policy and expedited delivery for all our parts. For detailed Toyota parts information, click here.
Choose ToyotaPartsNow for discounted prices, exceptional service and fast delivery