×
ToyotaParts- Hello
- Login or Register
- Quick Links
- Live Chat
- Track Order
- Parts Availability
- RMA
- Help Center
- Contact Us
- Shop for
- Toyota Parts
- Scion Parts
My Garage
My Account
Cart
OEM Scion Door Handle
Inside Door Handle- Select Vehicle by Model
- Select Vehicle by VIN
Select Vehicle by Model
orMake
Model
Year
Select Vehicle by VIN
For the most accurate results, select vehicle by your VIN (Vehicle Identification Number).
151 Door Handles found


Scion Handle, Outside, Black, Front
Part Number: 69210-74030-C0$198.04 MSRP: $282.76You Save: $84.72 (30%)Ships in 1-3 Business DaysProduct Specifications- Other Name: Handle Assembly, Front Door; Exterior Door Handle, Front Outer; Handle Assembly, Front Door, Outside Passenger Side; Driver Side; Exterior Door Handle
- Position: Front
Scion Handle, Outside, Silver, Front
Part Number: 69210-74030-B0$197.81 MSRP: $282.42You Save: $84.61 (30%)Ships in 1-3 Business DaysProduct Specifications- Other Name: Handle Assembly, Front Door; Exterior Door Handle, Front Outer; Handle Assembly, Front Door, Outside Passenger Side; Driver Side; Exterior Door Handle
- Position: Front

Scion Handle, Outside, Blue, Driver Side
Part Number: 69220-52050-J2$105.69 MSRP: $148.35You Save: $42.66 (29%)Ships in 1-3 Business DaysProduct Specifications- Other Name: Handle Assembly, Front Door; Exterior Door Handle, Front Left Outer; Handle Assembly, Front Door Outside, Driver Side; Exterior Door Handle
- Manufacturer Note: DARK BLUE MC.,8P8
- Position: Driver Side

Scion Handle, Outside, Front
Part Number: 69210-74030-P3$163.67 MSRP: $231.69You Save: $68.02 (30%)Ships in 1-3 Business DaysProduct Specifications- Other Name: Handle Assembly, Front Door; Exterior Door Handle, Front Outer; Handle Assembly, Front Door, Outside Passenger Side; Driver Side; Exterior Door Handle
- Manufacturer Note: WIRELESS DOOR LOCK-W(PANIC) & W(SMART ENTRY:FRONT & BACK),DK. STEEL MC.,1H2
- Position: Front
Scion Handle, Outside, Blue, Front
Part Number: 69210-74030-J0$198.04 MSRP: $282.76You Save: $84.72 (30%)Ships in 1-3 Business DaysProduct Specifications- Other Name: Handle Assembly, Front Door; Exterior Door Handle, Front Outer; Handle Assembly, Front Door, Outside Passenger Side; Driver Side; Exterior Door Handle
- Position: Front
Scion Handle, Outside, White, Passenger Side
Part Number: 69210-52050-A1$89.69 MSRP: $125.90You Save: $36.21 (29%)Ships in 1-3 Business DaysProduct Specifications- Other Name: Handle Assembly, Front Door; Exterior Door Handle, Front Right Outer; Handle Assembly, Front Door, Outside Passenger Side; Exterior Door Handle
- Manufacturer Note: WHITE,068
- Position: Outside Passenger Side

Scion Handle, Outside, Black, Passenger Side
Part Number: 69230-20260-D1$105.28 MSRP: $147.77You Save: $42.49 (29%)Ships in 1-3 Business DaysProduct Specifications- Other Name: Handle Assembly, Rear Door; Exterior Door Handle, Rear Right Outer; Handle Assembly, Rear Door Outside, Passenger Side; Exterior Door Handle
- Manufacturer Note: BORDEAUX MC.,3P2
- Position: Passenger Side

Scion Handle, Outside, Light Blue, Front
Part Number: 69211-12220-R7$35.48 MSRP: $49.39You Save: $13.91 (29%)Ships in 1-3 Business DaysProduct Specifications- Other Name: Handle, Front Door, Outside; Exterior Door Handle, Front Outer, Rear Outer; Handle Assembly, Front Door, Outside Passenger Side; Rear Door Outside, Driver/Passenger Side.
- Manufacturer Note: BLUE ME.,8T4
- Position: Front

Scion Handle, Outside, Front
Part Number: 69210-33080-D3$40.86 MSRP: $56.87You Save: $16.01 (29%)Ships in 1-3 Business DaysProduct Specifications- Other Name: Handle Assembly, Front Door; Exterior Door Handle, Front Outer; Handle Assembly, Front Door, Outside Passenger Side; Driver Side; Exterior Door Handle
- Manufacturer Note: BORDEAUX MC.,3P2
- Position: Front
Scion Handle, Outside, Red, Front
Part Number: 69210-33080-D4$37.82 MSRP: $52.64You Save: $14.82 (29%)Ships in 1-3 Business DaysProduct Specifications- Other Name: Handle Assembly, Front Door; Exterior Door Handle, Front Outer; Handle Assembly, Front Door, Outside Passenger Side; Driver Side; Exterior Door Handle
- Manufacturer Note: SPECIAL EDITION,SUPER RED 5,3P0
- Position: Front
Scion Handle, Outside, Dark Blue, Front
Part Number: 69210-33080-J8$40.50 MSRP: $56.37You Save: $15.87 (29%)Ships in 1-3 Business DaysProduct Specifications- Other Name: Handle Assembly, Front Door; Exterior Door Handle, Front Outer, Rear Outer; Handle Assembly, Front Door, Outside Passenger Side; Driver Side; Exterior Door Handle
- Manufacturer Note: DK.BLUE MC.,8S6
- Position: Front
- Replaces: 69210-33080-J0
Scion Handle, Outside, White, Front
Part Number: 69211-74020-A1$36.20 MSRP: $50.38You Save: $14.18 (29%)Ships in 1-3 Business DaysProduct Specifications- Other Name: Handle, Front Door, Outside; Exterior Door Handle, Front Outer, Rear Outer; Handle Assembly, Front Door, Outside Passenger Side; Rear Door Outside, Driver/Passenger Side.
- Position: Front
Scion Handle, Outside, Red, Front
Part Number: 69210-33080-D7$44.32 MSRP: $61.69You Save: $17.37 (29%)Ships in 1-3 Business DaysProduct Specifications- Other Name: Handle Assembly, Front Door; Exterior Door Handle, Front Outer; Handle Assembly, Front Door, Outside Passenger Side; Driver Side; Exterior Door Handle
- Manufacturer Note: BLACKISH RED MC.,3R0
- Position: Front

Scion Handle, Outside, Blue
Part Number: SU003-01587$25.64 MSRP: $33.19You Save: $7.55 (23%)Ships in 1-3 Business DaysProduct Specifications- Other Name: Handle Out Door; Exterior Door Handle, Front Outer; Handle Assembly, Front Door, Outside Passenger Side; Driver Side; Exterior Door Handle
- Manufacturer Note: GALAXY BLUE SILICA,E8H
Scion Handle, Outside, White
Part Number: SU003-01593$25.64 MSRP: $33.19You Save: $7.55 (23%)Ships in 1-3 Business DaysProduct Specifications- Other Name: Handle Out Door; Exterior Door Handle, Front Outer; Handle Assembly, Front Door, Outside Passenger Side; Driver Side; Exterior Door Handle
- Manufacturer Note: SATIN WHITE PEARL,37J
Scion Handle, Outside, Silver, Front Outer
Part Number: SU003-05306$108.11 MSRP: $141.03You Save: $32.92 (24%)Ships in 1-3 Business DaysProduct Specifications- Other Name: Handle Out Door Smt; Exterior Door Handle, Front Outer; Handle Assembly, Front Door, Outside Passenger Side; Driver Side; Exterior Door Handle
- Manufacturer Note: ICE SILVER METALLIC,G1U
- Position: Front Outer
Scion Handle, Outside, Black, Passenger Side
Part Number: 69210-52050-D0$91.00 MSRP: $127.73You Save: $36.73 (29%)Product Specifications- Other Name: Handle Assembly, Front Door; Exterior Door Handle, Front Right Outer; Handle Assembly, Front Door, Outside Passenger Side; Exterior Door Handle
- Manufacturer Note: BORDEAUX MC.,3P2
- Position: Outside Passenger Side
- Product Specifications
- Other Name: Handle Assembly, Front Door; Exterior Door Handle, Front Right Outer; Handle Assembly, Front Door, Outside Passenger Side; Exterior Door Handle
- Manufacturer Note: DK.GRAYISH OLIVE ME,6M7
- Position: Outside Passenger Side
- Product Specifications
- Other Name: Handle Assembly, Front Door; Exterior Door Handle, Front Left Outer; Handle Assembly, Front Door Outside, Driver Side; Exterior Door Handle
- Manufacturer Note: DK.GRAYISH OLIVE ME,6M7
- Position: Driver Side
Scion Handle, Outside, Gray, Front
Part Number: 69210-33080-B5$44.32 MSRP: $61.69You Save: $17.37 (29%)Product Specifications- Other Name: Handle Assembly, Front Door; Exterior Door Handle, Front Outer; Handle Assembly, Front Door, Outside Passenger Side; Driver Side; Exterior Door Handle
- Manufacturer Note: DK.GRAY MC.,1E0
- Position: Front
| Page 1 of 8 |Next >
1-20 of 151 Results
Scion Door Handle
OEM parts deliver unmatched quality you can rely on. They pass extensive quality control inspections. Scion produces them to the official factory specifications. This process helps prevent defects and imperfections. So you can get exceptional lifespan and a flawless fit. Need new OEM Scion Door Handle? You'll love our wide selection of genuine options. Shop in minutes and skip the hunt. Our prices are unbeatable, you'll save time and money. It's easy to shop and find the right piece. Our committed customer service team gives professional help from start to finish. Every part includes a manufacturer's warranty. We ship quickly, your parts will arrive fast at your door.
Scion Door Handle unlocks the door easily, thus riders jump in or out without a hassle. The brand separated itself in the sea of beige, whereby they sold small cars in loud colors and maintained a simple pricing strategy to all. Scion invited young drivers to virtual parties such as the Scion City and restricted Release Series drops, which were mirrored of sneaker launching. Scion was the experimental laboratory of its parent company, trying out the tweaks and trim ideas of its infotainment systems and the new concept of trim, which were eventually rolled into mainstream units. Scion also caught more than a million first-time buyers before the badge was put to rest in 2016, but its rebel spirit still remains in showrooms. Its cars were customizable due to the ability of buyers to combine paint colors, audio options, and seat materials with a single click of a build tool. This freedom made a simple hatchback self-expression as a car to many first-time drivers. Door Handle connects the cabin with the street by pushing a lever unlatching the latch as soon as your fingers are pulled. Door Handle resists incessant pulling due to cast metal of high quality and an inner spring that winks thousands of times. Door Handle fits properly into the factory cutout without any rewiring, such that anyone with a screwdriver can replace it within a few minutes. Door Handle makes the locking mechanism reactive, and it translates to fast exits and tight security of all rides.
Scion Door Handle Parts and Q&A
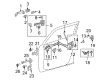
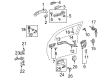
- Q: What is the step-by-step procedure for reassembling the front door and Door Handle after disassembly on Scion tC?A:Install the front door weather strip LH on its complementary locations while fixing all 17 clips with special attention to the two marked by arrows. Apply MP grease to the sliding areas of the front door check assembly LH then mount it to the door panel with 2 nuts tightened to 5.5 Nm. Afterwards secure the bolt to the body panel using adhesive (Part No. 08833-00070, Three Bond 1324 or equivalent) before tightening it to 30 Nm. Secure the two claws each that connect the front door outside handle pad both at the rear and at the front positions. To assemble the left-hand side front door lock outside handle frame you must install the front door lock open rod then apply MP grease before securing it with a T30 "Torx" socket wrench that should produce 4.0 Nm torque. The bellcrank lever should be pulled and held during installation of the front door handle assembly outside LH in order to protect it from getting damaged. Use new packing to finish securing the door lock assembly LH after engagement of the control rod and door lock connector connection with three screws (torque set at 5.0 Nm). Application of MP grease precedes this step. The front door outside handle cover LH requires installation with a T30 "Torx" socket wrench that applies 4.0 Nm of torque while using the hole plug. The installation requires a bolt (torque at 8.5 Nm) for the front door frame sub-assembly rear lower LH followed by a T25 "Torx" socket-wrenched (torque at 5.4 Nm) attachment of the power window regulator motor assembly LH front. Before installation apply window regulator grease then screw Bolt A loosely and insert the regulator into the door panel before torquing 5 bolts to 8.0 Nm. Install the front door glass sub-assembly LH while maintaining the proper glass run position and attach it to the window regulator using 2 bolts tightened to 8.0 Nm. Fasten the front door No. 1 stiffener cushion with 2 bolts as well as install the side air bag sensor assembly LH if equipped and a new front door service hole cover and make sure no wrinkles or folds remain visible. Connect each connector after which install the front door inside handle sub-assembly LH by moving the handle as specified while connecting the two cables. The service process includes installation of the front door glass weather strip inner LH component alongside the front No. 2 speaker assembly and the front No. 1 speaker assembly. Secure the outer rear view mirror assembly LH and then add the front door trim board sub-assembly LH while installing clips and screws. Begin by plugging in the front door inside handle bezel then fit the front armrest base panel along the upper LH side or RH accordingly before connecting all functional switches. Installation of the assist grip cover LH followed by the front door lower frame bracket garnish LH comes first then reconnect the negative battery terminal before inspecting the SRS warning light and performing initializations for systems which need battery reconnect.
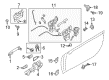
- Q: What is the step-by-step procedure for reassembling the front door and Door Handle on Scion xB?A:The assembly of the front door starts with attaching the cushion to its panel. The front door outside handle frame sliding areas require an application of MP grease before inserting the outside handle frame into position using a "TORX" socket wrench T30 which needs 4.0 Nm (41 kgf-cm, 35 in-lbf) torque to secure it properly. Use the two claws to fix the front pad on the front door outside handle of the door exterior followed by installation of the back pad. Insert the front door outside handle assembly into its designated place according to the indicated positions. The "TORX" socket wrench T30 must be used to install the front door outside handle cover at 4.0 Nm (41 kgf-cm, 35 in-lbf) while also inserting the hole plug. Before proceeding with the installation, attach the front door inside panel reinforcement rear extension using paired bolts that require 6.2 Nm (53 kgf-cm, 55 in-lbf) torque. After that, add the separation door stiffener cushion by screwing in one bolt set to 12 Nm (122 kgf-cm, 9 ft-lbf). The front door frame rear lower sub-assembly receives a bolt installed at 6.2 Nm (63 kgf-cm, 55 in-lbf) before clips activate the door frame garnish and the front door Weather Strip installs through 18 clips. First apply MP grease to the sliding components of the door check and install it onto the door panel with 2 bolts tightened to 5.5 Nm (56 kgf-cm, 49 in-lbf) before applying adhesive to the bolt threads which must be fastened to the body panel at 30 Nm (306 kgf-cm, 22 ft-lbf). Start by applying MP grease on the sliding and rotating sections then loosely install bolt A on the regulator before inserting it into the door panel. Next tighten bolt A temporarily and proceed to attach five bolts before fully tightening bolt A to a torque setting of 8.0 Nm (82 kgf-cm, 71 in-lbf) and making the connector connection. To install the front door glass run the operator should slide the door glass along the glass run and avoid damage and fix it to the window regulator through 2 bolts at 8.0 Nm (82 kgf-cm, 71 in-lbf). You should place butyl tape on the door panel before installing a new front door service hole cover which requires no wrinkles or folds and demands seal quality checks. Begin the installation process by adding the 2 screws to the rear door trim bracket and then continue with front door belt molding followed by the outer rear view mirror assembly, front No. 1 speaker assembly and front door glass inner Weather Strip. The installation of the front door inside handle involves engaging 2 claws before connecting front door lock remote control cable and inside locking cable. Then install the front door trim board with its 10 clips while tightening the screw. After attaching the front door inside handle bezel through three claws you can add the front No. 2 speaker assembly. To install the front door lower frame bracket garnish you need to engage the two claws and secure it with a clip while ensuring connector connection. Somewhat similar, hook the negative battery terminal connection cable with 5.4 Nm (55 kgf-cm, 48 in-lbf) torque.