×
ToyotaParts- Hello
- Login or Register
- Quick Links
- Live Chat
- Track Order
- Parts Availability
- RMA
- Help Center
- Contact Us
- Shop for
- Toyota Parts
- Scion Parts
My Garage
My Account
Cart
OEM Scion xB Door Handle
Inside Door Handle- Select Vehicle by Model
- Select Vehicle by VIN
Select Vehicle by Model
orMake
Model
Year
Select Vehicle by VIN
For the most accurate results, select vehicle by your VIN (Vehicle Identification Number).
36 Door Handles found


Scion xB Handle, Outside, Black, Front Driver Side
Part Number: 69220-52050-C0$83.33 MSRP: $116.97You Save: $33.64 (29%)Ships in 1-3 Business Days
Scion xB Handle, Outside, Blue, Passenger Side
Part Number: 69230-20260-J4$99.07 MSRP: $139.06You Save: $39.99 (29%)Ships in 1-3 Business DaysScion xB Handle, Outside, Black, Driver Side
Part Number: 69240-20260-D1$105.28 MSRP: $147.77You Save: $42.49 (29%)Ships in 1-3 Business DaysScion xB Handle, Outside, Blue, Passenger Side
Part Number: 69210-52050-J2$87.09 MSRP: $122.24You Save: $35.15 (29%)Ships in 1-3 Business DaysScion xB Handle, Outside, Black, Front Passenger Side
Part Number: 69210-52050-C0$89.69 MSRP: $125.90You Save: $36.21 (29%)Ships in 1-3 Business DaysScion xB Handle, Outside, Gray, Passenger Side
Part Number: 69230-20260-B2$109.72 MSRP: $154.01You Save: $44.29 (29%)Ships in 1-3 Business DaysScion xB Handle, Outside, Olive, Passenger Side
Part Number: 69230-20260-G3$110.07 MSRP: $154.51You Save: $44.44 (29%)Ships in 1-3 Business DaysScion xB Handle, Outside, Blue, Driver Side
Part Number: 69240-20260-J4$101.47 MSRP: $142.44You Save: $40.97 (29%)Ships in 1-3 Business DaysScion xB Handle, Outside, White, Passenger Side
Part Number: 69230-20260-A2$99.29 MSRP: $139.38You Save: $40.09 (29%)Ships in 1-3 Business DaysScion xB Handle, Outside, Gray, Driver Side
Part Number: 69240-20260-B2$101.79 MSRP: $142.89You Save: $41.10 (29%)Ships in 1-3 Business DaysScion xB Handle, Outside, Black, Rear Passenger Side
Part Number: 69230-20260-C0$94.39 MSRP: $132.48You Save: $38.09 (29%)Ships in 1-3 Business DaysScion xB Handle, Outside, White, Driver Side
Part Number: 69240-20260-A2$96.21 MSRP: $135.04You Save: $38.83 (29%)Ships in 1-3 Business DaysScion xB Handle, Outside, Gray, Passenger Side
Part Number: 69210-52050-B0$101.54 MSRP: $142.53You Save: $40.99 (29%)
Scion xB Handle, Outside, Blue, Front
Part Number: 69211-12220-V3$43.96 MSRP: $61.19You Save: $17.23 (29%)Ships in 1-3 Business DaysScion xB Handle, Outside, Front
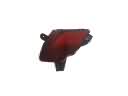
Part Number: 69211-12220-M2$35.36 MSRP: $49.21You Save: $13.85 (29%)Ships in 1-3 Business DaysScion xB Handle, Outside, Blackish Red, Front
Part Number: 69211-12220-Y2$36.20 MSRP: $50.38You Save: $14.18 (29%)Ships in 1-3 Business DaysScion xB Handle, Outside, Red, Front
Part Number: 69211-12220-X0$35.36 MSRP: $49.21You Save: $13.85 (29%)Ships in 1-3 Business DaysScion xB Handle, Outside, Front
Part Number: 69211-12220-K5$35.96 MSRP: $50.05You Save: $14.09 (29%)Ships in 1-3 Business DaysScion xB Handle, Outside, Orange, Front
Part Number: 69211-12220-M1$32.92 MSRP: $45.83You Save: $12.91 (29%)Ships in 1-3 Business DaysScion xB Handle, Outside, Bluish Silver, Front
Part Number: 69211-12220-S1$36.20 MSRP: $50.38You Save: $14.18 (29%)Ships in 1-3 Business Days
| Page 1 of 2 |Next >
1-20 of 36 Results
Scion xB Door Handle
Choose genuine Door Handle that pass strict quality control tests. You can trust the top quality and lasting durability. Shopping for OEM Door Handle for your Scion xB? Our website is your one-stop destination. We stock an extensive selection of genuine Scion xB parts. The price is affordable so you can save more. It only takes minutes to browse and find the exact fit. Easily add to cart and check out fast. Our hassle-free return policy will keep you stress-free. We process orders quickly for swift delivery. Your parts will arrive faster, so you can get back on the road sooner.
Among all the Scion xB parts and parts, the Scion xB Door Handle is indeed an essential part of every car that showcases dependability and functionality in terms of performance of the door handle. Being compatible with different xB models, this Door Handle is produced with the use of materials such as plastic or metal, offering users a rather heavy-duty handle that makes it easier for the latch to be turned. This comes out clearly in the successive generation of the Scion xB where its consistency underlines the basic function of complementing the main aspects because it optimizes efficiency and safety by providing easy access to drivers and passengers into the automobile. The Scion xB Door Handle is designed for high usage and environmental variability hence will provide any car owner with value for his/ her money. Specifically, the noted Scion xB has been highly acclaimed for its considerably small yet roomy design, and it is in this regard that the Door Handle contributes towards enhancing easy entry to the car's interior. Since the design look and feel of each xB model is different, some significantly so, the underlying mechanism of the Door Handle must remain consistent so as not to obfuscate the level of convenience that is offered to users. ALSO ANOTHER PART OF THE EXTERIOR TRIM IS THE Scion xb DOOR HANDLE WHICH ALSO AFFECTS THE SAFEETY RATINGS OF THIS CAR LET ALONE THE OVERALL SAFEETY THAT HAS BEEN GIVEN COMMENDING RATING IN THE SAFEETY TESTS. These characteristics of reliability, performance, and usability make the Scion xB Door Handle a competitive facet in the automotive industry in reference to the functional requisite of the Scion xB.
Scion xB Door Handle Parts and Q&A
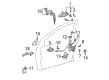
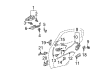
- Q: How to disassemble the front door handle on Scion xB?A:As a first step before disassembly of the front door handle you should disconnect the cable from the negative battery terminal and allow 90 seconds for Air Bag safety. You must remove the front door armrest base upper panel after disassembling the connector then extracting the screw and removing the 6 claws and 2 clips. Remove the front door lower frame bracket garnish by unfastening its 2 claws and clip and unplug the connector. Following the front No. 2 speaker assembly the technician should disassemble the front door inside handle bezel through three claw release mechanisms. The front door trim board sub-assembly requires unscrewing with disengagement of ten clips followed by separating the front Door Lock remote control cable and inside locking cable. The removal of the front door inside handle sub-assembly starts by dislodging its 2 claws. Move to the front door glass inner Weather Strip and then proceed with removing the front door No. 1 speaker assembly before handling the outer rear view mirror assembly followed by the front door belt moulding. Remove the front door trim bracket by fastener removal of two screws and eliminate the front door service hole cover by disconnecting connectors and clamps. The Power Window Switch needs to be temporarily installed on the front door glass until the two retaining bolts become visible before bolting removal so ensure the glass remains intact and damage-free. Following the indicated path of removal, operators should detach the front door glass and then the power window switch. Remove the front door glass run and window regulator sub-assembly by disconnecting the connector and loosening bolt A followed by removing the 5 bolts while paying attention to the safety of these components. You can remove the front door check assembly after taking out its 3 bolts while avoiding damage to the components. Seventeen clips need to be opened to detach the front door Weather Strip before removing the door frame garnish by unclipping it. Safely disconnect the front door frame rear lower sub-assembly by untightening its bolt until it becomes loose. You can remove the front door stiffener cushion by undoing its bolt then you should unwrap the rear extension of front door inside panel reinforcement by unfastening the two bolts. You can remove the front door outside handle cover by first taking out the hole plug followed by unscrewing the screw with a "TORX" socket wrench T30 then removing the cover. Unscrew the front door lock assembly followed by taking out the front door outside handle assembly by removing it according to the marked direction. The next step requires you to remove the front door outside handle rear pad after separating its 2 claws and following with the front door outside handle front pad. Close the "TORX" socket wrench T30 onto the front door outside handle frame sub-assembly screw before sliding to remove the assembly and retrieving the door panel cushion.
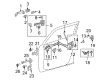
- Q: What is the step-by-step procedure for reassembling the front door and Door Handle on Scion xB?A:The assembly of the front door starts with attaching the cushion to its panel. The front door outside handle frame sliding areas require an application of MP grease before inserting the outside handle frame into position using a "TORX" socket wrench T30 which needs 4.0 Nm (41 kgf-cm, 35 in-lbf) torque to secure it properly. Use the two claws to fix the front pad on the front door outside handle of the door exterior followed by installation of the back pad. Insert the front door outside handle assembly into its designated place according to the indicated positions. The "TORX" socket wrench T30 must be used to install the front door outside handle cover at 4.0 Nm (41 kgf-cm, 35 in-lbf) while also inserting the hole plug. Before proceeding with the installation, attach the front door inside panel reinforcement rear extension using paired bolts that require 6.2 Nm (53 kgf-cm, 55 in-lbf) torque. After that, add the separation door stiffener cushion by screwing in one bolt set to 12 Nm (122 kgf-cm, 9 ft-lbf). The front door frame rear lower sub-assembly receives a bolt installed at 6.2 Nm (63 kgf-cm, 55 in-lbf) before clips activate the door frame garnish and the front door Weather Strip installs through 18 clips. First apply MP grease to the sliding components of the door check and install it onto the door panel with 2 bolts tightened to 5.5 Nm (56 kgf-cm, 49 in-lbf) before applying adhesive to the bolt threads which must be fastened to the body panel at 30 Nm (306 kgf-cm, 22 ft-lbf). Start by applying MP grease on the sliding and rotating sections then loosely install bolt A on the regulator before inserting it into the door panel. Next tighten bolt A temporarily and proceed to attach five bolts before fully tightening bolt A to a torque setting of 8.0 Nm (82 kgf-cm, 71 in-lbf) and making the connector connection. To install the front door glass run the operator should slide the door glass along the glass run and avoid damage and fix it to the window regulator through 2 bolts at 8.0 Nm (82 kgf-cm, 71 in-lbf). You should place butyl tape on the door panel before installing a new front door service hole cover which requires no wrinkles or folds and demands seal quality checks. Begin the installation process by adding the 2 screws to the rear door trim bracket and then continue with front door belt molding followed by the outer rear view mirror assembly, front No. 1 speaker assembly and front door glass inner Weather Strip. The installation of the front door inside handle involves engaging 2 claws before connecting front Door Lock remote control cable and inside locking cable. Then install the front door trim board with its 10 clips while tightening the screw. After attaching the front door inside handle bezel through three claws you can add the front No. 2 speaker assembly. To install the front door lower frame bracket garnish you need to engage the two claws and secure it with a clip while ensuring connector connection. Somewhat similar, hook the negative battery terminal connection cable with 5.4 Nm (55 kgf-cm, 48 in-lbf) torque.