×
ToyotaParts- Hello
- Login or Register
- Quick Links
- Live Chat
- Track Order
- Parts Availability
- RMA
- Help Center
- Contact Us
- Shop for
- Toyota Parts
- Scion Parts
My Garage
My Account
Cart
OEM Scion xB Door Lock
Power Door Lock Actuator- Select Vehicle by Model
- Select Vehicle by VIN
Select Vehicle by Model
orMake
Model
Year
Select Vehicle by VIN
For the most accurate results, select vehicle by your VIN (Vehicle Identification Number).
11 Door Locks found


Scion xB Lock Actuator, Driver Side Part Number: 69040-42250
$289.61 MSRP: $413.49You Save: $123.88 (30%)Ships in 1-2 Business Days


Scion xB Lock Actuator, Passenger Side Part Number: 69030-42230
$267.82 MSRP: $382.39You Save: $114.57 (30%)Ships in 1-2 Business Days

Scion xB Lock Actuator, Driver Side Part Number: 69040-0C050
$255.24 MSRP: $364.43You Save: $109.19 (30%)

Scion xB Gate Lock, Rear Part Number: 69350-28151
$184.99 MSRP: $264.12You Save: $79.13 (30%)Ships in 1 Business Day


Scion xB Lock Actuator, Driver Side Part Number: 69060-06100
$264.21 MSRP: $377.23You Save: $113.02 (30%)Ships in 1-3 Business Days

Scion xB Lock Assembly, Passenger Side Part Number: 69330-52041
$128.30 MSRP: $181.62You Save: $53.32 (30%)Ships in 1-3 Business Days

Scion xB Lock Assembly, Passenger Side Part Number: 69310-52290
$177.65 MSRP: $253.65You Save: $76.00 (30%)Ships in 1-3 Business Days

Scion xB Lock Actuator, Passenger Side Part Number: 69050-06100
$266.42 MSRP: $380.40You Save: $113.98 (30%)Ships in 1-2 Business DaysScion xB Lock Assembly, Driver Side Part Number: 69320-52270
$177.65 MSRP: $253.65You Save: $76.00 (30%)Ships in 1-3 Business Days
Scion xB Lock Assembly, Rear Part Number: 69350-52100
$276.56 MSRP: $394.86You Save: $118.30 (30%)Ships in 1-3 Business DaysScion xB Lock Assembly, Driver Side Part Number: 69340-52041
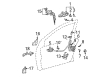
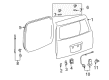
Scion xB Door Lock
Choose genuine Door Lock that pass strict quality control tests. You can trust the top quality and lasting durability. Shopping for OEM Door Lock for your Scion xB? Our website is your one-stop destination. We stock an extensive selection of genuine Scion xB parts. The price is affordable so you can save more. It only takes minutes to browse and find the exact fit. Easily add to cart and check out fast. Our hassle-free return policy will keep you stress-free. We process orders quickly for swift delivery. Your parts will arrive faster, so you can get back on the road sooner.
Door Lock is one of such parts that entered the history of the automobile, proving that Scion is a reliable car with excellent performance and safety for passengers. Meant for a range of xB models, the available Door Lock has special mechanisms like power door locks and automatic remote keyless entry that not only lets the user lock and unlock all doors at once with a twist of a switch or press of a button on a keyless fob. This change in door lock system symbolises the Scion's efforts towards enhancing the experience behind the wheels as latest systems can trigger locking even if the car is in gear or reaches a certain speed in addition to unlocking when the engine is turned on. Specifically, such innovations can greatly improve the efficiency of the Scion xB car's door locks and at the same time enhance passenger protection. In particular, the primary specialization of the Door Lock in terms of reliability that won its customer's trust in the automotive market. XB model compatibility guarantees Scion xB owners equal security and performance standards, thus the Door Lock is a crucial feature enhancing the car's appeal and usability. Therefore the Door Lock is an example of how the Scion brand carries the company's promise of quality, safety and ease of use.
Scion xB Door Lock Parts and Q&A
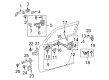
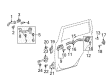
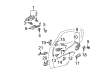
- Q: How to install the rear door lock on Scion xB?A:The first step for rear door lock installation involves replacing the door lock connecting part packing with new material unless reusing a previously removed door lock while maintaining a clean surface condition without grease or dirt on the packing material. For the front door lock apply MP grease to all sliding and rotating components followed by installing the rear door inside locking cable which requires pressing in the three claws to secure the cover. The next stage requires installation of the rear door lock remote control cable during which you should engage the claw followed by closing the cover. A new door lock wire harness seal should be positioned on the rear door lock before placing it into the rear door outside handle release plate and fixing it to the rear door panel while ensuring the rear door outside handle frames lock into place. Place Toyota Genuine Adhesive 1324, Three Bond 1324 or equivalent on screws' threads before tightening the rear door lock with 3 screws using a "TORX" T30 socket wrench to 5.0 Nm (51 kgf-cm, 44 in-lbf). Connect the connector, then proceed to install the rear door window regulator sub-assembly, rear door glass sub-assembly, rear door quarter window Weather Strip, rear door window division bar sub-assembly, rear door glass run, rear door belt moulding assembly, rear door Weather Strip, rear door check assembly, rear door service hole cover, rear door trim bracket, rear door glass inner Weather Strip, rear door trim board sub-assembly, rear door inside handle bezel, and rear door armrest base upper panel. Attach the cable to the negative battery terminal while tightening it to 5.4 Nm (55 kgf-cm, 48 in-lbf).
- Q: How to install the front door lock on Scion xB?A:The first step for installing the front door lock involves replacing packing in the connecting part with fresh packing while making sure the packing surface remains free from dirt and grease. First spread MP grease onto the sliding and rotating areas of the front door lock before installing the front door inside locking cable which requires the 3 claws to be engaged while closing the covering. The next step involves installation of front door lock remote control cables as well as new door lock wire harness seals onto the front door lock. The front door lock open rod should be inserted into its respective opening followed by adjustment to the front door outside handle frame. Make sure the connection remains secure. Torque the 3 front door lock screws by using a "TORX" socket wrench T30 tool after adhering their threads with Toyota Genuine Adhesive 1324 or Three Bond 1324 or equivalent. Maintain constant torque at 5.0 Nm (51 kgf-cm, 44 in-lbf). Connect the connector, then proceed to install the front door outside handle cover, separation door stiffener cushion, front door frame rear lower sub-assembly, front door window regulator sub-assembly, front door glass run, front door glass sub-assembly, front door service hole cover, front door trim bracket, front door belt moulding assembly, outer rear view mirror assembly, front door glass inner Weather Strip, front door trim board sub-assembly, front door inside handle bezel, front door lower frame bracket garnish, and front armrest base upper panel. Connect the negative cable to the battery terminal with 5.4 Nm torque specified as 55 kgf-cm strength and 48 in-lbf force.


Related Scion xB Parts
 Scion xB Clock Spring
 Scion xB Fuse Box
 Scion xB Relay
 Scion xB Air Bag Sensor
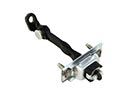 Scion xB Door Check
 Scion xB Door Hinge
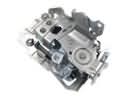 Scion xB Door Latch Assembly
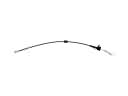 Scion xB Door Latch Cable
 Scion xB Door Lock Cylinder
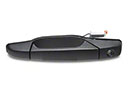 Scion xB Exterior Door Handle
 Scion xB Interior Door Handle
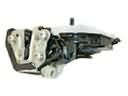 Scion xB Rear Passenger Door Handle Latch