×
ToyotaParts- Hello
- Login or Register
- Quick Links
- Live Chat
- Track Order
- Parts Availability
- RMA
- Help Center
- Contact Us
- Shop for
- Toyota Parts
- Scion Parts
My Garage
My Account
Cart
OEM Scion xB Window Motor
Window Lift Motor- Select Vehicle by Model
- Select Vehicle by VIN
Select Vehicle by Model
orMake
Model
Year
Select Vehicle by VIN
For the most accurate results, select vehicle by your VIN (Vehicle Identification Number).
6 Window Motors found


Scion xB Window Motor Part Number: 85720-AE010
$316.64 MSRP: $452.09You Save: $135.45 (30%)Ships in 1-2 Business Days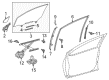
Scion xB Window Motor Part Number: 85710-AE010
$316.64 MSRP: $452.09You Save: $135.45 (30%)Ships in 1-2 Business Days
Scion xB Window Motor Part Number: 85720-32160
$316.64 MSRP: $452.09You Save: $135.45 (30%)Ships in 1-3 Business Days
Scion xB Window Motor, Driver Side Part Number: 85710-52090
$316.64 MSRP: $452.09You Save: $135.45 (30%)Ships in 1-3 Business Days
Scion xB Window Motor Part Number: 85710-32190
$349.02 MSRP: $498.32You Save: $149.30 (30%)Ships in 1-3 Business DaysScion xB Window Motor, Passenger Side Part Number: 85720-52080
$316.64 MSRP: $452.09You Save: $135.45 (30%)Ships in 1-3 Business Days
Scion xB Window Motor
Choose genuine Window Motor that pass strict quality control tests. You can trust the top quality and lasting durability. Shopping for OEM Window Motor for your Scion xB? Our website is your one-stop destination. We stock an extensive selection of genuine Scion xB parts. The price is affordable so you can save more. It only takes minutes to browse and find the exact fit. Easily add to cart and check out fast. Our hassle-free return policy will keep you stress-free. We process orders quickly for swift delivery. Your parts will arrive faster, so you can get back on the road sooner.
The Window Motor is indeed one of the most effective and reliable parts that depict the competency of cars in market. Appealing to the Scion xB owners, this window motor enables the regulation of the car windows and opening or closing them depending on the owners' preference within a single touch of the button. Its compatibility transcends the various xB models thus consumers of the two generations could benefit immensely from its sturdy workmanship. This switch is used alongside the window motor and it sends an electric current to the window regulator for it to work orderly. This goes a long way in making the driving experience much more enjoyable and also increases safety by permitting fast adjustments of the position of the windows should the weather change. It is a very durable component, but to avoid damage, constant checking is vital so that it does not develop problems such as slow movement or inability to function. To ensure optimum performance of the Scion xB, replacement is advised to be done at the right time using superior quality parts. Of course, it is vital to recognize the features of the Window Motor: this part is quite durable and very easy to install, which is why it is used by many xB lovers. Hailed for its dependability the Window Motor is an important factor of the car as it helps to keep the Scion xB vehicle running and safe making it a mainstay in Scion xB car models.
Scion xB Window Motor Parts and Q&A
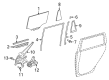
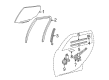
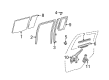
- Q: How to install the rear and front Window Motor assemblies on Scion xB?A:The start of rear power window regulator motor assembly installation includes applying MP grease to the sliding and rotating parts before attaching it with 3 T25 TORX socket wrench screws at 5.4 Nm (55 kgf-cm, 48 in-lbf). Once installed, position the rear door quarter window Weather Strip followed by the rear door glass sub-assembly and the rear door window division bar sub-assembly that needs 2 bolts and a screw tight at 6.2 Nm (63 kgf-cm, 54 in-lbf). After installing the rear door Weather Strip the repair sequence requires the sequence of adding the rear door glass run followed by the rear door service hole cover then the rear door trim bracket before moving onto the rear door trim board sub-assembly afterward installing the rear door inside handle bezel and the rear door armrest base upper panel. After applying MP grease to the front power window regulator motor assembly's sliding and rotating parts, install it with three TORX T25 socket wrench T25 screws into the motor assembly front where they should receive a torque of 5.4 Nm (55 kgf-cm, 48 in-lbf). Follow this order during installation of the front door window regulator sub-assembly along with the front door glass sub-assembly, the front door service hole cover, and the front door trim bracket, front door trim board sub-assembly, front door inside handle bezel, front door lower frame bracket garnish before moving on to the front armrest base upper panel. Complete the procedure by linking the cable to the negative battery terminal while tightening it to 5.4 Nm strength (55 kgf-cm, 48 in-lbf).
- Q: How to remove the Window Motor from both the RH and LH sides on Scion xB?A:The first step to extract both power window regulator motors is disconnecting the negative battery terminal cable. Start by taking off the series of components including the front armrest base upper panel, front door lower frame bracket garnish, front door inside handle bezel, front door trim board sub-assembly, front door trim bracket, and front door service hole cover and front door glass sub-assembly. When replacing the front power window regulator motor assembly you must first use a "TORX" socket wrench T25 to remove all 3 screws securing the motor assembly. Step following this is to remove the front door window regulator sub-assembly together with the front power window regulator motor assembly. Prerequisite steps for accessing the rear door involve disassembly of the rear door armrest base upper panel followed by removal of the rear door inside handle bezel, rear door trim board sub-assembly, rear door trim bracket and rear door service hole cover, rear door glass run. After detaching the rear window Weather Strip you can reach the rear door window division bar bolts and screw to remove them safely. The sequence requires removal of the rear door quarter window Weather Strip followed by the rear door glass sub-assembly before dismantling the rear door window regulator sub-assembly and finishing with the removal of the rear power window regulator motor assembly using the same "TORX" socket wrench T25 to take out the 3 screws.


Related Scion xB Parts
 Scion xB Seat Covers
 Scion xB Armrest
 Scion xB Cigarette Lighter
 Scion xB Door Lock Actuator
 Scion xB Sunroof
 Scion xB Window Regulator
 Scion xB Door Seal
 Scion xB Floor Pan
 Scion xB Instrument Panel Light Bulb
 Scion xB Power Window Switch
 Scion xB Weather Strip
 Scion xB Window Run
Browse Scion xB Window Motor by Years
2015
2014
2013
2012
2011
2010
2009
2008
2006
2005
2004