×
ToyotaParts- Hello
- Login or Register
- Quick Links
- Live Chat
- Track Order
- Parts Availability
- RMA
- Help Center
- Contact Us
- Shop for
- Toyota Parts
- Scion Parts
My Garage
My Account
Cart
OEM Scion Window Motor
Window Lift Motor- Select Vehicle by Model
- Select Vehicle by VIN
Select Vehicle by Model
orMake
Model
Year
Select Vehicle by VIN
For the most accurate results, select vehicle by your VIN (Vehicle Identification Number).
17 Window Motors found


Scion Window Motor Part Number: 85720-AE010
$316.64 MSRP: $452.09You Save: $135.45 (30%)Ships in 1-2 Business DaysProduct Specifications- Other Name: Motor Assembly, Power Window Regulator; Motor, Center Left, Front Left, Rear Left, Rear Right; Door Lock Actuator; Motor; Power Window Regulator Assembly for Front Driver, Passenger, and Driver Side.
- Replaces: 85720-35140


Scion Window Motor Part Number: 85710-42070
$316.64 MSRP: $452.09You Save: $135.45 (30%)Ships in 1-2 Business DaysProduct Specifications- Other Name: Motor Assembly, Power Window Regulator; Power Window Motor, Front Right, Rear Left, Rear Right; Door Lock Actuator Motor; Motor; Power Window Regulator Assemblies for Passenger and Driver Side.


Scion Window Motor, Driver Side Part Number: 85720-WB001
$43.35 MSRP: $60.35You Save: $17.00 (29%)Ships in 1-2 Business DaysProduct Specifications- Other Name: Motor Assembly, Power Window Regulator; Power Window Motor, Front Left; Motor Assembly, Power Window Regulator, Driver Side; Power Window Motor
- Position: Driver Side

Scion Window Motor, Passenger Side Part Number: SU003-01602
$154.52 MSRP: $203.44You Save: $48.92 (25%)Ships in 1-3 Business DaysProduct Specifications- Other Name: Motor Assembly Front Right-Hand; Power Window Motor, Front Right, Right; Motor; Motor Assembly, Power Window Regulator, Passenger Side
- Position: Passenger Side
Scion Window Motor Part Number: 85710-AE010
$316.64 MSRP: $452.09You Save: $135.45 (30%)Ships in 1-2 Business DaysProduct Specifications- Other Name: Motor Assembly, Power Window Regulator; Center Right, Front Right, Rear Left, Rear Right, Right; Motor; Power Window Regulator Assembly for Front Passenger, Driver, and Passenger Side.
- Replaces: 85710-35180

Scion Window Motor, Driver Side Part Number: 85720-WB002
$43.35 MSRP: $60.35You Save: $17.00 (29%)Ships in 1-3 Business DaysProduct Specifications- Other Name: Motor Assembly, Power Window Regulator; Power Window Motor, Rear Left; Motor Assembly, Power Window Regulator, Driver Side
- Position: Driver Side
Scion Window Motor, Driver Side Part Number: SU003-01603
$154.52 MSRP: $203.44You Save: $48.92 (25%)Ships in 1-2 Business DaysProduct Specifications- Other Name: Motor Assembly Front Left-Hand; Power Window Motor, Front Left, Left; Motor; Motor Assembly, Power Window Regulator, Driver Side
- Position: Driver Side

Scion Window Motor Part Number: 85720-AE020
$357.85 MSRP: $524.44You Save: $166.59 (32%)Ships in 1-3 Business DaysProduct Specifications- Other Name: Motor Assembly, Power Window Regulator; Power Window Motor, Front Left, Rear Right; Door Lock Actuator Motor; Motor Assembly, Power Window Regulator, Passenger Side; Driver Side; Power Window Motor
- Replaces: 85720-58010

Scion Window Motor, Driver Side Part Number: 85720-21050
$407.34 MSRP: $596.96You Save: $189.62 (32%)Ships in 1-3 Business DaysProduct Specifications- Other Name: Motor Assembly, Power Window Regulator; Power Window Motor, Front Left, Left; Motor Assembly, Power Window Regulator, Driver Side
- Position: Driver Side
Scion Motor Assembly, Power Window Regulator, Passenger Side Part Number: 85710-0E010
$408.36 MSRP: $598.46You Save: $190.10 (32%)Ships in 1-3 Business DaysProduct Specifications- Other Name: Motor Assembly, Power Window Regulator, Driver Side; Door Lock Actuator; Window Motor
- Replaces: 85710-58010

Scion Window Motor, Passenger Side Part Number: 85720-52080
$316.64 MSRP: $452.09You Save: $135.45 (30%)Ships in 1-3 Business DaysProduct Specifications- Other Name: Motor Assembly, Power Window Regulator; Power Window Motor, Rear Right; Motor Assembly, Power Window Regulator, Passenger Side
- Position: Passenger Side

Scion Window Motor Part Number: 85720-32160
$316.64 MSRP: $452.09You Save: $135.45 (30%)Ships in 1-3 Business DaysProduct Specifications- Other Name: Motor Assembly, Power Window Regulator; Power Window Motor, Front Left, Rear Right; Motor Assembly, Power Window Regulator, Passenger Side; Motor Assembly, Power Window Regulator, Driver Side

Scion Window Motor Part Number: 85720-32150
$316.64 MSRP: $452.09You Save: $135.45 (30%)Ships in 1-2 Business DaysProduct Specifications- Other Name: Motor Assembly, Power Window Regulator; Power Window Motor, Front Left, Rear Left, Rear Right; Motor; Power Window Regulator Assemblies for Passenger and Driver Side.
Scion Window Motor, Driver Side Part Number: 85710-52090
$316.64 MSRP: $452.09You Save: $135.45 (30%)Ships in 1-3 Business DaysProduct Specifications- Other Name: Motor Assembly, Power Window Regulator; Power Window Motor, Rear Left; Motor Assembly, Power Window Regulator, Driver Side
- Position: Driver Side

Scion Window Motor, Driver Side Part Number: 85720-12360
$338.07 MSRP: $482.69You Save: $144.62 (30%)Ships in 1-3 Business DaysProduct Specifications- Other Name: Motor Assembly, Power Window Regulator; Power Window Motor, Front Left; Motor Assembly, Power Window Regulator, Driver Side
- Position: Driver Side

Scion Window Motor Part Number: 85710-32190
$349.02 MSRP: $498.32You Save: $149.30 (30%)Ships in 1-3 Business DaysProduct Specifications- Other Name: Motor Assembly, Power Window Regulator; Power Window Motor, Front Right, Rear Left; Motor Assembly, Power Window Regulator, Passenger Side; Motor Assembly, Power Window Regulator, Driver Side
Scion Window Motor, Passenger Side Part Number: 85710-WB001
$43.35 MSRP: $60.35You Save: $17.00 (29%)Ships in 1-2 Business DaysProduct Specifications- Other Name: Motor Assembly, Power Window Regulator; Power Window Motor, Front Right, Rear Right; Motor Assembly, Power Window Regulator, Passenger Side; Power Window Motor
- Position: Passenger Side
Scion Window Motor
OEM parts deliver unmatched quality you can rely on. They pass extensive quality control inspections. Scion produces them to the official factory specifications. This process helps prevent defects and imperfections. So you can get exceptional lifespan and a flawless fit. Need new OEM Scion Window Motor? You'll love our wide selection of genuine options. Shop in minutes and skip the hunt. Our prices are unbeatable, you'll save time and money. It's easy to shop and find the right piece. Our committed customer service team gives professional help from start to finish. Every part includes a manufacturer's warranty. We ship quickly, your parts will arrive fast at your door.
Scion Window Motor allows each driver to raise or lower the glass immediately to ensure that cabins are calm and closed. In 2003, Scion grabbed the attention of young people by throwing dirty dealer discourse and opening up a neon-lit virtual city, where rides were purchased by avatars in a virtual shop. The shop window atmosphere was comparable to concerts that made the small Release Series drops seem more like a headline cultural experience that deterred product and life together. Scion pushed aside bargaining with no-haggle pricing, followed by pouring on fresh oranges, blues, and purples to get proud new owners to flaunt a unique commuter. The experimental division also multiplied as Toyota testbed proved new sales gimmicks and techno gadgets as the parent brand gazed and learned at a safe distance. Scion sold over 1,000,000 machines with buyers who made a purchase as first-time buyers into bigger showrooms with wallets already open. Each door has Window Motor connected directly to switch and 12-volt feed to provide split-second torque by way of stubby worm gear and balanced armature that is employed to flatten voltage dips. The Window Motor powers the regulator track in a linear motion without any jerks that may break glass or break seals. Thousands of hot or icy cycles later, Window Motor remains cool due to low-draw windings that reduce heat and nylon friction killers. The driver presses the button, Window Motor responds before the eyes are shifted back to mirrors and the focus is on the traffic but not the hardware. That is the spirit of responsiveness that is reminiscent of the original Scion promise of youth-friendly speed and control.
Scion Window Motor Parts and Q&A
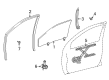
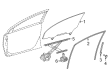
- Q: How to service and repair the power window motor on Scion tC?A:Service and repair of the power window motor starts with disconnecting the battery cable from the negative terminal while waiting 90 seconds to stop Air Bag activation. Detach the clip and claw holding the front door lower frame bracket garnish LH by scraping it with a screwdriver whose tip needs to be taped beforehand. You must remove 11 claws to detach the assist grip cover LH and then approach the front armrest base panel upper LH by uninstalling a clip and 5 claws and disconnecting the switch connector and taking out 3 screws from the window regulator master switch. The same techniques should be applied to detach and reinstall the armrest base panel upper RH on the passenger's side. In order to remove the front door inside handle bezel plug and the front door trim board sub-assembly LH you need to first apply protective tape before unbolting 3 screws and unplugging 9 clips to gradually pull out the trim without damaging pins. The detachment of both the front door inside handle sub-assembly LH requires removing 3 cables and disconnecting the claw from the outer rear view mirror assembly LH together with the front door belt moulding LH as well as the front No. 1 and No. 2 speaker assemblies and front door glass Weather Strip inner LH. You must remove the two bolts from the front door service hole cover LH, side Air Bag sensor assembly LH and front door No. 1 stiffener cushion. You must install either the window regulator master switch or power window regulator switch for temporary use on the front door glass sub-assembly LH before accessing 2 bolts with glass movement for subsequent glass removal with care. The procedure to remove the front door window regulator sub-assembly LH requires disconnecting the connector followed by bolt A loosening and removal of 5 bolts. Use a T25 TORX socket wrench to decompose the power window regulator motor assembly LH front through matchmark placement followed by the removal of three screws and the motor. The procedure starts with removing the sub-assembly rear bottom bolt then moving to take out the hole plug to loosen the screw of the outside handle cover LH using a T30 "TORX" socket wrench. Placing the bellcrank lever under control will prevent damage during the removal process while using a T30 "TORX" socket wrench to remove 3 screws from the front door lock assembly LH. Once the screws are removed you can pull and slide the front door handle assembly outside LH from its position. Detach the lock control rod after using a T25 "TORX" socket wrench to remove the screw from the front door outside handle frame sub-assembly LH and compressing the clip to separate the frame. The procedure to disassemble the front door exterior handle pads requires 2 claw removal for each piece while the front door check assembly LH requires bolt and nut removal along with removal of 2 clips and 17 clips using a clip remover for the front door Weather Strip LH. Any damage to the clips requires replacement.
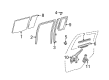
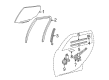
- Q: How to remove the Window Motor on Scion xB?A:The first step to remove the power window regulator motor is connecting the negative battery terminal's cable. To access the power window regulator motor on the RH side first separate the front armrest base upper panel, front door lower frame bracket garnish, front door inside handle bezel, front door trim board sub-assembly, front door trim bracket, front door service hole cover, and front door glass sub-assembly. The next step requires uninstallation of the front door window regulator sub-assembly. A person should utilize a "TORX" socket wrench T25 to remove the 3 screws which secure the front power window regulator motor assembly. The following steps expose the rear door: start by taking away the rear door armrest base upper panel followed by the rear door inside handle bezel before reaching the rear door trim board sub-assembly and rear door trim bracket then the rear door service hole cover and lastly the rear door glass run. The rear window Weather Strip needs removal to expose the screw which reaches the upper section of the rear door window division bar. The 2 bolts and screw must be properly dislodged to detach the bar keeping the rear door window in place. Handle the division bar carefully to prevent any damage. Start by eliminating the rear door quarter window Weather Stripping followed by the removal of rear door glass sub-assembly and rear door window regulator sub-assembly. The "TORX" socket wrench T25 should be used to uninstall the 3 screws which maintain the rear power window regulator motor assembly.