×
ToyotaParts- Hello
- Login or Register
- Quick Links
- Live Chat
- Track Order
- Parts Availability
- RMA
- Help Center
- Contact Us
- Shop for
- Toyota Parts
- Scion Parts
My Garage
My Account
Cart
OEM Scion xD Window Motor
Window Lift Motor- Select Vehicle by Model
- Select Vehicle by VIN
Select Vehicle by Model
orMake
Model
Year
Select Vehicle by VIN
For the most accurate results, select vehicle by your VIN (Vehicle Identification Number).
3 Window Motors found


Scion xD Window Motor Part Number: 85720-AE010
$316.64 MSRP: $452.09You Save: $135.45 (30%)Ships in 1-2 Business Days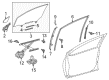
Scion xD Window Motor Part Number: 85710-AE010
$316.64 MSRP: $452.09You Save: $135.45 (30%)Ships in 1-2 Business Days
Scion xD Window Motor Part Number: 85720-AE020
$357.85 MSRP: $524.44You Save: $166.59 (32%)Ships in 1-3 Business Days
Scion xD Window Motor
Choose genuine Window Motor that pass strict quality control tests. You can trust the top quality and lasting durability. Shopping for OEM Window Motor for your Scion xD? Our website is your one-stop destination. We stock an extensive selection of genuine Scion xD parts. The price is affordable so you can save more. It only takes minutes to browse and find the exact fit. Easily add to cart and check out fast. Our hassle-free return policy will keep you stress-free. We process orders quickly for swift delivery. Your parts will arrive faster, so you can get back on the road sooner.
Scion xD Window Motor is one of the crucial parts of the Scion xD; this product came in the market reflecting the reliability and performance depicting the overall beauty of Scion xD automobiles. The following window motor has been engineered to enable the driver and passengers to open or close the windows and have control of the natural flowing air together with an acting shelter simply by the push of a button. The conversion is smooth as it combines well with the window switch in order to facilitate movement, thus improve on the comfort as well as safety of the car users during their travels. The Scion xD Window Motor is an excellent product because it fits different xD models and keeps customer's car as functional as possible. The motor of the window, like any moving part is a specific component that needs constant maintenance since frequent use exposes it to wear out hence the inability to move as it used to or complete stoppage. This paper aims to establish that conditions which affect the window motor will remove stress and improve the entire driving experience. The Scion xD comes with additional features of power locks and anti-lock brake system making the window motor vital in enhancing the car's efficiency as well as safety. Also, the Scion xD Window Motor boasts of superior quality which means that replacement units are of the superior quality of the part as was originally manufactured. Scion brand's focus on reliability and power makes Scion xD Window Motor part of the car's luxury to fuel an enjoyable ride.
Scion xD Window Motor Parts and Q&A
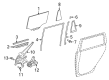
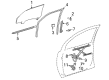
- Q: How to remove the Window Motor from both the RH and LH sides on Scion xD?A:Disconnecting the negative battery cable should be the first step to remove power window regulator motors from both the right-hand side (RH) and left-hand side (LH). Begin by removing the front armrest base upper panel followed by taking off the front door lower frame bracket garnish then extracting the front door inside handle bezel plus the front door trim board sub-assembly and front door trim bracket before removing the front door service hole cover and finally the front door glass sub-assembly. During the process remove the front door window regulator sub-assembly from service. To access the front power window regulator motor assembly the user should use a "TORX" socket wrench T25 to uninstall its three mounting screws. Start by removing the rear door armrest base upper panel followed by the rear door inside handle bezel and rear door trim board sub-assembly next is the removal of rear door trim bracket then use the rear door service hole cover and finally detach the rear door glass run. Start by detaching the rear window Weather Strip to reach the screw located at the upper side of the rear door window division bar before removing its 2 bolts and securing the screw for complete removal of this component without damage. The last steps are to remove the rear door glass sub-assembly together with the rear door window regulator sub-assembly and finally handle the rear power window regulator motor assembly by using a "TORX" socket wrench T25 for the 3 screws.
- Q: How to install the rear and front Window Motor assemblies on Scion xD?A:Put MP grease on the power window regulator motor moving areas before fastening the front power window regulator motor assembly with 3 "TORX" screws T25 and 5.4 Nm force (55 kgf-cm, 48 in-lbf). Mount the rear door window regulator first and then put in the rear door glass assembly. Put on the rear door window division bar with two bolts and one screw then tighten each bolt to 6.2 Nm (63 kgf-cm, 54 in-lbf). Afterwards attach the rear door Weather Strip. Put in place the door glass run and all related pieces starting from the service hole cover. To integrate the front power window regulator motor assembly use a T20 "TORX" socket wrench and place three screws subsequently tighten at 5.4 Nm (55 kgf-cm, 48 in-lbf). Put together the front door window regulator assembly, front door glass assembly, service hole cover, trim bracket, trim board assembly, inside handle bezel, lower frame bracket garnish, and armrest base upper panel. Set the minus cable end into the negative battery post then tighten it to 5.4 Nm torque.


Related Scion xD Parts
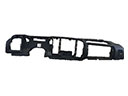 Scion xD Dash Panel Vent Portion Covers
 Scion xD Door Hinge
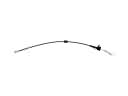 Scion xD Door Latch Cable
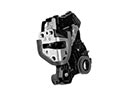 Scion xD Door Lock
 Scion xD Door Lock Actuator
 Scion xD Door Lock Cylinder
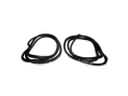 Scion xD Door Seal
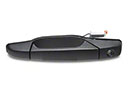 Scion xD Exterior Door Handle
 Scion xD Interior Door Handle
 Scion xD Power Window Switch
 Scion xD Speedometer
 Scion xD Weather Strip
Browse Scion xD Window Motor by Years
2014
2013
2012
2011
2010
2009
2008