×
ToyotaParts- Hello
- Login or Register
- Quick Links
- Live Chat
- Track Order
- Parts Availability
- RMA
- Help Center
- Contact Us
- Shop for
- Toyota Parts
- Scion Parts
My Garage
My Account
Cart
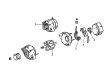
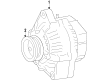
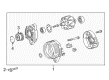
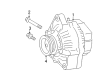
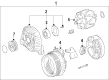
OEM Scion Alternator
Generator- Select Vehicle by Model
- Select Vehicle by VIN
Select Vehicle by Model
orMake
Model
Year
Select Vehicle by VIN
For the most accurate results, select vehicle by your VIN (Vehicle Identification Number).
14 Alternators found


Scion Alternator Part Number: 27060-37041
$344.46 MSRP: $504.82You Save: $160.36 (32%)Ships in 1-3 Business DaysProduct Specifications- Other Name: Alternator Assembly, With Regulator; New Alternator; Alternator Assembly
- Manufacturer Note: 12V 100A
- Replaces: 27060-37040


Scion Alternator Part Number: 27060-36011
$387.36 MSRP: $567.68You Save: $180.32 (32%)Ships in 1-3 Business DaysProduct Specifications- Other Name: Alternator Assembly, With Regulator; Alternator Reman; New Alternator; Alternators; Alternator Assembly
- Manufacturer Note: 12V 100A
- Replaces: 27060-36010


Scion Alternator Part Number: 27060-21140-84
$81.79 MSRP: $112.81You Save: $31.02 (28%)Ships in 1-3 Business DaysProduct Specifications- Other Name: Reman Alternator


Scion Alternator Part Number: 27060-21031-84
$144.24 MSRP: $189.72You Save: $45.48 (24%)Ships in 1-3 Business DaysProduct Specifications- Other Name: Alternator Assembly, With Regulator

Scion Alternator Part Number: 27060-47060
$272.60 MSRP: $389.21You Save: $116.61 (30%)Ships in 1-2 Business DaysProduct Specifications- Other Name: Alternator Assembly, With Regulator; Alternator Reman; Alternators; Alternator Assembly
- Manufacturer Note: 12V 80A

Scion Alternator Part Number: 27060-37150
$275.98 MSRP: $394.03You Save: $118.05 (30%)Ships in 1-3 Business DaysProduct Specifications- Other Name: Alternator Assembly, With Regulator; Alternator Assembly
- Manufacturer Note: 12V 100A
Scion Alternator Part Number: 27060-47240
$284.36 MSRP: $406.01You Save: $121.65 (30%)Ships in 1-3 Business DaysProduct Specifications- Other Name: Alternator Assembly, With Regulator; Alternator Assembly
- Manufacturer Note: 12V 100A,COLD AREA SPEC(FOR NORTH AMERICA)

Scion Alternator Part Number: 27060-WB002
$290.31 MSRP: $414.49You Save: $124.18 (30%)Ships in 1-3 Business DaysProduct Specifications- Other Name: Alternator Assembly, With Regulator; Alternator Assembly
- Manufacturer Note: 12V 100A
- Replaces: 27060-WB001
Scion Alternator Part Number: 27060-21030-84
$229.12 MSRP: $325.53You Save: $96.41 (30%)Ships in 1-3 Business DaysProduct Specifications- Other Name: Alternator Assembly, With Regulator
- Replaces: 27060-21030
Scion Alternator Part Number: 27060-21020-84
$229.12 MSRP: $325.53You Save: $96.41 (30%)Ships in 1-3 Business DaysProduct Specifications- Other Name: Alternator Assembly, With Regulator
- Replaces: 27060-21020

Scion Alternator Part Number: SU003-05860
$383.40 MSRP: $522.56You Save: $139.16 (27%)Ships in 1-3 Business DaysProduct Specifications- Other Name: Alternator Assembly
- Manufacturer Note: 12V 130A
- Replaces: SU003-00484


Scion Alternator Part Number: 27060-28321-84
$298.44 MSRP: $398.16You Save: $99.72 (26%)Ships in 1-3 Business DaysProduct Specifications- Other Name: Reman Alternator
- Replaces: 27060-28320, 27060-28321

Scion Alternator Part Number: 27060-28350-84
$171.10 MSRP: $225.44You Save: $54.34 (25%)Ships in 1-3 Business DaysProduct Specifications- Other Name: Reman Alternator

Scion Alternator Part Number: 27060-28270-84
$214.33 MSRP: $285.34You Save: $71.01 (25%)Ships in 1-3 Business DaysProduct Specifications- Other Name: Reman Alternator
Scion Alternator
OEM parts deliver unmatched quality you can rely on. They pass extensive quality control inspections. Scion produces them to the official factory specifications. This process helps prevent defects and imperfections. So you can get exceptional lifespan and a flawless fit. Need new OEM Scion Alternator? You'll love our wide selection of genuine options. Shop in minutes and skip the hunt. Our prices are unbeatable, you'll save time and money. It's easy to shop and find the right piece. Our committed customer service team gives professional help from start to finish. Every part includes a manufacturer's warranty. We ship quickly, your parts will arrive fast at your door.
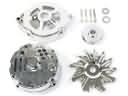
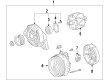
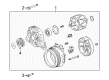
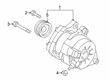
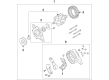
Scion Alternator converts engine movement to continuous electricity, keeping all onboard systems active. Scion succeeded by making young driving youths feel like members of the club, where there were no haggles and no-go colors that screamed uniqueness. The inventory remained slim to make the decision-making processes light and visits to the dealership remained fast. Limited Release Series releases ensured that the hype remained high as the owners were assured that their ride would remain unique. There are virtual campaigns like Scion City, which turned shopping into a game, and it was impossible to separate digital play from real asphalt. With more than 1,000,000 cars sold, the brand ushered first timers into a broader automotive universe and risk could pay. The mark of Scion continues to be visible in the way mass-market vehicles are pushing bolder paint and various add-ons that are DIY. Scion remained a moving test lab, allowing radical concepts to reach the showrooms years before other competitors could. The Alternator involves a machined, rugged two-piece aluminum shell that secures the position of the stator, rotor, and onboard regulator and spins off engine rotation into a clean 14-volt stream that provides headlights, stereo, and all charging ports even when the throttle closes at a red light. Alternator cooling fins cool rapidly, and thus on boiling summer freeway runs or when starting at night, voltage remains sharp. Alternator headroom implies that you can screw on additional lighting or audio without seeing the gauges shake. The secret of the longevity of the Alternator lies in the oversized bearings that shake off city stop-start maltreatment and cross-country marathons.
Scion Alternator Parts and Q&A
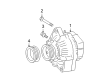
- Q: How to remove the alternator on Scion tC?A:Start the alternator removal process by disconnecting the wire from the car's negative battery terminal then wait for 90 seconds to avoid kicking on the Air Bag pretensioners. Begin by removing the front fender apron seal from its right-hand point through 3 clip and 2 screw extraction. The following step involves taking out the fan and generator V belt. Change the process by detaching the generator connector and removing the terminal cap before removing the generator wire nut. Moving on with the procedure include 2 wire harness clamps before replacing the 2 generator bolts and after that unfasten the wire harness clamp bracket bolt.
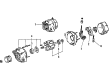
- Q: How to reassemble the alternator on Scion xB?A:Start the alternator reassembly by using Special Service Tools to install the generator drive end frame bearing through the application of press tools 09950-60010, 09951-00250, 09950-70010, and 09951-07100. Secure the retainer plate to the drive end frame by fitting its tabs into the cutouts then fasten it with four screws which should be torqued to 2.3 Nm (23 kgf-cm, 20 in-lbf). Start with the clutch pulley receiving the drive end frame before placing the generator rotor onto the generator rectifier end frame and adding a new generator washer on the generator rotor. To install the generator coil assembly into the drive end frame use Special Service Tools 09612-70100 and 09612-07240 to put the bolts at 5.8 Nm (59 kgf-cm, 51 in-lbf) torque and attach the cord clip with the bolt torqued to 4.6 Nm (47 kgf-cm, 41 in-lbf). Insert the 1.0 mm (0.039 in.) pin into the generator brush holder assembly to secure two brushes before screwing it in with 1.8 Nm (18 kgf-cm, 16 in-lbf) torque then remove the pin. Mount the terminal insulator to the generator rectifier end frame before screwing and torquing the generator rear end cover to 4.6 Nm (47 kgf-cm, 41 in-lbf) with 3 nuts. Set the Rotor Shaft Holding Tool and Clutch Pulley Wrench (SST: 09820-63020) and temporarily mount the clutch pulley on to the rotor shaft. Flip the holding tool into a vise clamp then insert the shaft end into the tool space and connect the clutch pulley wrench to the clutch pulley before tightening the clutch pulley clockwise using the wrench.