×
ToyotaParts- Hello
- Login or Register
- Quick Links
- Live Chat
- Track Order
- Parts Availability
- RMA
- Help Center
- Contact Us
- Shop for
- Toyota Parts
- Scion Parts
My Garage
My Account
Cart
OEM Scion xB Alternator
Generator- Select Vehicle by Model
- Select Vehicle by VIN
Select Vehicle by Model
orMake
Model
Year
Select Vehicle by VIN
For the most accurate results, select vehicle by your VIN (Vehicle Identification Number).
2 Alternators found

Scion xB Alternator Part Number: 27060-21020-84
$229.12 MSRP: $325.53You Save: $96.41 (30%)Ships in 1-3 Business Days
Scion xB Alternator Part Number: 27060-28321-84
$298.44 MSRP: $398.16You Save: $99.72 (26%)Ships in 1-3 Business Days
Scion xB Alternator
Choose genuine Alternator that pass strict quality control tests. You can trust the top quality and lasting durability. Shopping for OEM Alternator for your Scion xB? Our website is your one-stop destination. We stock an extensive selection of genuine Scion xB parts. The price is affordable so you can save more. It only takes minutes to browse and find the exact fit. Easily add to cart and check out fast. Our hassle-free return policy will keep you stress-free. We process orders quickly for swift delivery. Your parts will arrive faster, so you can get back on the road sooner.
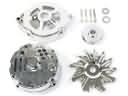
Alternator is one of the important component of the Scion xB series of vehicles that are well-known for their reliability as well as performance. This is mainly an electric charger and generator which transforms mechanical energy from the engine into electrical energy that is required in the electrical system of a car. Fitting most Scion xB models, the alternator is constructed with a two piece cast aluminum housing to shield the internal components such as the stator, rotor and built-in voltage regulator. This makes the design stable and efficient and especially is the newer xB models this uses the latest technology in its production. In the automobile market, one car part that sticks out is the Alternator because of its capacity to handle power boosts as well as additional power to parts. Moreover, the efficiency of its execution plays an essential role in safety and proper functioning of electrical devices included to Scion xB. Given it's high output and durability, the Alternator is amongst the most reliable alternators in the market today. From city driving to longer trips across the country, the Alternator is essential in boost the car's power supply and thus, an excellent addition to the Scion xB design.
Scion xB Alternator Parts and Q&A
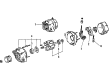
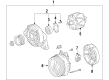
- Q: How to remove the alternator on Scion xB?A:Starting the alternator removal process from the 2AZ-FE engine requires disconnecting the negative battery terminal cable. Start by taking off the rear engine under cover from the right-hand side of the vehicle. Follow the process by removing both the fan along with the generator V belt. The generator assembly removal process requires disconnecting the generator connector followed by removing the nut and unharnessing the wire connector from terminal B. Then separate the two wire harness clamps while using a screwdriver to remove two bolts securing the generator assembly. Remove the bolt which will detach the wire harness clamp bracket.
- Q: How to service and repair the alternator on Scion xB?A:Service and repair operations on the alternator require you to begin by taking the generator apart. First use Special Service Tool 09820-63010 (09820-06010, 09820-06020) to remove the generator pulley by applying torque with a torque wrench to grasp the pulley holding tool until it reaches 39 Nm (400 kgf.cm, 29 ft.lbf) while aligning it with the rotor shaft. Place the adapter in a vise afterward put the socket inside the adapter and install the pulley nut. Prudent rotation of the pulley holding tool in a counterclockwise direction will loosen the pulley nut but the operator must stop when it reaches half its turn to prevent rotor shaft damage. The procedure starts with removing the generator from its adapter before removing the socket and pulley holding tool in succession with the pulley nut and pulley. Start removing the rear end cover by unthreading both the nut and terminal insulator followed by removing the bolt and three nuts and plate terminal and end cover. Start by detachment of the brush holder assembly that requires the brush holder cover along with the two screws holding the brush holder in place. Start with removing the three screws that secure the generator regulator assembly while proceeding to unscrew the four screws holding the generator holding unit with rectifier. To remove the generator rectifier end frame, first separate the four rubber insulators and seal plate and four nuts and cord clip before using tool Special Service Tool 09286-46011 to proceed. To complete the generator rotor assembly removal process you must take off the generator washer before carefully extracting the rotor from the drive end frame. Reassemble the device by inserting the generator rotor along with the washer before you use a 19 mm socket wrench to press in the rectifier end frame while installing four nuts and a cord clip that need tightening with nut A set to 4.5 N.m (46 kgf.cm, 40 in.lbf) and nut B set to 5.4 N.m (55 kgf.cm, 48 in.lbf). Place the seal plate while maintaining correct orientation of the four rubber insulators. First install the rectifier holder by tightening its four screws to 2.9 N.m (30 kgf.cm, 26 in.lbf) and after that do the generator regulator assembly with three screws at 2.0 N.m (20 kgf.cm, 18 in.lbf), then install the brush holder assembly with two screws at the same torque while double-checking the brush holder orientation before installing its cover. Use the bolt to install the rear end cover and plate terminal before tightening the bolt to 3.9 N.m (40 kgf.cm, 34 in.lbf) and securing the three nuts to 4.4 N.m (45 kgf.cm, 39 in.lbf). Finish the installation by affixing the terminal insulator with a nut that is tightened to 4.1 N.m (42 kgf.cm, 36 in.lbf). Finally, install the generator pulley by hand-tightening the pulley nut, then use Special Service Tool 09820-63010 (09820-06010, 09820-06020) to tighten the socket clockwise to 39 Nm (400 kgf.cm, 29 ft.lbf), ensuring the tool is secured to the pulley shaft, clamp the adapter in a vise, insert the socket, and attach the pulley nut to the adapter, tightening the pulley nut with the pulley holding tool clockwise to 133 Nm (1,356 kgf.cm, 98 ft.lbf), then remove the generator from the adapter, and check that the pulley moves smoothly.