×
ToyotaParts- Hello
- Login or Register
- Quick Links
- Live Chat
- Track Order
- Parts Availability
- RMA
- Help Center
- Contact Us
- Shop for
- Toyota Parts
- Scion Parts
My Garage
My Account
Cart
OEM Scion xA Alternator
Generator- Select Vehicle by Model
- Select Vehicle by VIN
Select Vehicle by Model
orMake
Model
Year
Select Vehicle by VIN
For the most accurate results, select vehicle by your VIN (Vehicle Identification Number).
3 Alternators found


Scion xA Alternator Part Number: 27060-21140-84
$81.79 MSRP: $112.81You Save: $31.02 (28%)Ships in 1-3 Business Days

Scion xA Alternator Part Number: 27060-21031-84
$144.24 MSRP: $189.72You Save: $45.48 (24%)Ships in 1-3 Business DaysScion xA Alternator Part Number: 27060-21030-84
$229.12 MSRP: $325.53You Save: $96.41 (30%)Ships in 1-3 Business Days
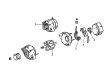
Scion xA Alternator
Choose genuine Alternator that pass strict quality control tests. You can trust the top quality and lasting durability. Shopping for OEM Alternator for your Scion xA? Our website is your one-stop destination. We stock an extensive selection of genuine Scion xA parts. The price is affordable so you can save more. It only takes minutes to browse and find the exact fit. Easily add to cart and check out fast. Our hassle-free return policy will keep you stress-free. We process orders quickly for swift delivery. Your parts will arrive faster, so you can get back on the road sooner.
The Scion xA Alternator is one of the crucial parts, which dramatically reveals the steadiness and power of the Scion xA models. The alternator work as a battery charger and an electrical generator; it provides electrical energy by converting mechanical energy from the engine and make the electrical system of the vehicle runs smoothly. This alternator comes with a cast aluminium-steel body that dwarfs an iron core for the stator and rotor, a pulley, and a cooling fan. Versatility allows drivers of the Scion xA to get identical performance with the different models of this subcompact car. The Scion xA Alternator as well comes with built in voltage regulation which automatically responds to the current electricity requirements of the car and that is very vital for the proper running of the car components. As a result of the alternator's capacity to handle raises in electrical loads, the Scion xA Alternator is regarded as one of the finest in the automotive industry, especially if one has added parts. This high-output alternator not only eliminates stock alternator failure but also the car's general performance and reliability are improved by the increased power supply. This alternator is sued on the Scion xA with 1.5 L DOHC I4 engine and it has greatly boosted the fuel economy and performance of the car. On balance, Scion xA Alternator is a clear example of the Scion firm's dedication to he provision of quality and innovation making it an extremely vital aspect of the civic xA car.
Scion xA Alternator Parts and Q&A
- Q: How to replace the alternator assembly on Scion xA?A:Start by removing the terminal cap followed by unfastening both the nut and generator wire until the generator connector disconnects alongside wire harness clamp removal. The repair process starts with bolts A and B loosening followed by relieving tension on the fan and generator V ribbed belt. After that, both components can be extracted from their positions. The process begins with bolt A and its nut which needs to be removed from the fan belt adjusting bar then proceeds to remove bolt B together with the generator. The first step for installation involves the temporary connection of the generator through bolt B while you insert the fan belt adjusting bar using bolt A and secure the nut with 11 Nm torque (112 kgf.cm and 8 ft.lbf). Install the fan and generator V-ribbed belt temporarily on their respective pulleys after positioning the adjusting bar between the engine mounting bracket and generator while pushing the bar toward the frontend to achieve proper V-ribbed belt tension. Avoid placing the adjustment bar between the oil control valve and generator to prevent damage. Start by torquing bolt A to 19 Nm (189 kgf.cm, 14 ft.lbf) followed by torquing bolt B to 54 Nm (551 kgf.cm, 40 ft.lbf). Begin by installing the clamped wire harness and connecting the generator connector. You should then attach the generator wire to the nut before tightening it to 9.8 Nm (100 kgf.cm, 7 ft.lbf). After that, install the terminal cap. Finally, inspect the Drive Belt.
- Q: How to overhaul the alternator assembly on Scion xA?A:Following these instructions professionals should use Special Service Tool 09820-63010 (09820-06010, 09820-06020) while holding the tool with a torque wrench to tighten the socket clockwise to 39 Nm (400 kgf.cm, 29 ft.lbf) before securing it to the rotor shaft. Then attach the pulley nut to the socket before placing it into the adapter and rotating the nut counterclockwise just for a half turn so as not to harm the rotor shaft. Begin the process by taking the generator out of the adapter and following with the removal of the socket and pulley holding tool before removing the pulley nut along with the pulley. The rear end cover removal process starts by disconnecting the terminal insulator nut followed by untightening and removing the bolt and three nuts along with the plate terminal. The next step requires removal of the brush holder cover together with two screws and three regulator screws to separate the generator brush holder and generator regulator. Disconnect the generator holder with rectifier by removing four screws before utilizing Special Service Tool 09286-46011 to detach the generator rectifier end frame which requires the removal of four rubber insulators together with the seal plate and four nuts and clip code. During the generator rotor assembly removal process start by taking out the washer and rotor from the drive end frame while watching for the rotor to avoid falling. Check the generator regulator assembly connections between F and B along with F and E terminals and get a new regulator when you find the specified continuity is not met. Test generator slip rings for electrical stability while confirming they maintain a connection to slip rings but do not link rotor to slip ring. Replace the rotor if any of these conditions are not met. Measuring the slip ring diameter with vernier calipers requires replacement of the rotor if it measures less than 12.8mm (0.504in.) and a check for bearing wear should also be conducted. A proper continuity test must be performed on both positive and negative rectifiers of the generator holder with rectifier. If the test results are outside specified values then substitute the rectifier holder. A generator assembly should be replaced when no stator coil continuity exists or a coil lead shows electrical connection to the drive end frame. Check the brush length extension as a replacement trigger bar unit must be selected when the measurement falls under 4.5 mm (0.177 in.). The installation requires using a 19 mm socket wrench to put in the rectifier end frame while tightening four nuts and clip code until nut A reaches 4.5 Nm (46 kgf.cm, 40 in.lbf) and nut B reaches 5.4 Nm (55 kgf.cm, 48 in.lbf). Insert the seal plate with four rubber insulators while verifying the right direction for installation. Install the generator holder with rectifier through four screws tightened to 2.9 Nm (30 kgf.cm, 26 in.lbf). Next follow with generator regulator assembly secured through three screws at 2.0 Nm (20 kgf.cm, 18 in.lbf). The final step is installing the generator brush holder assembly with two screws at this torque value. Secure the rear end cover with the plate terminal by bolting it in place then tightening its three nuts to 3.9 Nm (40 kgf.cm, 34 in.lbf). Finally, install the terminal insulator by torquing its nut to 3.6 Nm (37 kgf.cm, 32 in.lbf). The generator pulley must be positioned on the rotor shaft manually but tightnered to 39 Nm (400 kgf.cm, 29 ft.lbf) with the holding tool in place. After securing the tool follow steps of vise clamp then socket insertion then achieve pulley nut torque to 111 Nm (1,125 kgf.cm, 81 ft.lbf) before extracting the generator from the adapter to verify pulley movement fluidity.


