×
ToyotaParts- Hello
- Login or Register
- Quick Links
- Live Chat
- Track Order
- Parts Availability
- RMA
- Help Center
- Contact Us
- Shop for
- Toyota Parts
- Scion Parts
My Garage
My Account
Cart
OEM Toyota Solara Control Arm
Suspension Arm- Select Vehicle by Model
- Select Vehicle by VIN
Select Vehicle by Model
orMake
Model
Year
Select Vehicle by VIN
For the most accurate results, select vehicle by your VIN (Vehicle Identification Number).
5 Control Arms found


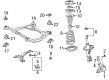
Toyota Solara Control Arm, Passenger Side Part Number: 48068-06100
$161.79 MSRP: $229.03You Save: $67.24 (30%)Ships in 1 Business Day
Toyota Solara Control Arm, Lower Driver Side Part Number: 48069-06100
$174.59 MSRP: $247.16You Save: $72.57 (30%)Ships in 1 Business Day
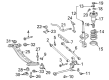
Toyota Solara Control Arm, Rear Part Number: 48710-33060
$131.95 MSRP: $186.80You Save: $54.85 (30%)Ships in 1-3 Business Days
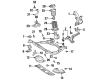
Toyota Solara Lower Control Arm, Driver Side Part Number: 48069-07030
$199.79 MSRP: $285.25You Save: $85.46 (30%)Ships in 1-3 Business DaysToyota Solara Lower Control Arm, Passenger Side Part Number: 48068-07030
$199.79 MSRP: $285.25You Save: $85.46 (30%)Ships in 1-3 Business Days
Toyota Solara Control Arm
Choose genuine Control Arm that pass strict quality control tests. You can trust the top quality and lasting durability. Shopping for OEM Control Arm for your Toyota Solara? Our website is your one-stop destination. We stock an extensive selection of genuine Toyota Solara parts. The price is affordable so you can save more. It only takes minutes to browse and find the exact fit. Easily add to cart and check out fast. Our hassle-free return policy will keep you stress-free. We process orders quickly for swift delivery. Your parts will arrive faster, so you can get back on the road sooner.
Toyota Solara Control Arm Parts and Q&A
- Q: How to remove the rear No. 1 lower Control Arm on Toyota Solara?A:Begin the rear No. 1 lower suspension arm removal process by taking off the wheel from the rear position first. The next step involves removing the wheel from both the 2AZ-FE and 3MZ-FE engines after which the center Exhaust Pipe assembly needs removal on the 2AZ-FE engine while performing the same action on the 3MZ-FE engine. The next step should involve taking out the rear stabilizer bar. You should next proceed with separating the rear strut rod assembly. Remove the bolt, nut, and rear suspension arm No. 2 from the rear axle carrier of the LH side while maintaining the nut stable during bolt removal. The same procedure should be applied to the RH side. The second step consists of taking apart the No. 1 rear suspension arm assembly by unbolted its component of bolt, nut and rear suspension arm No. 1 from the rear axle carrier while ensuring the nut stays stationary. The same procedure is used to uninstall the No. 1 rear suspension arm assembly from the right-hand side. The rear suspension member must be kept upright through use of a jack before extracting the four nuts along with two bolts and four retainers from the rear suspension member. The last step involves taking out the bolt alongside the rear suspension arm No. 1 from the LH side of the No. 1 rear suspension arm assembly.
- Q: How to install the No.2 rear Control Arm assembly LH on Toyota Solara?A:The installation of No.2 rear suspension arm assembly LH starts by placing the rear suspension arm No.2 (inner side) with its bolt loosely fastened but facing the rear of the vehicle. The rear suspension arm should be recently positioned before the installer applies a torque of 100 Nm (1, 020 kgf-cm, 74 ft-lbf) to the bolt for complete tightening. After installing the rear suspension member sub-assembly you must implement the same installation procedure to temporarily fasten the No.1 rear suspension arm assembly LH and RH on both sides. Apply the exact procedure for the RH side to tighten the No.2 rear suspension arm assembly LH and RH now in a temporary manner. Tighten the rear strut rod assembly with low torque and stabilize the suspension system. Fasten the No.1 rear suspension arm assembly LH and RH in full followed by the No.2 rear suspension arm assembly LH and RH where you should apply identical tightening procedures to both the LH and RH sides. Attain full rod assembly torque before you put on the stabilizer bar rear. The 2AZ-FE engine requires the center Exhaust Pipe assembly installation but the 3MZ-FE engine should use this same installation process. The rear wheel needs to be installed after adjusting its torque to 103 Nm (1,050 kgf-cm, 76 ft-lbf) while checking for correct rear wheel alignment.


Related Toyota Solara Parts
 Toyota Solara Ball Joint
 Toyota Solara Bump Stop
 Toyota Solara Coil Spring Insulator
 Toyota Solara Front Cross-Member
 Toyota Solara Lateral Link
 Toyota Solara Rear Crossmember
 Toyota Solara Shock Absorber
 Toyota Solara Shock and Strut Boot
 Toyota Solara Strut Housing
 Toyota Solara Strut Mounts
 Toyota Solara Sway Bar Bushing
 Toyota Solara Sway Bars
Browse Toyota Solara Control Arm by Years
2008
2007
2006
2005
2004
2003
2002
2001
2000
1999