×
ToyotaParts- Hello
- Login or Register
- Quick Links
- Live Chat
- Track Order
- Parts Availability
- RMA
- Help Center
- Contact Us
- Shop for
- Toyota Parts
- Scion Parts
My Garage
My Account
Cart
OEM Toyota Sienna Brake Master Cylinder
- Select Vehicle by Model
- Select Vehicle by VIN
Select Vehicle by Model
orMake
Model
Year
Select Vehicle by VIN
For the most accurate results, select vehicle by your VIN (Vehicle Identification Number).
9 Brake Master Cylinders found


Toyota Sienna Master Cylinder Part Number: 47207-08011
$229.14 MSRP: $327.17You Save: $98.03 (30%)Ships in 1-2 Business Days
Toyota Sienna Master Cylinder Part Number: 47201-08040
$185.11 MSRP: $264.29You Save: $79.18 (30%)Ships in 1-3 Business DaysToyota Sienna Master Cylinder Part Number: 47207-08020
$393.49 MSRP: $576.67You Save: $183.18 (32%)Ships in 1-3 Business Days
Toyota Sienna Master Cylinder Part Number: 47055-08021
$902.77 MSRP: $1323.01You Save: $420.24 (32%)Ships in 1-3 Business DaysToyota Sienna Master Cylinder Part Number: 47055-08020
$1191.61 MSRP: $1746.33You Save: $554.72 (32%)Ships in 1-3 Business Days
Toyota Sienna Cylinder Sub-Assembly, Brake Stroke Simulator Part Number: 47055-08030
$522.32 MSRP: $765.46You Save: $243.14 (32%)Ships in 1-2 Business Days
Toyota Sienna Master Cylinder Part Number: 47201-0E060
$246.74 MSRP: $352.28You Save: $105.54 (30%)Toyota Sienna Master Cylinder Part Number: 47207-45020
Toyota Sienna Master Cylinder Part Number: 47201-08030
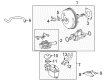
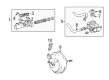
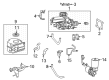
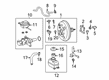
Toyota Sienna Brake Master Cylinder
Choose genuine Brake Master Cylinder that pass strict quality control tests. You can trust the top quality and lasting durability. Shopping for OEM Brake Master Cylinder for your Toyota Sienna? Our website is your one-stop destination. We stock an extensive selection of genuine Toyota Sienna parts. The price is affordable so you can save more. It only takes minutes to browse and find the exact fit. Easily add to cart and check out fast. Our hassle-free return policy will keep you stress-free. We process orders quickly for swift delivery. Your parts will arrive faster, so you can get back on the road sooner.
Toyota Sienna Brake Master Cylinder Parts and Q&A
- Q: How to install the brake master cylinder on Toyota Sienna?A:Two nuts should be used to attach the brake master cylinder at 13 Nm (130 kgf-cm, 9 ft-lbf torque). After that slide the clip and then attach the master cylinder reservoir tube. The brake master cylinder requires attachment of 2 brake tubes through Special Service Tool: 09023-00101 and should receive a torque of 15 Nm (155 kgf-cm, 11 ft-lbf). The installation process demands attaching the air cleaner assembly with hose followed by brake fluid addition to the reservoir and afterward a brake fluid bleeding sequence of the brake master cylinder along with brake line and brake actuator (with VSC). Determining the brake fluid reservoir's braking liquid amount is essential along with brake fluid leak inspection. As the last step remove and install the outer front part of the cowl top panel sub-assembly while checking the brake actuator with Techstream software.
- Q: How to remove and replace the brake master cylinder on Toyota Sienna?A:Begin the brake master cylinder replacement by draining brake fluid before cleaning all fluid that contacts painted surfaces with suitable methods. The battery negative terminal must be separated while the air cleaner assembly with hose receives removal before proceeding to detach the cowl top panel sub-assembly's outer front. Special Service Tool: 09023-00101 enables the removal of 2 brake tubes from the brake master cylinder assembly by disconnecting the brake master cylinder reservoir hose with the clip sliding mechanism before unscrewing both brake master cylinder nuts. The brake master cylinder installation requires two nut fastening with a torque of 13 Nm (130 kgf-cm, 9 ft. lbs.) followed by reconnecting the brake master cylinder reservoir hose using the clip and applying Special Service Tool: 09023-00101 to join the two brake tubes to the master cylinder with 15 Nm (155 kgf-cm, 11 ft. lbs. torque). The install procedure includes reattaching the air cleaner assembly with hose followed by a brake fluid fill in the reservoir then performing brake master cylinder, brake line, and brake actuator with VSC bleeding. The first step of check includes inspecting brake fluid reservoir levels while looking for leakages. Next install both cowl top panel sub-assembly and front outer panels and measure brake pedal height before testing the brake actuator with the intelligent tester.


Related Toyota Sienna Parts
 Toyota Sienna Wheel Bearing
 Toyota Sienna Brake Booster
 Toyota Sienna Brake Caliper
 Toyota Sienna Yaw Sensor
 Toyota Sienna Brake Booster Vacuum Hose
 Toyota Sienna Brake Caliper Piston
 Toyota Sienna Brake Fluid Pump
 Toyota Sienna Brake Master Cylinder Reservoir
 Toyota Sienna Brake Rotor
 Toyota Sienna Brake Shoe Set
 Toyota Sienna Master Cylinder Repair Kit
 Toyota Sienna Parking Brake Shoes