×
ToyotaParts- Hello
- Login or Register
- Quick Links
- Live Chat
- Track Order
- Parts Availability
- RMA
- Help Center
- Contact Us
- Shop for
- Toyota Parts
- Scion Parts
My Garage
My Account
Cart
OEM Toyota Tundra Timing Belt
Engine Timing Belt- Select Vehicle by Model
- Select Vehicle by VIN
Select Vehicle by Model
orMake
Model
Year
Select Vehicle by VIN
For the most accurate results, select vehicle by your VIN (Vehicle Identification Number).
2 Timing Belts found


Toyota Tundra Belt, Timing Part Number: 13568-09070
$61.13 MSRP: $85.81You Save: $24.68 (29%)Ships in 1-3 Business Days


Toyota Tundra Timing Belt Part Number: 13568-YZZ03
$58.42 MSRP: $81.32You Save: $22.90 (29%)Ships in 1-3 Business Days
Toyota Tundra Timing Belt
Choose genuine Timing Belt that pass strict quality control tests. You can trust the top quality and lasting durability. Shopping for OEM Timing Belt for your Toyota Tundra? Our website is your one-stop destination. We stock an extensive selection of genuine Toyota Tundra parts. The price is affordable so you can save more. It only takes minutes to browse and find the exact fit. Easily add to cart and check out fast. Our hassle-free return policy will keep you stress-free. We process orders quickly for swift delivery. Your parts will arrive faster, so you can get back on the road sooner.
Toyota Tundra Timing Belt Parts and Q&A
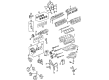
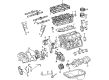
- Q: How to Properly Remove and Install a Timing Belt on Toyota Tundra?A:A proper timing belt removal process starts with these steps: engineering under cover removal followed by engine coolant drainage then disconnect the upper radiator hose. Disconnection of the PS pump requires unclipping two PS air hoses from the air intake chamber and resonator followed by removing the bolt securing the PS pressure tube clamp to the frame and disconnecting the PS pump by removing its bolt and nut. The process to remove the A/C Compressor from the engine requires first disconnecting the A/C compressor connector followed by Drive Belt removal and then unbolt the four anchor points. First disconnect the fan by fluid-coupling the fan pulleys before taking off the generator drive belt and pulling out the No.2 fan shroud. To remove the fan with fluid coupling and fan pulleys the technician should first disconnect the A/C compressor bracket but only if A/C was present on the vehicle. First disconnect the upper radiator hose and proceed to remove the No.2 timing belt cover by disconnecting the Camshaft position sensor connector and the four high-tension cord clamps then unfastening the six bolts. Initiate fan bracket removal by first unthreading the nut while unmounting the PS pump adjusting strut and afterward unfastening the bolt besides the nut and the fan bracket. Use the crankshaft pulley to achieve TDC/compression of the No.1 piston by aligning its groove with the "0" timing mark on the No.1 timing belt cover. Additionally check the pulley timing alignment of both camshafts and the No.3 timing belt cover before rotating the pulley one revolution if needed. The timing belt tensioner removal requires the alternate loosening of two mounting bolts that remove the tensioner and dust boot with the belt while extracting the tensioner. The loosening operation of the RH camshaft timing pulley bolt requires Special Service Tool: 09960-10010 (09962-01000, 09963-01000) while the LH camshaft timing pulley bolt needs Special Service Tool: 09960-10011 (09962-01000, 09963-01000) until bolt removal of all components is possible. First use Special Service Tool 09213-54015 (90119-08216), 09330-00021 to free up the crankshaft pulley bolt and afterward remove Special Service Tool 09950-50012 (09551-05010, 09552-05010, 09553-05020, 09554-05030) plus the pulley bolt and pulley. Special Service Tool: 09950-50012 (09551-05010, 09552-05010, 09553-05020, 09554-05030) combined with service bolt may be needed for removing the crankshaft timing pulley. The process begins by removing the starter wire bracket followed by the No.1 timing belt cover after unfastening its two bolts and four bolts. Then separate the timing belt guide and timing belt. When reusing the timing belt install a fresh alignment mark on it to match the drilled mark of the crankshaft timing pulley when its original installation indicator is gone. The mechanic will remove No.2 idler pulley and No.1 idler pulley using a combination of a bolt removal tool for the No.2 idler pulley followed by a 10 mm hexagon wrench for removing the pivot bolt, No.1 idler pulley, and plate washer. The crankshaft timing pulley requires removal using Special Service Tools: 09950-50010 (09951-05010, 09952-05010, 09953-05020, 09954-05010). When manual removal is impossible, the service bolt is needed to extract it. During examination check for damage in the timing belt while making sure it avoids bending, twisting, oil contact, water or steam exposure. Also inspect the timing cover gasket and its installation. The inspection includes checking for oil leakage from idler pulleys while verifying their smooth operation together with timing belt tensioner leak detection and push rod movement evaluation through a measurement check that the protrusion should be 10.0 - 10.8 mm (0.394 - 0.425 inch). When installing the components put the crankshaft timing pulley into position based on the key groove and place the No.1 idler pulley and No.2 idler pulley using specified torque specifications. Install the timing belt on the engine but keep it temporary while maintaining a cold engine temperature. Then line up the timing marks between the crankshaft timing pulley and oil pump body while keeping both elements clean. The procedures include installation of the timing belt guide along with No.1 timing belt cover and starter wire bracket while checking all gaskets for integrity and replacing them if required. Apply torque specs to install the crankshaft pulley and next install the LH camshaft timing pulley according to manufactured specifications. Place the No.1 cylinder at TDC/compression while you position the timing belt across the LH camshaft timing pulley. Afterwards, connect the timing belt across the RH camshaft timing pulley where all marks should be properly aligned. The timing belt tensioner installation requires proper torque application while the technician needs to verify valve timing by rotating the crankshaft pulley two rotations to confirm alignment of timing marks. Fasten the fan bracket together with the No.2 timing belt cover and A/C compressor bracket as per torque specifications followed by transient fan fitment with fluid coupling and fan pulleys before securing the No.2 fan shroud and adjusting the drive belt for the generator. The installation process starts with tightening the fan through fluid coupling and fan pulleys then it proceeds to connect the A/C compressor along with the PS pump to the engine after ensuring proper torque values on all fasteners. The procedure ends by installing the engine under cover after starting the motor to check for leakage then performing a road test which includes examining abnormal noise levels and checking shock and slippage as well as shift points and smooth operation. Finally, technicians need to check the engine coolant level.
- Q: How to service and repair the timing belt on Toyota Tundra?A:Service and repair of the timing belt requires first step removal of the engine under cover followed by draining engine coolant and disconnecting upper radiator hose. First detach the PS pump from the machine by removing its two air hoses from the air intake chamber and resonator and the bolting down the PS pressure tube clamp to the frame while also removing the Drive Belt before lastly removing the bolt and nut to disconnect the PS pump. To proceed with disconnecting the A/C Compressor from the engine start by taking out the A/C compressor connector and drive belt alongside removing four bolts. First disconnect the generator drive belt and the fan with fluid coupling and fan pulleys while loosening their fan. Then remove the No. 2 fan shroud. Begin with the removal of five bolts which secure the A/C compressor bracket then detach the upper radiator hose and uninstall the No. 2 timing belt cover by disconnecting the camshaft position sensor connector and four high-tension clamps and then remove the six bolts. Take out the PS pump adjusting strut and nut followed by unpulling the fan bracket and its bolt and nut. Using the crankshaft pulley, drivers should set the No. 1 cylinder to TDC/compression before checking that the timing marks on the camshaft timing pulleys and No. 3 timing belt cover correctly align with the timing mark "0" on the No. 1 timing belt cover. You must rotate the crankshaft pulley completely when its position is incorrect. To reuse the timing belt apply matchmarks both on the pulleys and timing belt which should match up with the end of the No. 1 timing belt cover. The timing belt tensioner unveils after slowly unwinding its two supporting bolts followed by timing belt removal. Special Service Tool 09960-10010 (09962-01000, 09963-01000) must be used to loosen the RH camshaft timing pulley bolt while the same tool can be applied to loosen the LH camshaft timing pulley bolt before removing bolt, knock pin and camshaft timing pulley. You need Special Service Tools 09213-54015 (90119-08216) and 09330-00021 to stop the crankshaft pulley bolt before using 09950-50013 including 09551-05010, 09552-05010, 09553-05020 and 09554-05031 to remove the pulley bolt and its attached pulley. Remove the crankshaft timing pulley through the use of a service bolt with Special Service Tool: 09950-50013 (09551-05010, 09552-05010, 09553-05020, 09554-05031) if needed. To proceed with replacement disconnect the starter wire bracket and remove its two mounting bolts and the four bolts securing the timing belt cover. This action enables the removal of both components along with the timing belt guide followed by the belt itself. To reinstall a used timing belt you must add a new installation mark which will correspond to the drilled mark on the crankshaft timing pulley when installation marks vanish. Disassemble the No. 2 idler pulley by clearing its bolt and idler pulley but use a 10 mm hexagon wrench to eliminate the pivot bolt for the No. 1 idler pulley along with its idler pulley and plate washer. The crankshaft timing pulley needs to be removed along with Special Service Tool: 09950-50013 (09951-05010, 09952-05010, 09953-05020, 09954-05011) and service bolt when needed for manual removal. Check the timing belt for defects while confirming no bending or twisting and no presence of oil water or steam on it. Verify that the timing cover gasket is properly arranged and not damaged. The inspection of idler pulleys should include oil leakage checks as well as testing their smooth functioning while inspecting the timing belt tensioner for oil leaks and correct push rod activities. You should verify the push rod extends 10.0 - 10.8 mm (0.394 - 0.425 inch) from the housing end. Install the No. 1 idler pulley through key groove alignment while adding adhesive (Part No. 08833-00080, Three Bond 1344, Loctite 242 or equivalent) before torquing it to 35 Nm (350 kgf-cm, 26 ft. lbs.). Fasten the No. 2 idler pulley using a torque of 40 Nm (400 kgf-cm) which equals 30 ft-lbs. Mount the timing belt for a temporary installation while maintaining a cold engine state before matching the timing marks between the crankshaft timing pulley and oil pump body. Clean all pulleys while placing the timing belt installation mark in line with the crankshaft timing pulley drilled mark and bolt it onto both the crankshaft timing pulley and the No.1 idler pulley together with the water pump pulley. Proceed by fixing the timing belt guide so its cup side points outward then add the No. 1 timing belt cover and starter wire bracket while checking for gasket damage that requires replacement. Configure the crankshaft pulley so its set key matches the key groove before torquing the retaining bolt to 295 Nm (2,950 kgf-cm, 217 ft. lbs.). Synchronize the knock pin hole of the LH camshaft timing pulley with the knock pin groove and torque the bolt to 110 Nm (1,100 kgf-cm, 81 ft. lbs.). Align the pulley set key with the key groove to position the No. 1 cylinder at TDC/compression stages. Set the LH camshaft timing pulley by verifying the installation mark matches with the timing mark then do the same with the RH camshaft timing pulley before torquing the bolt to 110 Nm (1,100 kgf-cm, 81 ft. lbs.). The timing belt tensioner requires you to press in this push rod and align its holes to complete installation before torquing bolts to 27 Nm (275 kgf-cm, 20 ft. lbs.). Validate the valve timing by rotating the crankshaft pulley twice and verify proper alignment between time marks. Montage the fan bracket along with the No. 2 timing belt cover and A/C compressor bracket by torquing them to 47 Nm (479 kgf-cm, 35 ft. lbs.). Install the fan using fluid coupling along with the pulleys before adding the No. 2 fan shroud. The installation of the generator drive belt requires adjustment followed by tight fan connections using fluid coupling and fan pulleys with 5.4 Nm (54 kgf-cm, 48 inch lbs.) torque. The A/C compressor should be attached to the engine with four bolts torqued to 25 Nm (250 kgf-cm, 18 ft. lbs.) and PS pump connection needs proper torque and correct hose installation. The procedure includes attaching the upper radiator hose then adding proper coolant to the engine before checking leaks while putting on the engine under cover during a road test for abnormal sounds and additional checks of shock and slippage and shift points and overall smooth performance. Recheck the engine coolant level afterward.


Related Toyota Tundra Parts
 Toyota Tundra Oil Filter
 Toyota Tundra Dipstick
 Toyota Tundra Camshaft Bearing
 Toyota Tundra Crankshaft Pulley
 Toyota Tundra Crankshaft Seal
 Toyota Tundra Cylinder Head
 Toyota Tundra Dipstick Tube
 Toyota Tundra Intake Valve
 Toyota Tundra Oil Pump
 Toyota Tundra Timing Cover Gasket
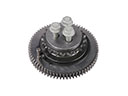 Toyota Tundra Timing Idler Gear
 Toyota Tundra Valve Stem Seal