×
ToyotaParts- Hello
- Login or Register
- Quick Links
- Live Chat
- Track Order
- Parts Availability
- RMA
- Help Center
- Contact Us
- Shop for
- Toyota Parts
- Scion Parts
My Garage
My Account
Cart
OEM 2002 Toyota Tundra Timing Belt
Engine Timing Belt- Select Vehicle by Model
- Select Vehicle by VIN
Select Vehicle by Model
orMake
Model
Year
Select Vehicle by VIN
For the most accurate results, select vehicle by your VIN (Vehicle Identification Number).
2 Timing Belts found


2002 Toyota Tundra Timing Belt
Part Number: 13568-YZZ03$58.42 MSRP: $81.32You Save: $22.90 (29%)Ships in 1-3 Business DaysProduct Specifications- Other Name: Belt Set, Timing; Engine Timing Belt; Timing Belt Kit
- Replaces: 13568-69095
- Item Weight: 1.00 Pounds
- Condition: New
- SKU: 13568-YZZ03
- Warranty: This genuine part is guaranteed by Toyota's factory warranty.


2002 Toyota Tundra Belt, Timing
Part Number: 13568-09070$61.13 MSRP: $85.81You Save: $24.68 (29%)Ships in 1-3 Business DaysProduct Specifications- Other Name: Engine Timing Belt; Timing Belt Kit; Timing Belt
- Manufacturer Note: (L)
- Replaces: 13568-59095
- Part Name Code: 13568
- Item Weight: 2.40 Pounds
- Item Dimensions: 13.4 x 11.6 x 2.2 inches
- Condition: New
- Fitment Type: Direct Replacement
- SKU: 13568-09070
- Warranty: This genuine part is guaranteed by Toyota's factory warranty.
2002 Toyota Tundra Timing Belt
Looking for affordable OEM 2002 Toyota Tundra Timing Belt? Explore our comprehensive catalogue of genuine 2002 Toyota Tundra Timing Belt. All our parts are covered by the manufacturer's warranty. Plus, our straightforward return policy and speedy delivery service ensure an unparalleled shopping experience. We look forward to your visit!
2002 Toyota Tundra Timing Belt Parts Q&A
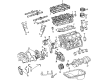
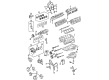
- Q: How to Properly Remove and Install a Timing Belt on 2002 Toyota Tundra?A: The procedure to remove the timing belt begins with engine under cover removal together with engine coolant drainage and radiator assembly removal. Start by disassembling the throttle body cover followed by removing the intake air connector assembly along with the drive belt and fan as well as fluid coupling and fan pulley by loosening all 4 fluid coupling nuts from the fan bracket and continuing with drive belt and 4 nuts which lead to the removal of the fan, coupling assembly and fan pulley. Securely suspend the PS pump after you remove its three bolts. You must first detach the drive belt idler pulley by unbolting the pulley and removing its cover plate and pulley. The first step requires removal of the RH No. 3 timing belt cover through disassembly of 3 bolts and a nut before proceeding to detach the LH No. 3 timing belt cover by disconnecting the engine wire from its 2 wire clamps then removing 4 bolts and a nut to disconnect the camshaft position sensor wire and its connector before removing the cover and bolt and nut and oil cooler pipe. The service begins with taking out two bolts from the No. 2 timing belt cover followed by disconnecting the A/C compressor during normal operations then extracting the fan bracket supported by its two bolts and two nuts. Verify the presence of three installation marks on the crankshaft pulley by rotating it; install fresh marks before removing the belt when it is being reused. Identify Special Service Tools 09213-70010 (90105-08076), 09330-00021 and use them to loosen the crankshaft pulley bolt while setting the No. 1 cylinder to TDC/compression by aligning the crankshaft pulley groove with timing mark "0" of the No. 1 timing belt cover ensuring both camshaft timing pulleys and timing belt rear plates remain aligned correctly. First use the crankshaft pulley bolt to avoid turning the pulley then proceed to remove the timing belt tensioner while placing new installation marks on the belt if you decide to reuse it. You can use Special Service Tool: 09960-10010 (09962-01000, 09963-01000) to disconnect the timing belt from camshaft timing pulleys through the loosening of the tension spring and after that remove the camshaft timing pulleys with the same tool. The technician removes the generator followed by the drive belt tensioner and crankshaft pulley using a combination of Special Service Tools listed as 09950-50013 (09951-05010, 09952-05010, 09953-05010, 09953-05020, 09954-05011). It is vital to refrain from turning the crankshaft pulley. First remove the No. 1 timing belt cover then timing belt guide and timing belt cover spacer before the timing belt itself ensuring to place a new installation mark if reusing the belt. To begin the procedure start by removing the No. 1 idler pulley and No. 2 idler pulley through the use of a 10 mm hexagon wrench followed by taking out the crankshaft timing pulley without altering its position. Check the timing belt for any damages while making sure the belt stays away from oil exposure or water contact or steam exposure. Also inspect the idler pulleys together with the timing belt tensioner to confirm they operate without oil leakage or difficulties. To install the crankshaft timing pulley begin by aligning its key set with the key groove and then tap it into place using Special Service Tool: 09223-46011. Apply adhesive onto the pivot bolts of No. 1 and No. 2 idler pulleys before installing them to ensure easy movement. The timing belt installation should be performed when the engine temperature is cool with clean pulleys while using a marking point to align with the crankshaft timing pulley. First install the timing belt cover spacer and guide then the No. 1 timing belt cover and lastly position the crankshaft pulley with correct alignment. Proper installation sequence requires the drive belt tensioner along with generator units and a check of crankshaft pulley alignment. Before putting on the RH and LH camshaft timing pulleys the timing belt should connect to both pulleys after making sure they maintain clean surfaces. Set the timing belt tensioner in its correct position and then fasten it temporarily before evaluating valve timing by rotating the crankshaft pulley clockwise. After using Special Service Tool: 09213-54015 (90119-08216) to tighten the crankshaft pulley bolt begin installing the fan bracket followed by the A/C compressor when present and finally fit in the No. 2 then the RH No. 3 and LH No. 3 timing belt covers and check that all necessary wiring connections are correctly installed. The last step includes drive belt idler pulley, PS pump, fan pulley, fan, fluid coupling and drive belt installations followed by intake air connector assembly, throttle body cover, radiator assembly before filling with engine coolant, checking engine leaks, rechecking engine coolant level and finally installing the engine under cover.
Related 2002 Toyota Tundra Parts
 2002 Toyota Tundra Oil Filter
 2002 Toyota Tundra Timing Chain Tensioner
 2002 Toyota Tundra Valve Cover Gasket
 2002 Toyota Tundra Crankshaft Gear
 2002 Toyota Tundra Crankshaft Pulley
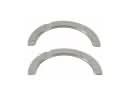 2002 Toyota Tundra Crankshaft Thrust Washer Set
 2002 Toyota Tundra Cylinder Head
 2002 Toyota Tundra Dipstick Tube
 2002 Toyota Tundra Engine Mount
 2002 Toyota Tundra Harmonic Balancer
 2002 Toyota Tundra Intake Valve
 2002 Toyota Tundra Rod Bearing