×
ToyotaParts- Hello
- Login or Register
- Quick Links
- Live Chat
- Track Order
- Parts Availability
- RMA
- Help Center
- Contact Us
- Shop for
- Toyota Parts
- Scion Parts
My Garage
My Account
Cart
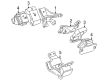
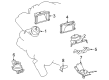
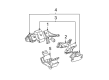
OEM Toyota Tundra Engine Mount
Engine Motor Mount- Select Vehicle by Model
- Select Vehicle by VIN
Select Vehicle by Model
orMake
Model
Year
Select Vehicle by VIN
For the most accurate results, select vehicle by your VIN (Vehicle Identification Number).
51 Engine Mounts found


Toyota Tundra Transmission Mount Part Number: 12371-0F030
$141.34 MSRP: $200.09You Save: $58.75 (30%)


Toyota Tundra Front Mount, Driver Side Part Number: 12362-0P020
$116.12 MSRP: $162.99You Save: $46.87 (29%)Ships in 1-3 Business Days


Toyota Tundra Front Mount Part Number: 12361-0P050
$118.19 MSRP: $167.32You Save: $49.13 (30%)


Toyota Tundra Front Mount Part Number: 12361-0S020
$125.83 MSRP: $178.13You Save: $52.30 (30%)Ships in 1-2 Business Days

Toyota Tundra Transmission Mount Part Number: 12371-0S020
$130.88 MSRP: $185.29You Save: $54.41 (30%)Ships in 1-2 Business Days

Toyota Tundra Front Mount, Driver Side Part Number: 12362-0F010
$154.62 MSRP: $218.88You Save: $64.26 (30%)Ships in 1-3 Business Days


Toyota Tundra Transmission Mount Part Number: 12371-50090
$80.69 MSRP: $113.26You Save: $32.57 (29%)Ships in 1-3 Business Days


Toyota Tundra Mount, Front Part Number: 12361-0F010
$80.69 MSRP: $113.26You Save: $32.57 (29%)Ships in 1-2 Business Days


Toyota Tundra Bracket, Engine Mounting, Front Passenger Side Part Number: 12311-38030
$85.19 MSRP: $119.58You Save: $34.39 (29%)Ships in 1-3 Business Days

Toyota Tundra Rear Mount Part Number: 12371-0P110
$104.39 MSRP: $146.53You Save: $42.14 (29%)Ships in 1-3 Business Days


Toyota Tundra Bracket, Engine Mounting, Front Driver Side Part Number: 12315-38020
$102.25 MSRP: $143.53You Save: $41.28 (29%)Ships in 1-3 Business Days


Toyota Tundra Front Mount, Driver Side Part Number: 12362-0S010
$103.91 MSRP: $145.86You Save: $41.95 (29%)Ships in 1-2 Business Days

Toyota Tundra Rear Mount Part Number: 12371-0F060
$111.50 MSRP: $156.51You Save: $45.01 (29%)Ships in 1-3 Business Days


Toyota Tundra Transmission Mount, Rear Part Number: 12371-0S040
$112.68 MSRP: $158.17You Save: $45.49 (29%)Ships in 1-3 Business Days
Toyota Tundra Transmission Mount Part Number: 12371-62150
$78.32 MSRP: $109.93You Save: $31.61 (29%)Ships in 1-3 Business Days
Toyota Tundra Rear Mount Part Number: 12371-F4010
$129.00 MSRP: $182.62You Save: $53.62 (30%)Ships in 1-3 Business DaysToyota Tundra Rear Mount Part Number: 12371-F4030
$133.94 MSRP: $189.61You Save: $55.67 (30%)Ships in 1-3 Business DaysToyota Tundra Transmission Mount Part Number: 12371-0F010
$133.23 MSRP: $188.60You Save: $55.37 (30%)Ships in 1-3 Business Days


Toyota Tundra Front Mount Part Number: 12361-0F020
$138.29 MSRP: $195.76You Save: $57.47 (30%)


Toyota Tundra Transmission Mount Part Number: 12371-0F050
| Page 1 of 3 |Next >
1-20 of 51 Results
Toyota Tundra Engine Mount
Choose genuine Engine Mount that pass strict quality control tests. You can trust the top quality and lasting durability. Shopping for OEM Engine Mount for your Toyota Tundra? Our website is your one-stop destination. We stock an extensive selection of genuine Toyota Tundra parts. The price is affordable so you can save more. It only takes minutes to browse and find the exact fit. Easily add to cart and check out fast. Our hassle-free return policy will keep you stress-free. We process orders quickly for swift delivery. Your parts will arrive faster, so you can get back on the road sooner.
Toyota Tundra Engine Mount Parts and Q&A
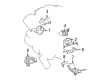
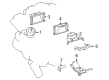
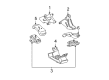
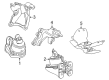
- Q: How to remove the rear Engine Mount on Toyota Tundra?A:Caring for the automatic transmission assembly with a transmission jack before lifting it from the crossmember is the first step for removing the rear engine mounting. The maintenance sequence begins with removing bolts of the rear No. 3 engine mounting insulator before proceeding with the removal of 4 nuts and bolts combined with 4 plate washers and the crossmember. After detaching the 4 bolts mounted to the transmission you can take away the rear No. 1 engine mounting insulator.
- Q: How to install the rear engine mounting on Toyota Tundra?A:The first step to install the 1GR-FE engine's rear engine mounting requires starting by supporting the automatic transmission assembly with a transmission jack for slight lifting off the crossmember. The transmission must receive the rear No. 1 engine mounting insulator fitted with 4 bolts that require a torque of 40 Nm (408 kgf-cm, 30 ft-lbf). The engine rear mounting insulator should receive the No. 3 frame crossmember sub-assembly through 4 bolts while maintaining a torque at 16 Nm (63 kgf-cm, 12 ft-lbf). Screw 4 bolts and apply 4 plate washers and 4 nuts on the frame crossmember at the specified torque of 110 Nm (1122 kgf-cm, 81 ft-lbf).


Related Toyota Tundra Parts
 Toyota Tundra Oil Drain Plug
 Toyota Tundra Oil Pan
 Toyota Tundra Valve Cover Gasket
 Toyota Tundra Cam Gear
 Toyota Tundra Camshaft Bearing
 Toyota Tundra Crankshaft Gear
 Toyota Tundra Crankshaft Seal
 Toyota Tundra Dipstick Tube
 Toyota Tundra Piston
 Toyota Tundra Spool Valve
 Toyota Tundra Timing Cover Gasket
 Toyota Tundra Variable Timing Sprocket