×
ToyotaParts- Hello
- Login or Register
- Quick Links
- Live Chat
- Track Order
- Parts Availability
- RMA
- Help Center
- Contact Us
- Shop for
- Toyota Parts
- Scion Parts
My Garage
My Account
Cart
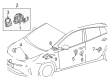
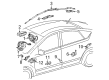
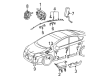
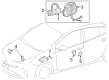
OEM Toyota Prius Air Bag
Air Bag Module- Select Vehicle by Model
- Select Vehicle by VIN
Select Vehicle by Model
orMake
Model
Year
Select Vehicle by VIN
For the most accurate results, select vehicle by your VIN (Vehicle Identification Number).
35 Air Bags found


Toyota Prius Side Impact Inflator Module, Driver Side
Part Number: 73920-47120$392.93 MSRP: $575.84You Save: $182.91 (32%)Ships in 1-3 Business Days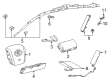
Toyota Prius Side Impact Inflator Module, Passenger Side
Part Number: 73910-47120$395.20 MSRP: $579.16You Save: $183.96 (32%)Ships in 1-3 Business Days
Toyota Prius Inflator Curtain, Passenger Side
Part Number: 62170-47010$754.08 MSRP: $1105.11You Save: $351.03 (32%)Ships in 1-3 Business Days
Toyota Prius Side Impact Inflator Module, Driver Side
Part Number: 73920-47040$429.47 MSRP: $629.40You Save: $199.93 (32%)Ships in 1-3 Business DaysToyota Prius Inflator Curtain, Driver Side
Part Number: 62180-47010$779.14 MSRP: $1141.85You Save: $362.71 (32%)Ships in 1-3 Business Days
Toyota Prius Side Impact Inflator Module, Passenger Side
Part Number: 73910-47130$395.20 MSRP: $579.16You Save: $183.96 (32%)Ships in 1-2 Business Days
Toyota Prius Inflator Curtain, Passenger Side
Part Number: 62170-47020$566.92 MSRP: $830.83You Save: $263.91 (32%)Ships in 1-3 Business Days
Toyota Prius Knee Inflator Module, Lower
Part Number: 73900-47020-E0$877.23 MSRP: $1285.59You Save: $408.36 (32%)Ships in 1-3 Business Days
Toyota Prius Passenger Air Bag, Upper
Part Number: 73960-47060$662.49 MSRP: $970.88You Save: $308.39 (32%)Ships in 1-3 Business DaysToyota Prius Side Impact Inflator Module, Passenger Side
Part Number: 73910-47040$429.47 MSRP: $629.40You Save: $199.93 (32%)Ships in 1-3 Business Days
Toyota Prius Passenger Air Bag
Part Number: 73960-47010$677.84 MSRP: $993.39You Save: $315.55 (32%)Ships in 1-3 Business Days
Toyota Prius Passenger Air Bag
Part Number: 73970-47030-B0$737.14 MSRP: $1080.29You Save: $343.15 (32%)Ships in 1-3 Business Days
Toyota Prius Side Impact Inflator Module, Black, Passenger Side
Part Number: 73930-47050-C0$446.84 MSRP: $654.84You Save: $208.00 (32%)Ships in 1-2 Business DaysToyota Prius Passenger Air Bag
Part Number: 73960-47040$597.48 MSRP: $875.60You Save: $278.12 (32%)Ships in 1-3 Business Days
Toyota Prius Rear Seat Air Bag, Driver Side
Part Number: 73940-47010-C0$446.84 MSRP: $654.84You Save: $208.00 (32%)Ships in 1-3 Business Days
Toyota Prius Inflator Module, Passenger Side
Part Number: 739F0-10010$306.50 MSRP: $437.62You Save: $131.12 (30%)Ships in 1-3 Business Days
Toyota Prius Inflator Curtain, Driver Side
Part Number: 62180-47120$696.99 MSRP: $1021.44You Save: $324.45 (32%)Ships in 1-2 Business DaysToyota Prius Side Impact Inflator Module, Passenger Side
Part Number: 73910-47100$392.93 MSRP: $575.84You Save: $182.91 (32%)Ships in 1-3 Business DaysToyota Prius Inflator Curtain, Passenger Side
Part Number: 62170-47120$696.99 MSRP: $1021.44You Save: $324.45 (32%)Ships in 1-2 Business DaysToyota Prius Side Impact Inflator Module, Driver Side
Part Number: 73920-47160$395.20 MSRP: $579.16You Save: $183.96 (32%)Ships in 1-2 Business Days
| Page 1 of 2 |Next >
1-20 of 35 Results
Toyota Prius Air Bag
Choose genuine Air Bag that pass strict quality control tests. You can trust the top quality and lasting durability. Shopping for OEM Air Bag for your Toyota Prius? Our website is your one-stop destination. We stock an extensive selection of genuine Toyota Prius parts. The price is affordable so you can save more. It only takes minutes to browse and find the exact fit. Easily add to cart and check out fast. Our hassle-free return policy will keep you stress-free. We process orders quickly for swift delivery. Your parts will arrive faster, so you can get back on the road sooner.
Toyota Prius Air Bag Parts and Q&A
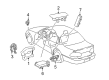
- Q: How to inspect the front passenger Air Bag assembly after a collision on Toyota Prius?A:The inspection process of the front passenger Air Bag assembly starts with conducting diagnostic systems checks immediately following a crash. The front passenger Air Bag needs replacement with a new Air Bag when visual examination reveals any cuts, cracks or discoloration on its surface and in the grooved portion during inspection of undamaged Air Bags which were not involved in collisions. The front passenger Air Bag needs replacement with a new one after a vehicular collision when visual checks detect any damages such as cuts or cracks or discoloration or damage to connectors or deformation or cracking on the instrument panel or its reinforcement. The correct procedures need strict adherence when removing or installing the front passenger Air Bag.
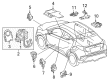
- Q: How to remove and install the side Air Bag assembly and front seat on Toyota Prius?A:The process for removing the side Air Bag assembly begins with seat removal through 2 track cover removal and 4 bolt uninstallation followed by connector disconnection of the side Air Bag while protecting the wire harness. The reclining adjuster release handle needs two screws removed before you can remove it along with the front seat cushion shield from both sides. After disconnecting the wire harness from the seat cushion assembly users need to unscrew four bolts from the seatback assembly while keeping the deployment side of the Air Bag in an upward direction. The first installation step is to attach the seatback assembly to the seat adjuster through 4 bolts of 43 N.m (440 kgf.cm, 32 ft.lbf) torque specification while using 5 new hog rings to fasten the assembly. First install the seat cushion assembly after which you should secure the front seat cushion shields on both sides with 2 screws. Reconnect the reclining adjuster release handle before putting on the front seat while also maintaining care of the Air Bag wire harness. When connecting the side Air Bag connector place the front seat in the most front position then test the locking mechanism of the seat adjuster. Holding the seat track handle should be avoided before seat installation on the vehicle with front bolt torque at 37 N.m (375 kgf.cm, 27 ft.lbf) followed by final tightening of interior bolts at 37 N.m (375 kgf.cm, 27 ft.lbf). Install the rear side bolts at the most front point where they guarantee torques exactly to 37 N.m (375 kgf.cm, 27 ft.lbf). Afterwards thread in the 2 seat track covers.


Related Toyota Prius Parts
 Toyota Prius TPMS Sensor
 Toyota Prius Clock Spring
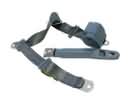 Toyota Prius Seat Belt
 Toyota Prius Speedometer
 Toyota Prius Air Bag Control Module
 Toyota Prius Air Bag Sensor
 Toyota Prius Camshaft Position Sensor
 Toyota Prius Ignition Lock Cylinder
 Toyota Prius Ignition Switch
 Toyota Prius Power Window Switch
 Toyota Prius Relay
 Toyota Prius Throttle Position Sensor