×
ToyotaParts- Hello
- Login or Register
- Quick Links
- Live Chat
- Track Order
- Parts Availability
- RMA
- Help Center
- Contact Us
- Shop for
- Toyota Parts
- Scion Parts
My Garage
My Account
Cart
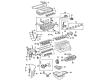
OEM Toyota Oil Pan
Oil Drain Pan- Select Vehicle by Model
- Select Vehicle by VIN
Select Vehicle by Model
orMake
Model
Year
Select Vehicle by VIN
For the most accurate results, select vehicle by your VIN (Vehicle Identification Number).
131 Oil Pans found


Toyota Oil Pan Part Number: 12101-28050
$114.81 MSRP: $161.17You Save: $46.36 (29%)Ships in 1-3 Business DaysProduct Specifications- Other Name: Pan Sub-Assembly, Oil; Engine Oil Pan


Toyota Oil Pan Part Number: 12101-0D010
$121.37 MSRP: $171.81You Save: $50.44 (30%)Ships in 1-3 Business DaysProduct Specifications- Other Name: Pan Sub-Assembly, Oil; Engine Oil Pan
- Manufacturer Note: (L)
- Replaces: 12101-0D020, 12101-22022, 12101-22023, 12101-22021, 12101-22024


Toyota Oil Pan, Lower Part Number: 12102-0P030
$146.51 MSRP: $207.40You Save: $60.89 (30%)Ships in 1-2 Business DaysProduct Specifications- Other Name: Pan Sub-Assembly, Oil; Engine Oil Pan, Lower; Lower Oil Pan
- Position: Lower


Toyota Oil Pan Part Number: 12102-37010
$113.87 MSRP: $159.83You Save: $45.96 (29%)Ships in 1-3 Business DaysProduct Specifications- Other Name: Pan Sub-Assembly, Oil; Engine Oil Pan; Lower Oil Pan
- Manufacturer Note: (J)
- Replaces: 12102-0T020


Toyota Pan Sub-Assembly, Oil, Lower Part Number: 12102-0P041
$145.92 MSRP: $206.58You Save: $60.66 (30%)Ships in 1-2 Business DaysProduct Specifications- Other Name: Oil Pan
- Position: Lower


Toyota Pan Sub-Assembly, Oil, Lower Part Number: 12102-0P020
$142.05 MSRP: $201.08You Save: $59.03 (30%)Ships in 1-2 Business DaysProduct Specifications- Other Name: Engine Oil Pan; Oil Pan
- Position: Lower
- Replaces: 12102-31050, 12102-31051


Toyota Pan Sub-Assembly, Oil, Lower Part Number: 12102-50130
$105.81 MSRP: $148.53You Save: $42.72 (29%)Ships in 1-3 Business DaysProduct Specifications- Other Name: Engine Oil Pan; Oil Pan
- Position: Lower


Toyota Oil Pan, Lower Part Number: 12102-0S010
$192.80 MSRP: $275.27You Save: $82.47 (30%)Ships in 1-3 Business DaysProduct Specifications- Other Name: Pan Sub-Assembly, Oil; Engine Oil Pan, Lower; Lower Oil Pan; Engine Oil Pan
- Position: Lower
- Replaces: 12102-38010


Toyota Oil Pan Part Number: 12101-0V030
$121.95 MSRP: $172.64You Save: $50.69 (30%)Ships in 1-2 Business DaysProduct Specifications- Other Name: Pan Sub-Assembly, Oil; Engine Oil Pan
- Replaces: 12101-36050, 12101-0V040


Toyota Oil Pan Part Number: 12101-75050
$167.43 MSRP: $237.01You Save: $69.58 (30%)Ships in 1-3 Business DaysProduct Specifications- Other Name: Pan Sub-Assembly, Oil; Engine Oil Pan


Toyota Oil Pan, Lower Part Number: 12102-AD010
$78.79 MSRP: $110.59You Save: $31.80 (29%)Ships in 1-3 Business DaysProduct Specifications- Other Name: Pan Sub-Assembly, Oil; Engine Oil Pan, Lower; Lower Oil Pan; Engine Oil Pan
- Manufacturer Note: (L)
- Position: Lower
- Replaces: 12102-31010


Toyota Oil Pan, Upper Part Number: 12111-21033
$381.12 MSRP: $558.54You Save: $177.42 (32%)Ships in 1-3 Business DaysProduct Specifications- Other Name: Pan, Oil; Engine Oil Pan, Upper; Upper Oil Pan; Pan Sub-Assembly, Oil; Engine Oil Pan
- Position: Upper
- Replaces: 12111-21032, 12111-21030, 12111-21031


Toyota Pan Sub-Assembly, Oil Part Number: 12101-0V010
$120.07 MSRP: $169.98You Save: $49.91 (30%)Ships in 1 Business DayProduct Specifications- Other Name: Engine Oil Pan; Oil Pan
- Replaces: 12101-36040


Toyota Oil Pan, Lower Part Number: 12102-75021
$120.54 MSRP: $170.64You Save: $50.10 (30%)Ships in 1-2 Business DaysProduct Specifications- Other Name: Pan Sub-Assembly, Oil; Engine Oil Pan, Lower; Lower Oil Pan; Engine Oil Pan
- Position: Lower


Toyota Oil Pan Part Number: 12101-0H010
$126.54 MSRP: $179.13You Save: $52.59 (30%)Ships in 1-3 Business DaysProduct Specifications- Other Name: Pan Sub-Assembly, Oil; Engine Oil Pan; Lower Oil Pan
- Replaces: 12101-28030


Toyota Pan Sub-Assembly, Oil Part Number: 12102-46031
$154.38 MSRP: $218.55You Save: $64.17 (30%)Ships in 1-2 Business DaysProduct Specifications- Other Name: Oil Pan
- Replaces: 12102-46030


Toyota Oil Pan Part Number: 12101-65030
$166.13 MSRP: $235.19You Save: $69.06 (30%)Ships in 1-3 Business DaysProduct Specifications- Other Name: Pan Sub-Assembly, Oil

Toyota Oil Pan Part Number: 12101-65012
$167.43 MSRP: $237.01You Save: $69.58 (30%)Ships in 1-3 Business DaysProduct Specifications- Other Name: Pan Sub-Assembly, Oil; Engine Oil Pan
- Replaces: 12101-65010, 12101-65011


Toyota Oil Pan Part Number: 12101-74150
$82.90 MSRP: $116.38You Save: $33.48 (29%)Product Specifications- Other Name: Engine Oil Pan; Pan Sub-Assembly, Oil


Toyota Oil Pan Part Number: 12101-22040
$120.90 MSRP: $171.14You Save: $50.24 (30%)Product Specifications- Other Name: Pan Sub-Assembly, Oil; Engine Oil Pan
| Page 1 of 7 |Next >
1-20 of 131 Results
Toyota Oil Pan
OEM parts deliver unmatched quality you can rely on. They pass extensive quality control inspections. Toyota produces them to the official factory specifications. This process helps prevent defects and imperfections. So you can get exceptional lifespan and a flawless fit. Need new OEM Toyota Oil Pan? You'll love our wide selection of genuine options. Shop in minutes and skip the hunt. Our prices are unbeatable, you'll save time and money. It's easy to shop and find the right piece. Our committed customer service team gives professional help from start to finish. Every part includes a manufacturer's warranty. We ship quickly, your parts will arrive fast at your door.
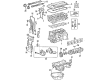
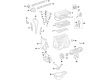
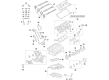
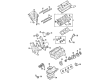
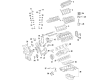
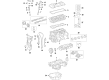
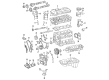
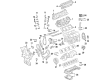
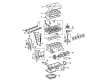
Toyota Oil Pan gathers and protects engine oil to ensure that lubrication is maintained during daily driving. Toyota expanded into a famous brand in the world by reducing waste and encouraging fast solutions to problems. Its factories cut down time losses and allow teams to stop lines whenever anything does not look right. Hybrid technology never stagnates; in 2022 engineers refined the plug-in technology and allocated batteries to a greater number of models. The TNGA platform sheds weight, reduces the center of gravity, and reduces cornering grip without sacrificing comfort. Customers continue to choose this because cars have long-running capabilities, consume less fuel, and are able to endure rough roads. In 2024 Toyota has gone even further with the range with the plug-in RAV4, which travels 42 electric miles and then the engine is awakened. The high quality of the Toyota has been the magnet that draws drivers every year. Oil Pan is positioned beneath the block, a hard metallic sump holding all that valuable quart until the pump demands it. The hard braking and cornering turbulence is broken by baffles inside to ensure that the pickup does not gulp air and starve bearings. When the Oil Pan is cracked by a rock, it quickly forms puddles and the dipstick drops before you can even blink. Change to a new Oil Pan at the initial wet stain and save gaskets, rods, and your wallet. Have the sealant surfaces remain straight and eliminate micro-leaks that roast catalytic converters, which occur by using a clean undented Oil Pan. That is such a small gesture that it fits the keep-it-running philosophy of Toyota drivers.
Toyota Oil Pan Parts and Q&A
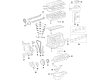
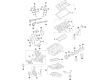
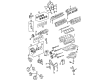
- Q: How to remove and install the oil pan in V6 engine on 1995 through 2004 Toyota Tacoma?A:The procedure of removing the oil pan in all 4WD models requires the separation of the front driveshafts and front differential assembly, and therefore it is often easier to pull out the engine to gain access to the area of the oil pan. To start with, remove the cover beneath the engine hood and then, unbend the cable which is negative from the battery; additionally, if the stereo you are to steal has an anti theft feature, make sure that you have the correct code. Open the hood and loosen the bolt from the top of the rack and trace using a wrench. In case of 4WD models, it is required to have the front differential and drive axles detached. Pull out the oil pump pick-up pipe and drain the used engine oil and then remove the used oil filter and the flywheel housing cover. Remove the bolts and nuts that hold the oil pan, and gently lift it off If you find that it has become stuck it will help not to force it in a way that will damage the mating surfaces. Take off the oil pump strainer/pickup and the baffle plate, if fitted, at the underside of the engine. Regarding installation, one will have to remove all previous silicone that was used in the installation process, clean both faces of the block and oil pan, and ensure the threaded bolt holes were clean. Ensure that the oil pan flange is distorted and then the distorted part the flattened out. Replace the baffle if the one was removed, check the oil pump pick-up/strainer assembly for any signs of wear and if worn replace the pick-up with the strainer and a new gasket. Cove the oil pan flange with ATV sealant, set the oil pan in its place on the engine block, and use the bolts to secure it tightening them from the center out. Reversing the procedures to the removal process should complete the installation process, refill the oil and replace the oil filter. Last but not the least, start the engine to observe for the oil pressure and leaks.
- Q: How to remove and install the oil pan in V6 engine on Toyota Tundra?A:On 4WD models, it will be necessary to either remove the front axle/differential assembly or remove the engine from the vehicle in order to remove the oil pan. Begin by disconnecting the cable from the negative terminal of the battery. Raise the front of the vehicle and place it securely on jackstands. Drain the engine oil and remove the splash shield from underneath the engine. Remove the bolts and nuts that secure oil pan No. 2 (the smaller stamped steel pan) to the larger cast aluminum oil pan, which may be stuck due to RTV sealant; tap it loose with a rubber-tipped mallet or carefully cut the sealant with a putty knife and hammer, ensuring not to damage the mating surfaces. Next, remove the two oil pump pickup tube/strainer mounting nuts and the pickup/strainer assembly, followed by the four bolts that attach the flywheel housing cover and the cover itself. Remove the 17 bolts and 2 nuts securing the oil pan to the engine block, along with the 4 stud bolts, and carefully pry the oil pan loose from the engine block, taking care to only pry in the small cutout areas along the side of the pan. For installation, use a scraper to remove all traces of old sealant from the block and oil pan, and clean the mating surfaces with brake system cleaner. Ensure the threaded holes in the block are clean and check the flange of the steel oil pan for distortion around the bolt holes, flattening it if necessary. Inspect the strainer for cracks or blockage, clean it with solvent, and install it using a new gasket, tightening the fasteners to the specific torque. Apply a 1/8 inch bead of RTV sealant to the upper oil pan flange, position the pan onto the block, and install the fasteners, tightening them to the specific torque in several steps while working from the center out. After installing the aluminum portion of the oil pan, apply a bead of RTV sealant to the flange of the No. 2 oil pan, position it on the upper oil pan, and install the bolts, again tightening them to the specific torque in several steps while working from the center out. Finally, the remainder of installation is the reverse of removal; add oil and install a new filter, then run the engine and check for leaks.


Related Toyota Parts
 Toyota Timing Chain
 Toyota Crankshaft Pulley
 Toyota Dipstick
 Toyota Engine Mount
 Toyota Harmonic Balancer
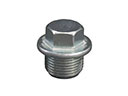 Toyota Oil Drain Plug
 Toyota Oil Filler Cap
 Toyota Balance Shaft Gear
 Toyota Exhaust Valve
 Toyota Oil Pump Spring
 Toyota Piston Ring Set
 Toyota Timing Cover Gasket
Browse Toyota Oil Pan by Models
Tacoma 4Runner Camry Tundra Corolla RAV4 Highlander Prius Sienna Land Cruiser Pickup FJ Cruiser 86 Sequoia T100 Avalon Celica Supra Yaris Matrix MR2 Solara Venza GR86 Echo C-HR Cressida Grand Highlander Paseo Previa Prius C Prius Prime Corolla Cross Corolla iM Crown Crown Signia GR Corolla MR2 Spyder Prius V Starlet Tercel Van Yaris iA Prius Plug-In GR Supra Prius AWD-e RAV4 Prime