×
ToyotaParts- Hello
- Login or Register
- Quick Links
- Live Chat
- Track Order
- Parts Availability
- RMA
- Help Center
- Contact Us
- Shop for
- Toyota Parts
- Scion Parts
My Garage
My Account
Cart
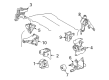
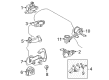
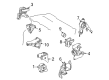
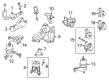
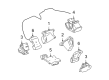
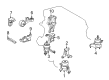
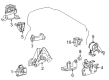
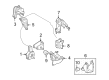
OEM Toyota Engine Mount
Engine Motor Mount- Select Vehicle by Model
- Select Vehicle by VIN
Select Vehicle by Model
orMake
Model
Year
Select Vehicle by VIN
For the most accurate results, select vehicle by your VIN (Vehicle Identification Number).
1500 Engine Mounts found


Toyota Side Mount, Passenger Side Part Number: 12305-0T051
$170.25 MSRP: $241.01You Save: $70.76 (30%)Product Specifications- Other Name: Insulator Sub-Assembly; Engine Mount, Right; Engine Mount Bracket; Motor Mount; Mount; Insulator Sub-Assembly, Engine Mounting, Passenger Side
- Position: Passenger Side
- Replaces: 12305-0T050


Toyota Side Mount, Driver Side Part Number: 12372-28220
$139.23 MSRP: $197.09You Save: $57.86 (30%)Ships in 1-3 Business DaysProduct Specifications- Other Name: Insulator, Engine Mounting; Engine Mount, Left; Engine Mount Bracket; Motor Mount; Insulator, Engine Mounting, Driver Side(For Transverse Engine)
- Position: Driver Side


Toyota Front Mount Part Number: 12361-0T060
$95.14 MSRP: $133.55You Save: $38.41 (29%)Product Specifications- Other Name: Insulator, Engine Mounting; Engine Mount, Front; Engine Mount Bracket; Motor Mount; Insulator, Engine Mounting, Front(For Transverse Engine)


Toyota Side Mount, Passenger Side Part Number: 12305-37070
$154.62 MSRP: $218.88You Save: $64.26 (30%)Ships in 1-3 Business DaysProduct Specifications- Other Name: Insulator Sub-Assembly; Engine Mount, Right; Engine Mount Bracket; Motor Mount; Insulator Sub-Assembly, Engine Mounting, Passenger Side
- Position: Passenger Side


Toyota Side Mount, Driver Side Part Number: 12372-22200
$104.39 MSRP: $146.53You Save: $42.14 (29%)Ships in 1-3 Business DaysProduct Specifications- Other Name: Insulator, Engine Mounting; Engine Mount, Left; Engine Mount Bracket; Motor Mount; Insulator, Engine Mounting, Driver Side(For Transverse Engine)
- Position: Driver Side


Toyota Side Mount, Passenger Side Part Number: 12305-28240
$178.70 MSRP: $255.14You Save: $76.44 (30%)Ships in 1-3 Business DaysProduct Specifications- Other Name: Insulator Sub-Assembly; Engine Mount, Right; Engine Mount Bracket; Motor Mount; Insulator Sub-Assembly, Engine Mounting, Passenger Side
- Position: Passenger Side


Toyota Rear Mount Part Number: 12371-28190
$98.11 MSRP: $137.71You Save: $39.60 (29%)Ships in 1-3 Business DaysProduct Specifications- Other Name: Insulator, Engine Mounting; Engine Mount, Rear; Engine Mount Bracket; Motor Mount; Insulator, Engine Mounting, Rear
- Position: Rear


Toyota Side Mount, Driver Side Part Number: 12372-0T050
$101.42 MSRP: $142.37You Save: $40.95 (29%)Ships in 1-2 Business DaysProduct Specifications- Other Name: Insulator, Engine Mounting; Engine Mount, Left; Engine Mount Bracket; Motor Mount; Mount; Insulator, Engine Mounting, Driver Side(For Transverse Engine)
- Position: Driver Side


Toyota Side Mount, Passenger Side Part Number: 12362-0P051
$158.85 MSRP: $224.87You Save: $66.02 (30%)Product Specifications- Other Name: Insulator, Engine Mounting; Engine Mount, Right; Engine Mount Bracket; Motor Mount; Insulator, Engine Mounting, Passenger Side(For Transverse Engine)
- Position: Passenger Side
- Replaces: 12362-0P050


Toyota Front Mount Part Number: 12361-62160
$88.51 MSRP: $124.24You Save: $35.73 (29%)Ships in 1-3 Business DaysProduct Specifications- Other Name: Insulator, Engine Mounting; Engine Mount, Front; Engine Mount Bracket; Motor Mount; Insulator; Insulator, Engine Mounting, Front; Engine Mount
- Position: Front
- Replaces: 12361-62140

Toyota Rear Mount Part Number: 12371-28210
$126.30 MSRP: $178.79You Save: $52.49 (30%)Ships in 1-3 Business DaysProduct Specifications- Other Name: Insulator, Engine Mounting; Engine Mount, Rear; Engine Mount Bracket; Motor Mount; Insulator, Engine Mounting, Rear
- Position: Rear


Toyota Torque Arm Part Number: 12363-0V070
$80.09 MSRP: $112.43You Save: $32.34 (29%)Ships in 1-3 Business DaysProduct Specifications- Other Name: Rod, Engine Moving Control; Engine Support Rod; Engine Mount Torque Strut; Motor Mount; Torque Rod
- Replaces: 12363-36020, 12363-0V031, 12363-0V030, 12363-36021


Toyota Side Mount, Driver Side Part Number: 12372-0V070
$95.03 MSRP: $133.38You Save: $38.35 (29%)Product Specifications- Other Name: Insulator, Engine Mounting; Automatic Transmission Mount, Upper; Engine Mount, Left; Engine Mount Bracket; Motor Mount; Insulator, Engine Mounting, Driver Side(For Transverse Engine)
- Position: Driver Side
- Replaces: 12372-36060


Toyota Rear Mount Part Number: 12371-0D100
$126.77 MSRP: $179.45You Save: $52.68 (30%)Ships in 1-3 Business DaysProduct Specifications- Other Name: Insulator, Engine Mounting; Engine Mount Bracket; Motor Mount; Mount; Insulator, Engine Mounting, Rear; Engine Mount
- Position: Rear


Toyota Rear Mount Part Number: 12371-0T040
$111.50 MSRP: $156.51You Save: $45.01 (29%)Product Specifications- Other Name: Insulator, Engine Mounting; Engine Mount, Rear; Engine Mount Bracket; Motor Mount; Insulator, Engine Mounting, Rear; Engine Mount
- Position: Rear


Toyota Side Mount, Driver Side Part Number: 12372-F0010
$154.27 MSRP: $218.38You Save: $64.11 (30%)Ships in 1-2 Business DaysProduct Specifications- Other Name: Insulator, Engine Mounting; Auto Trans Mount, Rear Left; Engine Mount Bracket; Transfer Case Mount; Motor Mount; Side Transmission Mount; Insulator, Engine Mounting, Driver Side(For Transverse Engine); Transmission Mount
- Position: Driver Side


Toyota Front Mount Part Number: 12361-0T210
$88.74 MSRP: $124.57You Save: $35.83 (29%)Ships in 1-3 Business DaysProduct Specifications- Other Name: Insulator, Engine Mounting; Engine Mount, Front; Engine Mount Bracket; Motor Mount; Mount; Insulator, Engine Mounting, Front(For Transverse Engine)
- Position: Front


Toyota Insulator, Engine Mounting, Rear Part Number: 12371-50180
$152.74 MSRP: $216.22You Save: $63.48 (30%)Ships in 1-3 Business DaysProduct Specifications- Other Name: Insulator, Engine Mounting; Transmission Mount; Motor Mount


Toyota Side Mount, Passenger Side Part Number: 12305-0P030
$183.13 MSRP: $261.46You Save: $78.33 (30%)Ships in 1-3 Business DaysProduct Specifications- Other Name: Insulator Sub-Assembly; Engine Mount, Front, Right; Engine Mount Bracket; Motor Mount; Front Mount; Insulator Sub-Assembly, Engine Mounting, Passenger Side
- Position: Passenger Side
- Replaces: 12305-31090


Toyota Rear Mount Part Number: 12371-0P030
$58.78 MSRP: $81.82You Save: $23.04 (29%)Product Specifications- Other Name: Insulator, Engine Mounting; Automatic Transmission Mount; Engine Mount Torque Strut; Engine Mount Bracket; Motor Mount; Rear Insulator; Insulator, Engine Mounting, Rear
| Page 1 of 75 |Next >
1-20 of 1500 Results
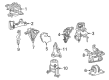
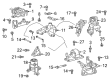
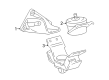
Toyota Engine Mount
OEM parts deliver unmatched quality you can rely on. They pass extensive quality control inspections. Toyota produces them to the official factory specifications. This process helps prevent defects and imperfections. So you can get exceptional lifespan and a flawless fit. Need new OEM Toyota Engine Mount? You'll love our wide selection of genuine options. Shop in minutes and skip the hunt. Our prices are unbeatable, you'll save time and money. It's easy to shop and find the right piece. Our committed customer service team gives professional help from start to finish. Every part includes a manufacturer's warranty. We ship quickly, your parts will arrive fast at your door.
Toyota Engine Mount ensures the engine remains quiet and steady during all drives. Toyota was able to expand its Japanese origins of 1937 into an international icon by mastering lean production that reduced wastage and allowed problems to be resolved immediately. Shoppers are embracing how this brand combines that factory discipline with never-ending upgrades like Hybrid Synergy Drive, expanded plug-in, and the versatile TNGA chassis that tightens handling and enhances safety without adding to weight. There are real-world benefits to drivers too, in the increased fuel economy in a Prius to the electric range of the RAV4 plug-in, and it is showing that durability can coexist with innovation. All these build up to permanent loyalty since the vehicles feel sturdy over the years when daily commuting becomes brutal. Hybrid tweaks are released every year and indicate that the company does not need to flaunt about its objectives but rather prioritize actual gains. Within all existing Toyotas, the Engine Mount incorporates either layered rubber, fluid-filled chambers, or active electronics to secure the powerplant and eliminate vibration from idle to redline, as well as prevent unwanted vibration from finding its way into the cabin. The crankshaft is also kept in position in the same Engine Mount, thereby avoiding any drive train angles from changing when you punch the throttle or brakes. That stability assists Toyota in safeguarding the lifespan of the drive trains and the silence which is anticipated by the people. Engine Mounts may age by leaking, becoming soft from heat, or cracking its rubber, thus a driver should pay attention to thuds during shifts or additional shaking at idle. A new, fresh Engine Mount will bring back the feel that is planted and synonymous with Toyota on any road.
Toyota Engine Mount Parts and Q&A
- Q: How should engine mounts be checked and replaced in 3.5L V6 engine on Toyota Highlander?A:Engine mounts are usually very reliable and usually do not need intervention; however, if they are broken or worn, they should be replaced to avoid straining or damaging driveline elements. During the check the engine should be lifted slightly off the mounts to take the weight off them. First, lift the vehicle and firmly set it on jackstands; place a jack beneath the engine oil pan and insert a large wood block between the jack top and the oil pan; then lift the engine sufficiently off its mounts to shift the load off the mounts but remain far off the drain plug area. This is more important when only supporting a particular part of the body with a jack while the rest of it is under the engine. Test for deterioration at or around the mount area by examining the mounts for crack, hard rubber and if the mounts have totally come off from the metal plates; test the relative movement between the mount plates and the engine or frame with a large screw driver or a pry bar. If any movement is observed, drop the engine and compact the mount fasteners. For replacement, the vehicle should be on jackstands and the engine should also be supported. To deinstall, uninstall the bolts, lift the engine sideways, and disconnect the mount though an engine lift or floor jack and a wooden block placed under the oil pan can be used. If only a single mount is being replaced, the other mount's nut for the mount to engine bracket should be loosened to permit enough elevation of the engine for mount removal. It is done in the reverse method as the removal, applying non-hardening thread locking compound on the mount bolts and nuts while tightening it.
- Q: How should engine mounts be checked and replaced on Toyota Land Cruiser?A:Engine mounts are long lasting items and very rarely cause any reliability issues, however if a mount is broken or perished it should be replaced before it causes damage to the driveline. To check the mounts, lift the engine upward a little off the mounts to take the weight off them. First, securely lift the car off the ground with jack stands and place a jack under the oil pan with a large piece of wood between the jack head and oil pan, lifting the engine only slightly to free up the weight on the rubber engine mounts. As to the mounts, check for cracks, hardened rubber, or where the rubber has delaminated from the metal plates; it is also supply to split down the center. Make sure that any of the mount plates has shifted in relation to the engine or frame by using a large screwdriver or a pry bar; if it has shifted lower the engine and then tighten the mount fasteners. To conform a slow process of deteriorating, the mounts are treated by rubber preservative. For replacement, turn off the vehicle and disconnect the negative battery cable with the car well-supported on jackstands. Pop off the nut on the through bolt and the second bolt and nut that joins the mount to the frame bracket. Lift the engine up a little by a jack or hoist to that the fan cannot touch the radiator or shroud, then take out the through bolt and nut to pull out the mount. Removal is done in reverse order or installation, and the thread locking compound must be applied on the mount bolts and must be tightened.
")

Related Toyota Parts
 Toyota Valve Cover Gasket
 Toyota Camshaft
 Toyota Crankshaft Pulley
 Toyota Harmonic Balancer
 Toyota Oil Pan Gasket
 Toyota Oil Pump
 Toyota Piston
 Toyota Cylinder Head Gasket
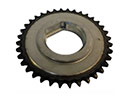 Toyota Balance Shaft Gear
 Toyota Engine Mount Torque Strut
 Toyota Rocker Arm
 Toyota Spool Valve
Browse Toyota Engine Mount by Models
Tacoma 4Runner Camry Tundra Corolla RAV4 Highlander Prius Sienna Land Cruiser Pickup FJ Cruiser 86 Sequoia T100 Avalon Celica Supra Yaris Matrix MR2 Solara Venza GR86 Echo C-HR Cressida Grand Highlander Paseo Previa Prius C Prius Prime Corolla Cross Corolla iM Crown Crown Signia GR Corolla MR2 Spyder Prius V Starlet Tercel Van Yaris iA Prius Plug-In GR Supra Prius AWD-e RAV4 Prime