×
ToyotaParts- Hello
- Login or Register
- Quick Links
- Live Chat
- Track Order
- Parts Availability
- RMA
- Help Center
- Contact Us
- Shop for
- Toyota Parts
- Scion Parts
My Garage
My Account
Cart
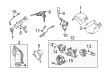
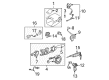
OEM Toyota Automatic Transmission Shift Levers
Automatic Transmission Shifter- Select Vehicle by Model
- Select Vehicle by VIN
Select Vehicle by Model
orMake
Model
Year
Select Vehicle by VIN
For the most accurate results, select vehicle by your VIN (Vehicle Identification Number).
107 Automatic Transmission Shift Levers found


Toyota Shift Lever Part Number: 33055-0C030
$61.49 MSRP: $86.31You Save: $24.82 (29%)Ships in 1-3 Business DaysProduct Specifications- Other Name: Lever Sub-Assembly, Shift; Automatic Transmission Shift Lever
- Replaces: 33055-0C010


Toyota Gear Shift Assembly Part Number: 33560-47023
$547.85 MSRP: $802.89You Save: $255.04 (32%)Ships in 1-3 Business DaysProduct Specifications- Other Name: Lever Assembly, Shift, Lock Control; Automatic Transmission Selector Handle
- Replaces: 33560-47022, 33560-47021


Toyota Gear Shift Assembly Part Number: 33530-33131
$128.78 MSRP: $182.31You Save: $53.53 (30%)Ships in 1-3 Business DaysProduct Specifications- Other Name: Lever Assembly, Shift; Lever Assembly, Shift (For Floor Shift)
- Replaces: 33530-33130


Toyota Gear Shift Assembly Part Number: 33530-12770
$142.05 MSRP: $201.08You Save: $59.03 (30%)Ships in 1 Business DayProduct Specifications- Other Name: Lever Assembly, Shift; Lever Assembly, Shift (For Floor Shift)


Toyota Gear Shift Assembly Part Number: 33530-35260
$201.42 MSRP: $287.58You Save: $86.16 (30%)Ships in 1-3 Business DaysProduct Specifications- Other Name: Lever Assembly, Shift; Lever Assembly, Shift (For Floor Shift)


Toyota Gear Shift Assembly Part Number: 33530-04060
$207.82 MSRP: $296.73You Save: $88.91 (30%)Product Specifications- Other Name: Lever Assembly, Shift; Lever Assembly, Shift (For Floor Shift)


Toyota Gear Shift Assembly Part Number: SU003-04598
$142.65 MSRP: $187.79You Save: $45.14 (25%)Ships in 1-3 Business DaysProduct Specifications- Other Name: Lever Complete; Lever Assembly, Shift (For Floor Shift)
- Replaces: SU003-00876, SU003-04526


Toyota Shift Lever Part Number: 33055-41020
$60.90 MSRP: $85.48You Save: $24.58 (29%)Product Specifications- Other Name: Lever Sub-Assembly, Shift; Manual Transmission Shift Lever; Lever Sub-Assembly, Column Shift


Toyota Gear Shift Assembly Part Number: 33530-12850
$132.18 MSRP: $187.11You Save: $54.93 (30%)Product Specifications- Other Name: Lever Assembly, Shift; Lever Assembly, Shift (For Floor Shift)


Toyota Gear Shift Assembly Part Number: 33530-35270
$194.31 MSRP: $277.43You Save: $83.12 (30%)Product Specifications- Other Name: Lever Assembly, Shift; Lever Assembly, Shift (For Floor Shift)


Toyota Gear Shift Assembly Part Number: 33530-16150
$271.88 MSRP: $388.17You Save: $116.29 (30%)Product Specifications- Other Name: Lever Assembly, Shift; Lever Assembly, Shift (For Floor Shift)
- Replaces: 33530-16140


Toyota Gear Shift Assembly, Lower Part Number: 33560-60091
$1180.16 MSRP: $1729.54You Save: $549.38 (32%)Product Specifications- Other Name: Lever Assembly, Shift, Lock Control; Shift Lever; Lever Assembly, Shift, Lower
- Position: Lower
- Replaces: 33560-60090


Toyota Shift Lever Part Number: 33055-0C020
Product Specifications- Other Name: Lever Sub-Assembly, Shift; Automatic Transmission Shift Lever; Lever Sub-Assembly, Column Shift


Toyota Shift Lever Part Number: 33055-41012
Product Specifications- Other Name: Lever Sub-Assembly, Shift; Lever Sub-Assembly, Column Shift
- Replaces: 33055-41011, 33055-41010


Toyota Gear Shift Assembly Part Number: 33501-0C021
Product Specifications- Other Name: Shaft Sub-Assembly, Control; Shift Lever; Controller
- Replaces: 33501-0C020


Toyota Gear Shift Assembly Part Number: 33501-0C012
Product Specifications- Other Name: Shaft Sub-Assembly, Control; Shift Lever; Controller
- Replaces: 33501-0C010, 33501-0C011


Toyota Gear Shift Assembly Part Number: 33501-08011
Product Specifications- Other Name: Shaft Sub-Assembly, Control; Automatic Transmission Selector Handle; Control Shaft
- Replaces: 33501-08010


Toyota Gear Shift Assembly Part Number: 33530-35141
Product Specifications- Other Name: Lever Assembly, Shift; Lever Assembly, Shift (For Floor Shift)
- Replaces: 33530-35140

Toyota Gear Shift Assembly Part Number: 33530-35310
Product Specifications- Other Name: Lever Assembly, Shift; Lever Assembly, Shift (For Floor Shift)


Toyota Gear Shift Assembly Part Number: 33530-42020
Product Specifications- Other Name: Lever Assembly, Shift; Lever Assembly, Shift (For Floor Shift)
| Page 1 of 6 |Next >
1-20 of 107 Results
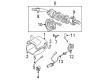
Toyota Automatic Transmission Shift Levers
OEM parts deliver unmatched quality you can rely on. They pass extensive quality control inspections. Toyota produces them to the official factory specifications. This process helps prevent defects and imperfections. So you can get exceptional lifespan and a flawless fit. Need new OEM Toyota Automatic Transmission Shift Levers? You'll love our wide selection of genuine options. Shop in minutes and skip the hunt. Our prices are unbeatable, you'll save time and money. It's easy to shop and find the right piece. Our committed customer service team gives professional help from start to finish. Every part includes a manufacturer's warranty. We ship quickly, your parts will arrive fast at your door.
Toyota Automatic Transmission Shift Levers are located by the driver's seat to allow your hand to select the Park, Reverse, Neutral, or Drive position and relay accurate instructions to the gearbox. Toyota perfected the principle of lean building so every car feels tight, wastes nothing, and shrugs off daily abuse. The updated Hybrid Synergy Drive sips fuel yet kicks hard when you punch the pedal. The TNGA platform lowers the center of gravity for sharper turns and stronger crash protection. Owners trust Toyota for easy controls, logical cabin layouts, and parts that continue to function long after trendy rivals rust away. Toyota Automatic Transmission Shift Levers have the advantage of this thinking in that they have solid detent gates, smooth bushings, and a tough brake shift interlock that prevents mis-shifts but runs smooth when the pedal is down. First, park your Toyota on level ground, disconnect the battery, and keep the airbag quiet before you switch Automatic Transmission Shift Levers. Pop the console trim with a plastic tool, unclip the indicator lamp plug, and back out the bolts so the old lever pops up free. Thread the shift cable eye onto the new pivot, press the harness connector until it clicks, then drop the lever through the console and tighten the fasteners. Once tightened, the Automatic Transmission Shift Levers feel solid. Snap the trim back, reconnect the battery, cycle every gate, and drive off knowing that each range engages cleanly.
Toyota Automatic Transmission Shift Levers Parts and Q&A
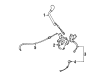
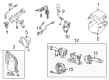
- Q: How to service and repair the Automatic Transmission Shift Levers assembly for the column shift type on Toyota Tundra?A:Initial service of the column shift type shift lever assembly requires starting with an on-car examination to check smooth movement of the P to R positions when the ignition is ON and the brake pedal is depressed while validating forward movement in D and reverse movement in R. Check the installation of park/neutral position switch assembly as well as the shift lever assembly when problems occur. The service requires disconnecting the negative battery cable for at least 90 seconds before removing the front door scuff plates as well as the cowl side trim board and lower instrument panel finish panel and instrument panel safety pad insert and steering pad and steering wheel assembly and both steering column covers. The installer should detach the turn signal switch assembly including spiral cable sub-assembly then remove the column shift assembly by unconnecting the transmission control cable and harness. The column shift requires disassembly with the removal of shifting bellcrank assembly, compression spring, shift lever plate sub-assembly, lock release link, lever subassembly, shift lock solenoid and transmission control switches for P and S positions. Check the column shift lever subassembly while evaluating its resistance level then readjust the shift lever alignment if required. Installation must begin with the transmission control switches while the assembly process requires secure connection of the shift lock plate and solenoid and lever subassembly at the correct torque levels. The last step involves installing the column shift assembly and turn signal switch assembly and steering components and negative battery terminal reconnection while systems operating after reconnection initiation may be necessary.

Related Toyota Parts
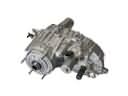 Toyota Transfer Case
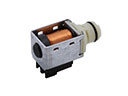 Toyota Shift Solenoid
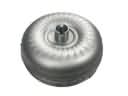 Toyota Torque Converter
 Toyota Automatic Transmission Filter
 Toyota Clutch Master Cylinder
 Toyota Flywheel
 Toyota Shift Cable
 Toyota Transmission Drain Plug
 Toyota Transmission Pan
 Toyota Valve Body
 Toyota Automatic Transmission Output Shaft Seal
 Toyota Clutch Hose