×
ToyotaParts- Hello
- Login or Register
- Quick Links
- Live Chat
- Track Order
- Parts Availability
- RMA
- Help Center
- Contact Us
- Shop for
- Toyota Parts
- Scion Parts
My Garage
My Account
Cart
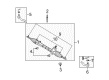
OEM Scion xB Rack And Pinion
Steering Gear- Select Vehicle by Model
- Select Vehicle by VIN
Select Vehicle by Model
orMake
Model
Year
Select Vehicle by VIN
For the most accurate results, select vehicle by your VIN (Vehicle Identification Number).
2 Rack And Pinions found

Scion xB Gear Assembly Part Number: 45510-12471
$608.35 MSRP: $891.54You Save: $283.19 (32%)Ships in 1-3 Business Days
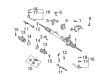
Scion xB Steering Gear Part Number: 44200-52340
$610.09 MSRP: $894.08You Save: $283.99 (32%)Ships in 1-3 Business Days
Scion xB Rack And Pinion
Choose genuine Rack And Pinion that pass strict quality control tests. You can trust the top quality and lasting durability. Shopping for OEM Rack And Pinion for your Scion xB? Our website is your one-stop destination. We stock an extensive selection of genuine Scion xB parts. The price is affordable so you can save more. It only takes minutes to browse and find the exact fit. Easily add to cart and check out fast. Our hassle-free return policy will keep you stress-free. We process orders quickly for swift delivery. Your parts will arrive faster, so you can get back on the road sooner.
To Rack And Pinion essentially forms part of the magnificent Scion xB car model recognized for its reliability and excellent performance. This steering mechanism converts the rotational movement of the steering wheel into smooth lateral movement of the front wheels for better control. There has been a combination of manual and power rack and pinion steering in Scion xB models in the past but now in the present models hydraulic power assist is dominantly used. This innovation also corrects the ease of steering while also increasing the general effectiveness and safety of the vehicle by decreasing the amount of energy needed to control the car. The Rack And Pinion is adaptable with different xB models where a driver would desire to hinder a decline in their car's performance. Problems like leakage of fluid or wear and tear of the gears of the rack and pinion can compromise on the power steering, thus the need for routine checking. The Scion box shaped xB and solid options for its engine would be more benefited from the rack and pinion system that has also gained a reputation for its durability in the market. Standard features include hydraulic power assist and other special features distinguish the Rack And Pinion, guaranteeing that the driver has a good handling of the ride. In summary, the Rack And Pinion is important in improving the reliability, safety, and other features of the Scion xB models.
Scion xB Rack And Pinion Parts and Q&A
- Q: How to install the Rack And Pinion and related components on Scion xB?A:Install each tie rod end sub-assembly LH and sub-assembly RH by fitting them to the rack and pinion assembly while matching their marks. Subsequently adjust toe-in then tighten the lock nut. The front suspension crossmember sub-assembly requires 2 bolts and 2 nuts to install the steering link assembly at 138 Nm (1407 kgf-cm, 102 ft-lbf) torque which starts from the left side of the vehicle with a condition that the nut stays fixed during bolt tightening. Synchronize the matchmarks before installing the steering intermediate shaft onto the steering link assembly using a bolt secured with a 35 Nm torque value (357 kgf-cm, 26 ft-lbf). Position the round hole of the No. 1 steering column hole cover sub-assembly over the protrusion on the steering link assembly before attachment. Perform front suspension crossmember sub-assembly installation before adding front suspension member rear braces to both Left Hand (LH) and Right Hand (RH) sides. For both sides follow the same procedure when installing the front lower suspension arm sub-assembly LH and RH. Secretly join the tie rod end sub-assembly LH to the Steering Knuckle while tightening the nut to 49 Nm (500 kgf-cm, 36 ft-lbf). Then adjust the nut angularly to 60 degrees before inserting a new cotter pin if the holes are misaligned. Keep the same installation steps for the tie rod end sub-assembly RH. Execute the same procedure for installing the tie rod end sub-assembly on the right-hand side. The front stabilizer link assembly installation follows the same procedures for both left-hand and right-hand sides. The procedure must be performed twice to attach the front suspension member reinforcement to both LH and RH sides. The installation order is rear engine under cover LH, rear engine under cover RH along with No. 2 engine under cover and No. 1 engine under cover. The installation of the No. 1 steering column hole cover sub-assembly requires you to attach clip B onto the body before installing it with clip A while being careful to avoid damaging the lip portion. Nissan Tida builds the No.2 steering intermediate shaft assembly and column hole cover silencer sheet. Ending the installation process requires wheel attachment where torque reaches 103 Nm (1050 kgf-cm, 76 ft-lbf). Subsequently, a front wheel orientation check and adjustment must be performed.
- Q: How to service and repair the Rack And Pinion on Scion xB?A:The first step for power steering link maintenance involves disconnecting front wiper arms from both sides and removing the hood to cowl top seal and cowl top ventilator louvers, windshield Wiper Motor along with its link assembly and cowl panel sub-assembly. The center front wheel inspection leads to disconnecting the steering column hole cover plate and sliding yoke sub-assembly but only after fixing the steering wheel with a seat belt to stop rotation and marking sliding yoke and intermediate shaft positions before disconnection. The technician must detach the No. 1 steering column hole cover sub-assembly followed by hood sub-assembly removal and power steering fluid draining and finally disconnecting both front wheels. Starting with the removal of tie rod end sub-assemblies from both sides of the vehicle, the team will proceed to detach engine under covers and pressure feed tube assembly and No. 1 front suspension arm sub-assemblies. Place the engine assembly on No. 1 engine hangers (Part No.: 12281-21010) then secure it with bolts (Part No.: 91642-81025) to a torque value of 40 Nm (408 kgf-cm, 30 ft. lbs.). The mechanics should remove the front suspension crossmember sub-assembly together with the power steering rack housing heat insulator and the No. 1 steering column hole cover sub-assembly. First separate the steering intermediate shaft before handling the power steering rack and pinion assembly while maintaining marks on its steering link and No. 2 bracket. Remove the steering turn pressure tubes on both sides by using Special Service Tool: 09023-38201 then disassemble the power steering rack and pinion assembly starting with tie rod ends and continuing to steering rack boot clips and clamps. The repair requires inspection of the power steering rack followed by installation of power steering rack housing oil seal, rack steering piston ring and power steering rack with correct torque specifications applied. The service will end with front wheels installation after applying pressure feed tube assembly and installing tie rod ends alongside steering rack end sub-assembly and check fluid levels until system bleeding is complete. Next step is to inspect for leaks before attaching the hood and exterior components.


Related Scion xB Parts
 Scion xB Steering Wheel
 Scion xB Drag Link
 Scion xB Headlight Switch
 Scion xB Ignition Lock Cylinder
 Scion xB Power Steering Hose
 Scion xB Rack and Pinion Boot
 Scion xB Steering Column
 Scion xB Steering Column Cover
 Scion xB Steering Gear Box
 Scion xB Steering Shaft
 Scion xB Tie Rod End
 Scion xB Windshield Wiper Switch