×
ToyotaParts- Hello
- Login or Register
- Quick Links
- Live Chat
- Track Order
- Parts Availability
- RMA
- Help Center
- Contact Us
- Shop for
- Toyota Parts
- Scion Parts
My Garage
My Account
Cart
OEM Scion Vapor Canister
Fuel Vapor Canister- Select Vehicle by Model
- Select Vehicle by VIN
Select Vehicle by Model
orMake
Model
Year
Select Vehicle by VIN
For the most accurate results, select vehicle by your VIN (Vehicle Identification Number).
11 Vapor Canisters found


Scion Vapor Canister Part Number: 77740-52090
$531.17 MSRP: $778.43You Save: $247.26 (32%)Ships in 1-3 Business DaysProduct Specifications- Other Name: Canister Assembly, Charcoal


Scion Vapor Canister Part Number: 77740-21020
$257.22 MSRP: $367.25You Save: $110.03 (30%)Ships in 1-3 Business DaysProduct Specifications- Other Name: Canister Assembly, Charcoal


Scion Vapor Canister Part Number: 77740-52100
$285.06 MSRP: $407.00You Save: $121.94 (30%)Ships in 1-3 Business DaysProduct Specifications- Other Name: Canister Assembly, Charcoal


Scion Vapor Canister Part Number: 77740-12720
$489.74 MSRP: $717.72You Save: $227.98 (32%)Ships in 1-3 Business DaysProduct Specifications- Other Name: Canister Assembly, Charcoal


Scion Vapor Canister Part Number: 77740-WB001
$168.88 MSRP: $239.07You Save: $70.19 (30%)Ships in 1-3 Business DaysProduct Specifications- Other Name: Canister Assembly, Charcoal


Scion Vapor Canister Part Number: 77740-52070
$244.64 MSRP: $349.29You Save: $104.65 (30%)Ships in 1-2 Business DaysProduct Specifications- Other Name: Canister Assembly, Charcoal


Scion Vapor Canister Part Number: 77740-21011
$251.74 MSRP: $359.43You Save: $107.69 (30%)Ships in 1-3 Business DaysProduct Specifications- Other Name: Canister Assembly, Charcoal
- Replaces: 77740-21010


Scion Vapor Canister Part Number: SU003-01027
$171.86 MSRP: $226.25You Save: $54.39 (25%)Ships in 1-3 Business DaysProduct Specifications- Other Name: Canister Us; Canister Assembly, Charcoal


Scion Vapor Canister Part Number: SU003-04502
$205.39 MSRP: $272.73You Save: $67.34 (25%)Ships in 1-3 Business DaysProduct Specifications- Other Name: Canister Us; Canister Assembly, Charcoal

Scion Vapor Canister Part Number: 77740-12750
$450.92 MSRP: $660.83You Save: $209.91 (32%)Ships in 1-3 Business DaysProduct Specifications- Other Name: Canister Assembly, Charcoal

Scion Vapor Canister Part Number: 77740-74010
$320.13 MSRP: $457.07You Save: $136.94 (30%)Ships in 1-3 Business DaysProduct Specifications- Other Name: Canister Assembly, Charcoal
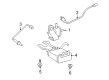
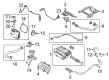
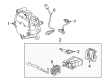
Scion Vapor Canister
OEM parts deliver unmatched quality you can rely on. They pass extensive quality control inspections. Scion produces them to the official factory specifications. This process helps prevent defects and imperfections. So you can get exceptional lifespan and a flawless fit. Need new OEM Scion Vapor Canister? You'll love our wide selection of genuine options. Shop in minutes and skip the hunt. Our prices are unbeatable, you'll save time and money. It's easy to shop and find the right piece. Our committed customer service team gives professional help from start to finish. Every part includes a manufacturer's warranty. We ship quickly, your parts will arrive fast at your door.
Scion Vapor Canister captures fuel vapor, which is recycled to be burned, reducing emissions and waste. In 2003, Scion changed everything by introducing small vehicles, loud paint, and a no-haggle charge that enabled young drivers to avoid the dull dance at the dealerships and go straight to the car that feels like its owner. Interest was maintained at a high level because it released small batches of its releases, organized digital parties in its virtual Scion City, and acted like a rolling experiment lab where Toyota could test new ideas and transform first-time shoppers into loyal fans without preaching to them. Still heard today in the Scion lineup since the badge retired in 2016, it showed that simple ordering, extreme personalization, and a price that is easy to start with can help pull over a million first-time buyers into the fold and make the car buying experience not as research-related as homework. The Vapor Canister in each Scion has gasoline fumes trapped and purged into charcoal pellets, then on demand by a purge valve so that the engine might burn the fumes, and the unit pairs with sensors to indicate leakage, honest fuel pressure, and meet the demanding evaporative-emission regulations, at no power cost. The Vapor Canister is durable enough to withstand heat, vibration, and splash so the driver can concentrate on the steering wheel and the sealed charcoal bed silently removes pollution, maintains cabin odors, and gets a few extra miles out of each tank, while the Vapor Canister ensures optimal performance.
Scion Vapor Canister Parts and Q&A
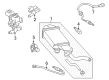
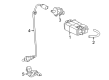
- Q: How to remove the Vapor Canister on Scion tC?A:The procedure of removing the Evaporative Emission Control Canister requires disconnecting the negative battery cable followed by 90-second waiting time to avoid triggering Air Bag and seat belt pretensioner activation. You must detach the front floor panel brace together with the center exhaust pipe assembly and No. 1 fuel tank protector and rear suspension brace lower right piece. You must disconnect the canister assembly by removing the leak detection pump connector and the fuel emission hose with its two clamps and the fuel tank vent hose. Pinch the fuel tank vent hose retainer to remove its connector with great care for cleanliness then refrain from applying tools to prevent nylon tube damage. The disconnected components should receive plastic bag coverage before moving on. The fuel tank vent connector and pipe should be released through push and pull movements. To disconnect the fuel tank vent hose begin by pinching the tab of the retainer until the lock claws disengages before pulling the hose free from the charcoal canister while maintaining cleanliness and protecting the hose from damage. The clip remover tool should remove the temporary workshop clip that can be left off during reassembly. Reinstallation of this clip is unnecessary. Last step to remove the canister filter sub-assembly is to disconnect two hoses and remove the bolt with filter.
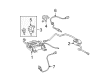
- Q: How to replace a Vapor Canister on Scion xB?A:The replacement process of Charcoal Canister Assembly requires disconnecting its connector along with the purge hose and two fuel tank vents. When replacing the connector begin by fully inserting it into position before pinching Portion A and extracting the component. When you remove the fuel emission tube from the connector it requires you to pinch the clip on the fuel tube connector. Establish if there is any contamination around the connector or mud before starting since these conditions could compromise the O-ring seal. The nylon tube requires protection from tools as well as avoidance of bending or twisting motions; a vinyl or plastic bag offers the best protective option. The application of gentle pushing and pulling motions will help extract the pipe and connector when they become stuck. You should remove the charcoal canister after you take out the three bolts. The installation of the new charcoal canister requires bolted attachment using a torque of 19 N.m (193 kgf.cm, 14 ft.lbf) and after that connect the fuel emission tube with the purge hose followed by the two fuel tank vent hoses and complete the process by connecting the connector.