×
ToyotaParts- Hello
- Login or Register
- Quick Links
- Live Chat
- Track Order
- Parts Availability
- RMA
- Help Center
- Contact Us
- Shop for
- Toyota Parts
- Scion Parts
My Garage
My Account
Cart
OEM Scion Radiator
Cooling Radiator- Select Vehicle by Model
- Select Vehicle by VIN
Select Vehicle by Model
orMake
Model
Year
Select Vehicle by VIN
For the most accurate results, select vehicle by your VIN (Vehicle Identification Number).
14 Radiators found


Scion Radiator Assembly Part Number: 16400-WB001
$212.20 MSRP: $302.99You Save: $90.79 (30%)Ships in 1-3 Business DaysProduct Specifications- Other Name: Radiator

Scion Radiator Assembly Part Number: 16400-22170
$313.02 MSRP: $446.93You Save: $133.91 (30%)Ships in 1-3 Business DaysProduct Specifications- Other Name: Radiator

Scion Radiator Assembly Part Number: 16400-40220
$202.81 MSRP: $289.57You Save: $86.76 (30%)Ships in 1-3 Business DaysProduct Specifications- Other Name: Radiator

Scion Radiator Assembly Part Number: 16400-21121
$223.44 MSRP: $319.02You Save: $95.58 (30%)Ships in 1-3 Business DaysProduct Specifications- Other Name: Radiator
- Replaces: 16400-21120

Scion Radiator Assembly Part Number: 16400-21381
$235.91 MSRP: $336.83You Save: $100.92 (30%)Ships in 1-3 Business DaysProduct Specifications- Other Name: Radiator
- Replaces: 16400-21270

Scion Radiator Assembly Part Number: 16400-21371
$235.91 MSRP: $336.83You Save: $100.92 (30%)Ships in 1-3 Business DaysProduct Specifications- Other Name: Radiator
- Replaces: 16400-21300

Scion Radiator Assembly Part Number: 16400-22160
$243.59 MSRP: $347.79You Save: $104.20 (30%)Ships in 1-3 Business DaysProduct Specifications- Other Name: Radiator

Scion Radiator Assembly Part Number: 16400-21071
$251.86 MSRP: $359.61You Save: $107.75 (30%)Ships in 1-3 Business DaysProduct Specifications- Other Name: Radiator
- Replaces: 16400-21070

Scion Radiator Assembly Part Number: 16400-36190
$264.08 MSRP: $377.05You Save: $112.97 (30%)Ships in 1-3 Business DaysProduct Specifications- Other Name: Radiator
- Replaces: 16400-36180

Scion Radiator Assembly Part Number: 16400-28661
$278.87 MSRP: $398.16You Save: $119.29 (30%)Ships in 1-3 Business DaysProduct Specifications- Other Name: Radiator
- Replaces: 16400-28660
Scion Radiator Assembly Part Number: 16400-22190
$293.80 MSRP: $419.48You Save: $125.68 (30%)Ships in 1-2 Business DaysProduct Specifications- Other Name: Radiator
Scion Radiator Assembly Part Number: 16410-AZ036
$108.36 MSRP: $151.85You Save: $43.49 (29%)Ships in 1-3 Business DaysProduct Specifications- Other Name: Radiator Assembly, L/Cap; Radiator

Scion Radiator Assembly Part Number: SU003-01172
$190.70 MSRP: $253.23You Save: $62.53 (25%)Ships in 1-3 Business DaysProduct Specifications- Other Name: Radiator
Scion Radiator Assembly Part Number: 16400-28651
$249.29 MSRP: $355.93You Save: $106.64 (30%)Product Specifications- Other Name: Radiator
- Replaces: 16400-28650
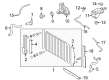
Scion Radiator
OEM parts deliver unmatched quality you can rely on. They pass extensive quality control inspections. Scion produces them to the official factory specifications. This process helps prevent defects and imperfections. So you can get exceptional lifespan and a flawless fit. Need new OEM Scion Radiator? You'll love our wide selection of genuine options. Shop in minutes and skip the hunt. Our prices are unbeatable, you'll save time and money. It's easy to shop and find the right piece. Our committed customer service team gives professional help from start to finish. Every part includes a manufacturer's warranty. We ship quickly, your parts will arrive fast at your door.
Scion Radiator maintains temperature inside the engine, protecting power and miles per gallon on each excursion. Scion was born in 2003 and turned the traditional car launch formula around by enticing first-time purchasers with bright paint, simple pricing and a few Release Series drops that sent every ride into the air as a piece of street art. The brand bypassed boring brochures through virtual hangouts like Scion City and through pop-up events, and talked directly to teens who wanted a compact that looked made-to-order right off the lot. Each Scion was a mobile laboratory in which Toyota experimented with radically different infotainment concepts, off-beat body styles, and in-car technologies and then transferred those that succeeded to its larger models. Scion is still a term that people mention when they are talking about cars that allowed them to work out a deal with dealers, despite the fact that the company ceased its activities in 2016. The Radiator is made of lightweight aluminum and tightly stacked cooling fins that pump the coolant over tiny pathways that conduct the engine heat to passing air and suppress detonation and maintain the viscosity of oil during the punishing commutes and the crunching pulls at night. A Radiator swap installation does not require hacks to mount the swaps until the angles of the hoses match those of the factory, and weekend wrenching is complete before lunch and wallets remain calm. This Radiator has extra core volume, which is more welcoming to the more powerful electric fans, which makes revs increase but the temp needle will not move even in gridlock. One Radiator dies the motor cooks, thus maintenance of this component is healthy to save gaskets, gas, and precious money.
Scion Radiator Parts and Q&A
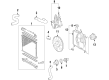
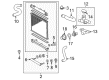
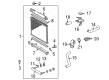
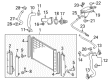
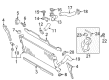
- Q: How to service and repair the radiator on Scion tC?A:Start radiator servicing by gripping and removing the radiator drain cock plug while extracting its O-ring. Install the claw of Special Service Tool: 09230-01010 (09231-01010, 09231-01030) on the overhaul handle while adjusting dimension B to the range of 0.2 to 0.3 mm using the stopper bolt to protect the claw from damage. The core plate receives treatment through straightening using the same tool until the stopper bolt terminates the process. Start faucet drain removal that clears the radiator tanks one by one through targeted light hammer tapping at their brackets followed by O-ring removal from each side. Examine the radiator core sub-assembly for damage by using pliers to fix any core plate groove deformed areas and note that replacement will be necessary if bottom damage occurs due to its two permitted recaulking operations before necessary change of unit. The left radiator tank installation should begin with a check for foreign objects in the core plate groove followed by addition of the new O-ring which must be untwisted before installing tank placement and final tapping to reduce gaps. Repetition occurs for the installation of the right radiator tank. To perform the core plate caulking process, use Special Service Tool: 09230-01010 (09231-01010, 09231-01020). Insert the punch assembly into the overhaul handle and adjust the stopper bolt until the dimension B measures 8.4 mm. After installing a new O-ring onto the drain cock plug users should install the plug.
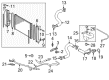
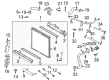
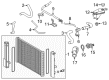
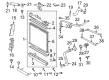
- Q: How to install the radiator and its components on Scion xB?A:The radiator installation begins by attaching the fan shroud to the radiator through two bolts which need tightening to 7.0 Nm (71 kgf-cm, 62 in-lbf). Begin by putting on the radiator outlet hose before adding the inlet hose and tightening the clamp to the fan shroud. First attach 2 radiator supports onto the repositioned radiator and then set the component onto the vehicle before hooking up both Automatic Transaxle oil cooler hoses. The next steps involve connecting the No. 1 water by-pass hose before installing the No. 2 fan shroud through 2 bolts while applying 7.0 Nm (71 kgf-cm, 62 in-lbf) torque. After that, connect the 2 fan motor connectors. Fasten the outlet and inlet radiator hoses to their respective positions while making sure that the heated oxygen sensor wire harness clamp remains activated. After that, install the No. 2 fan shroud along with the 2 radiator support cushions. Install the hood lock support with 4 bolts while torquing them to 13 Nm (127 kgf-cm, 9 ft-lbf) and complete the 2 connector connections. Follow the technical instructions to install the hood lock control cable over the hood lock support before inserting and tightening the No. 1 water hose clamp bracket with 2 bolts reaching a torque value of 5.0 Nm (51 kgf-cm, 44 in-lbf). Next, connect the 2 water hoses. Reinstall the front bumper cover together with radiator grille and No. 1 radiator grille garnish. The procedure for installing the battery involves first placing the battery tray followed by the battery and insulator before securing this assembly with an 17 Nm (168 kgf-cm, 12 ft-lbf) bolt that fastens a 3.5 Nm (35 kgf-cm, 31 in-lbf) locking nut while completing the electrical connection between the terminals through torque setting at 5.4 Nm (55 kgf-cm, 48 in-lbf). Complete maintenance by adding engine coolant followed by the recharge of refrigerant and engine heating procedures and leak evaluation of coolant and refrigerant. To complete installation inspect the hood while making all required modifications needed for performance.