My Garage
Cart
Make sure this part fits

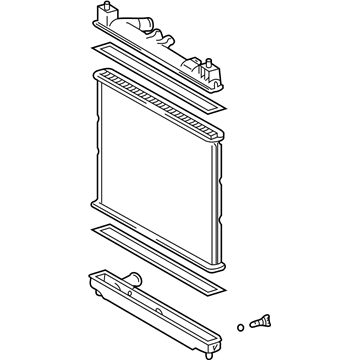
Toyota 16400-21071
Radiator Assembly

2000-2006 Toyota 1640021071

Customer Questions & Expert Answers (17)
Toyota 16400-21071 Radiator Assembly
  • Part Description
    Radiator
  • Replaces
    16400-21070
  • Manufacturer
    Toyota
Make sure this part fits
$251.86 MSRP: $359.61
You Save: $107.75 (30%)
Ships in 1-3 Business Days
1
ADD TO CART
  • Related Parts
  • Product Specifications
  • Vehicle Fitment
  • Customer Questions & Expert Answers
  • Product Specifications

    BrandGenuine Toyota
    Manufacturer Part Number16400-21071
    Part DescriptionRadiator
    Item Dimensions24.7 x 22.2 x 4.0 inches
    Item Weight8.50 Pounds
    ConditionNew
    Replaces16400-21070
    ManufacturerToyota
    SKU16400-21071
    WarrantyThis genuine Toyota part is guaranteed by Toyota's factory warranty.
    Shipping & ReturnShipping Policy Return Policy
    Warning: California's Proposition 65
  • Vehicle Fitment

    Year Make Model Trim Engine
    2004-2006 Scion xABase4 Cyl 1.5 L GAS
    2004-2006 Scion xBBase4 Cyl 1.5 L GAS
    2000-2005 Toyota EchoBase4 Cyl 1.5 L GAS
  • Customer Questions & Expert Answers

    Q:
    Is 16400-21071 a good match for my car? Posted by ToyotaPartsNow Specialist
    A:
    Find out if part number 16400-21071 is the right fit for your car by Selecting Your Vehicle model.
    Posted by ToyotaPartsNow Specialist
    Q:
    How to inspect and clean the radiator on Scion xA? Posted by Customer
    A:
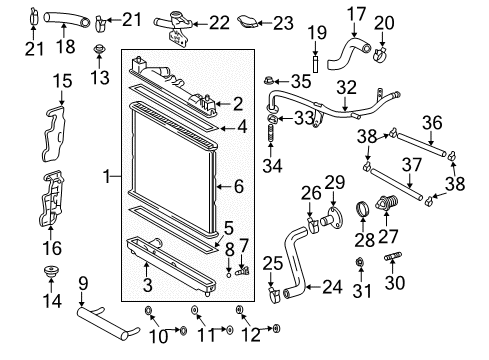
    Measure the valve opening pressure on the radiator cap sub-assembly when performing inspection and cleaning of the radiator. The inspection of rubber packing numbers 1, 2 and 3 requires water cleaning with hand scouring when foreign objects or stains are detected. The inspection should show that parts 1, 2, or 3 have no deformities, cracks or swelling and that 3 and 4 are freely separate from each other. Before testing with the radiator cap machine apply engine coolant to 2 and 3 then operate the pump several times with the device oriented at 30 degrees or more above horizontal while observing maximum pressure. The radiator cap sub-assembly needs replacement when the maximum pressure measurement falls below the specified minimum standard value. On-vehicle cleaning requires checking fins for blockage by inspecting for leaves or dirt along with insects or inspecting the hose connections and ensuring the radiator and condenser are clean. The blockage removal process begins by washing the fins with water or using a steam cleaner but you must maintain distance to prevent damage from occurring. To straighten fins you should use both a screwdriver and pliers while refraining from pouring water toward electronic elements. After cleaning, the fins need to be dried using compressed air.
    Posted by ToyotaPartsNow Specialist
    Q:
    How to remove and install a radiator on Scion xA? Posted by Customer
    A:
    A radiator replacement process starts with disconnecting the negative battery terminal cable and allowing at least 90 seconds of wait time to activate Air Bag and seat belt pretensioners. Engine coolant drainage is necessary before disconnecting three hoses which include the radiator's inlet and outlet and automatic transaxle oil cooler inlet and outlet. The radiator grille and hood lock assembly require removal of 3 bolts to begin. Additionally the hood lock support sub-assembly needs detachment through removal of 2 bolts and a clip with a hood lock support. The radiator support sub-assembly upper requires removal when you disconnect two connectors from the horns, detach the condenser using two bolts and take out four bolts to remove the radiator support upper. The radiator assembly removal process requires disconnecting the cooling fan motor connector and unbolting 3 pieces for the fan shroud with fan and then unbolting 2 water filler positions and lastly removing the 2 radiator support cushions and the radiator support lower. The first step needs to be installing the radiator assembly alongside the 2 radiator support cushions and radiator support lower after which you should install the water filler with 2 bolts tightened to 7.5 Nm followed by installing the fan shroud with fan through 3 bolts of 7.5 Nm tightening torque. After installing the radiator support sub-assembly upper with 4 bolts reaching 5.0 Nm torque then you should attach the condenser through 2 bolts while connecting the 2 connectors to the horns. Begin with installing the radiator support opening cover and continuously attach the hood lock support sub-assembly with two bolts and one clip before installing the hood lock assembly temporarily using three bolts. After adjusting the hood lock assembly you should install the radiator grille. Install first the automatic transaxle oil cooler hoses between outlet and inlet and then position the radiator hose tubing between outlet and inlet. A procedure includes reconnecting the cable to the negative terminal followed by inserting engine coolant while checking for leaks and performing required initializations following negative terminal cable changes.
    Posted by ToyotaPartsNow Specialist
    Q:
    How to inspect and clean the radiator on Scion xB? Posted by Customer
    A:
    You must verify the radiator cap sub-assembly through valve opening pressure measurement when checking and cleaning the radiator. Clean rubber packing 1, 2 and 3 by washing them with water followed by a manual scour. Ensure rubber packing in positions 1, 2, or 3 exhibits no deformity, cracking or swelling and parts 3 and 4 are not fused together. Engine coolant needs application to rubber packing 2 and 3 prior to using a radiator cap tester. The cap tester should be pumped multiple times in a position above horizontal at 30° or higher to identify the maximum pressure performance but the cap's inability to reach this point does not indicate failure. The replacement of a radiator cap sub-assembly becomes necessary when maximum pressure readings fall short of the minimum standard values. Vehicle cleaning should focus on clearing radiator and condenser blockages while ensuring these components remain free from leaves and dirt and insects together with cleaning the hose connections. Water or a sterile steam cleaner can be used to wash blocked fins when using proper standard distance during injection to prevent fin damage. Use a screwdriver or pliers to adjust bent fins and avoid spraying water toward electronic elements. Dry the fins with compressed air as the last step.
    Posted by ToyotaPartsNow Specialist
    Q:
    How to clean the radiator on Toyota Echo? Posted by Customer
    A:
    Begin radiator cleaning by inspecting the fins for blockage because water washing or steam cleaning along with compressed air drying will resolve obstructions if detected. Steaming between the device and core fins should be done carefully to protect the radiator fins from damage. Straightening damaged fins is possible through use of a screwdriver or pliers. Routine cleaning operations must exclude direct water exposure for electronic devices.
    Posted by ToyotaPartsNow Specialist
    Q:
    How do you remove the radiator support opening cover for the 2005 Scion xB? Posted by Customer
    A:
    Remove it by taking out 2 clips.
    Posted by ToyotaPartsNow Specialist
    See expert answers on similar Radiator
    Q:
    What is the first step to replace the radiator assembly for the 2004 Scion xB? Posted by Customer
    A:
    First, drain the engine coolant.
    Posted by ToyotaPartsNow Specialist
    See expert answers on similar Radiator
    Q:
    What components need to be removed after disconnecting the hoses for the 2005 Scion xA? Posted by Customer
    A:
    Remove the radiator grille, hood lock assembly by taking out 3 bolts, and the hood lock support sub-assembly by removing 2 bolts, a clip, and the support.
    Posted by ToyotaPartsNow Specialist
    See expert answers on similar Radiator
    Q:
    How do you remove the radiator support opening cover for the 2004 Scion xA? Posted by Customer
    A:
    Remove 2 clips to take off the radiator support opening cover.
    Posted by ToyotaPartsNow Specialist
    See expert answers on similar Radiator
    Q:
    What should be inspected for damage during the process for the 2004 Toyota Echo? Posted by Customer
    A:
    Inspect the lock plate for damage and correct any deformation.
    Posted by ToyotaPartsNow Specialist
    See expert answers on similar Radiator
    Q:
    How do you inspect for water leaks for the 2001 Toyota Echo? Posted by Customer
    A:
    Tighten the drain plug, plug the inlet and outlet pipes with Special Service Tool: 09230-01010, apply pressure with a radiator cap tester to 177 kPa (1.8 kgf/cm2, 26 psi), and submerge the radiator in water to check for leaks.
    Posted by ToyotaPartsNow Specialist
    See expert answers on similar Radiator
    Q:
    What torque specifications should be followed when installing the water filler for the 2006 Scion xB? Posted by Customer
    A:
    Use 2 bolts with a torque of 7.5 Nm.
    Posted by ToyotaPartsNow Specialist
    See expert answers on similar Radiator
    Q:
    What is the first step to remove the radiator for the 2004 Toyota Echo? Posted by Customer
    A:
    First, drain the engine coolant.
    Posted by ToyotaPartsNow Specialist
    See expert answers on similar Radiator
    Q:
    How should you dry the fins after washing for the 2005 Toyota Echo? Posted by Customer
    A:
    Use compressed air, ensuring to maintain a safe distance to avoid damaging the fins.
    Posted by ToyotaPartsNow Specialist
    See expert answers on similar Radiator
    Q:
    How is the oil cooler removed from the lower tank for the 2003 Toyota Echo? Posted by Customer
    A:
    Take off the 2 nuts and 2 plate washers.
    Posted by ToyotaPartsNow Specialist
    See expert answers on similar Radiator
    Q:
    How should you use a steam cleaner on the radiator for the 2002 Toyota Echo? Posted by Customer
    A:
    Maintain a safe distance between the steam cleaner and the core to avoid damaging the fins.
    Posted by ToyotaPartsNow Specialist
    See expert answers on similar Radiator
    Q:
    What is involved in the disassembly process for the 2000 Toyota Echo? Posted by Customer
    A:
    Remove the drain plug and O-ring, disconnect the No. 3 radiator hose, and remove the 2 bolts and water filter.
    Posted by ToyotaPartsNow Specialist
    See expert answers on similar Radiator
    If you have any questions about this product, please don't hesitate to ask us. We will be happy to help you!

OEM Toyota 16400-21071, Excellent Performance and Perfect Fitment

To ensure reliability, purchase Toyota part # 16400-21071 Radiator Assembly. It is sometimes referred to as Toyota Radiator. OEM parts are unrivaled in terms of quality. They go through extensive quality control inspections and are produced in accordance with Toyota's official factory specifications. All of these remove defects and imperfections. So you can relax knowing they promise exceptional lifespan and flawless fitment.

ToyotaPartsNow.com is a leading supplier of genuine Toyota parts such as Toyota 1640021071 Radiator Assembly. At ToyotaPartsNow.com, we have a wide variety of OEM Toyota parts available at competitive prices. Our comprehensive range of genuine Toyota parts come with a manufacturer's warranty for peace of mind. We also prioritize customer satisfaction, providing a hassle-free return policy and expedited delivery for all our parts. For detailed Toyota parts information, click here.
Choose ToyotaPartsNow for discounted prices, exceptional service and fast delivery