×
ToyotaParts- Hello
- Login or Register
- Quick Links
- Live Chat
- Track Order
- Parts Availability
- RMA
- Help Center
- Contact Us
- Shop for
- Toyota Parts
- Scion Parts
My Garage
My Account
Cart
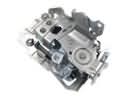
OEM Scion Door Lock
Power Door Lock Actuator- Select Vehicle by Model
- Select Vehicle by VIN
Select Vehicle by Model
orMake
Model
Year
Select Vehicle by VIN
For the most accurate results, select vehicle by your VIN (Vehicle Identification Number).
33 Door Locks found


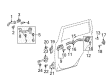
Scion Lock Actuator, Driver Side Part Number: 69040-42250
$289.61 MSRP: $413.49You Save: $123.88 (30%)Ships in 1-2 Business DaysProduct Specifications- Other Name: Lock Assembly, Front Door W; Door Lock Actuator Motor, Front Left; Door Latch Assembly, Front Left; Lock Assembly; Front Door W/Motor, Driver Side; Door Lock Actuator Motor; Door Latch Assembly.
- Position: Driver Side


Scion Lock Actuator, Passenger Side Part Number: 69030-42230
$267.82 MSRP: $382.39You Save: $114.57 (30%)Ships in 1-2 Business DaysProduct Specifications- Other Name: Lock Assembly, Front Door W; Door Lock Actuator Motor, Front Right; Door Latch Assembly, Front Right; Lock Assembly; Front Door W/Motor, Passenger Side; Door Lock Actuator Motor; Door Latch Assembly.
- Manufacturer Note: WIRELESS DOOR LOCK-WITH(PANIC BUTTON)&DOOR OUTSIDE HANDLE-BODY COLOR,W/O(PASSENGER KEY CYLINDER)&POWER WINDOW-WITH(DRIVER ONE TOUCH DOWN)
- Position: Passenger Side


Scion Lock Actuator, Driver Side Part Number: 69040-0C050
$255.24 MSRP: $364.43You Save: $109.19 (30%)Product Specifications- Other Name: Lock Assembly, Front Door W; Door Lock Actuator Motor, Front Left; Door Latch Assembly, Front Left; Lock Assembly; Front Door W/Motor, Driver Side; Door Lock Actuator Motor.
- Position: Driver Side
- Replaces: 69040-06180


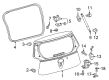
Scion Gate Lock, Rear Part Number: 69350-28151
$184.99 MSRP: $264.12You Save: $79.13 (30%)Ships in 1 Business DayProduct Specifications- Other Name: Lock Assembly, Back Door; Liftgate Latch; Tailgate Lock Actuator; Trunk Lock Actuator; Door Lock Actuator; Lock Actuator; Lock Assembly; Lock; Lock Assembly, Back Door, W/Courtesy Lamp Switch
- Manufacturer Note: KOREA SPEC
- Position: Rear
- Replaces: 69350-28150


Scion Lock Actuator, Driver Side Part Number: 69060-06100
$264.21 MSRP: $377.23You Save: $113.02 (30%)Ships in 1-3 Business DaysProduct Specifications- Other Name: Lock Assembly, Rear Door W; Door Lock Actuator Motor, Rear Left; Door Latch Assembly, Rear Left; Lock Assembly; Rear Door W/Motor, Driver Side; Door Lock Actuator Motor.
- Position: Driver Side
- Replaces: 69060-33120


Scion Lock Assembly, Front Door W/Motor, Passenger Side Part Number: 69030-33261
$279.12 MSRP: $398.52You Save: $119.40 (30%)Ships in 1 Business DayProduct Specifications- Other Name: Lock Assembly, Front Door W; Door Lock Actuator Motor; Door Latch Assembly; Door Lock Actuator; Door Lock
- Position: Passenger Side


Scion Lock Assembly, Passenger Side Part Number: 69330-52041
$128.30 MSRP: $181.62You Save: $53.32 (30%)Ships in 1-3 Business DaysProduct Specifications- Other Name: Lock Assembly, Rear Door; Door Latch Assembly, Rear Right; Door Lock Actuator; Door Lock; Lock; Lock Assembly, Rear Door, Passenger Side; Door Latch Assembly
- Manufacturer Note: W(CHILD LOCK LEVER)
- Position: Passenger Side


Scion Lock Assembly, Passenger Side Part Number: 69310-52290
$177.65 MSRP: $253.65You Save: $76.00 (30%)Ships in 1-3 Business DaysProduct Specifications- Other Name: Lock Assembly, Front Door; Door Latch Assembly, Front Right; Door Lock Actuator; Door Lock; Lock; Lock Assembly, Front Door, Passenger Side
- Position: Passenger Side


Scion Lock Assembly, Rear Part Number: 69350-21110
$231.01 MSRP: $329.83You Save: $98.82 (30%)Ships in 1-3 Business DaysProduct Specifications- Other Name: Lock Assembly, Back Door; Liftgate Latch, Rear; Trunk Lock Actuator Motor; Door Lock Actuator; Door Lock; Lock; Lock Assembly, Back Door, W/Courtesy Lamp Switch
- Position: Rear


Scion Lock Actuator, Driver Side Part Number: 69040-52410
$264.91 MSRP: $378.23You Save: $113.32 (30%)Ships in 1-2 Business DaysProduct Specifications- Other Name: Lock Assembly, Front Door W; Door Latch Assembly, Front Left; Door Lock Actuator Motor; Door Lock Actuator; Door Lock; Lock Assembly; Lock Assembly, Front Door W/Motor, Driver Side; Lock Assembly, Front Door, Driver Side
- Position: Driver Side


Scion Lock Actuator, Passenger Side Part Number: 69030-52520
$264.91 MSRP: $378.23You Save: $113.32 (30%)Ships in 1-2 Business DaysProduct Specifications- Other Name: Lock Assembly, Front Door W; Door Latch Assembly, Front Right; Door Lock Actuator Motor; Door Lock Actuator; Door Lock; Lock Assembly; Lock Assembly, Front Door W/Motor, Passenger Side; Lock Assembly, Front Door, Passenger Side
- Position: Passenger Side


Scion Lock Actuator, Passenger Side Part Number: 69050-06100
$266.42 MSRP: $380.40You Save: $113.98 (30%)Ships in 1-2 Business DaysProduct Specifications- Other Name: Lock Assembly, Rear Door W; Door Lock Actuator Motor, Rear Right; Door Latch Assembly, Rear Right; Lock Assembly; Rear Door W/Motor, Passenger Side; Door Lock Actuator Motor.
- Position: Passenger Side
- Replaces: 69050-33120


Scion Lock Actuator, Driver Side Part Number: 69040-WB001
$82.97 MSRP: $116.47You Save: $33.50 (29%)Ships in 1-3 Business DaysProduct Specifications- Other Name: Lock Assembly, Front Door W; Door Latch Assembly, Front Left; Door Lock Actuator Motor; Door Lock Actuator; Door Lock; Lock Assembly; Lock Assembly, Front Door, Driver Side
- Position: Driver Side


Scion Lock Actuator, Driver Side Part Number: SU003-04115
$162.10 MSRP: $213.42You Save: $51.32 (25%)Ships in 1-3 Business DaysProduct Specifications- Other Name: Latch&Actuator Assembly Door Front Left-Hand; Door Latch Assembly; Lock Actuator Motor; Door Lock; Lock Assembly; Lock Assembly, Front Door, Driver Side; Door Latch Assembly
- Position: Driver Side

Scion Lock Actuator, Driver Side Part Number: SU003-04113
$99.59 MSRP: $130.00You Save: $30.41 (24%)Ships in 1-3 Business DaysProduct Specifications- Other Name: Latch&Actuator Assembly Door Front Left-Hand; Door Latch Assembly; Lock Actuator Motor; Door Lock; Lock Assembly; Lock Assembly, Front Door, Driver Side; Door Latch Assembly
- Position: Driver Side


Scion Lock Actuator, Passenger Side Part Number: SU003-04112
$99.59 MSRP: $130.00You Save: $30.41 (24%)Ships in 1-2 Business DaysProduct Specifications- Other Name: Latch&Actuator Assembly Door Front Right-Hand; Door Latch Assembly; Lock Actuator Motor; Door Lock; Lock Assembly; Lock Assembly, Front Door, Passenger Side; Door Latch Assembly
- Position: Passenger Side
Scion Lock Actuator, Passenger Side Part Number: 69030-02130
$262.46 MSRP: $374.74You Save: $112.28 (30%)Ships in 1-2 Business DaysProduct Specifications- Other Name: Lock Assembly, Front Door W; Door Latch Assembly, Front Right; Door Lock Actuator Motor; Door Lock Actuator; Door Lock; Lock Assembly; Front Door W/Motor, Passenger Side; Door Latch Assembly
- Manufacturer Note: W(POWER DOOR LOCK)
- Position: Passenger Side
- Replaces: 69030-33221
Scion Lock Actuator, Passenger Side Part Number: 69030-WB001
$81.79 MSRP: $114.81You Save: $33.02 (29%)Ships in 1-3 Business DaysProduct Specifications- Other Name: Lock Assembly, Front Door W; Door Latch Assembly, Front Right; Door Lock Actuator Motor; Door Lock Actuator; Door Lock; Lock Assembly; Lock Assembly, Front Door, Passenger Side
- Position: Passenger Side
Scion Lock Actuator, Driver Side Part Number: 69040-02120
$262.46 MSRP: $374.74You Save: $112.28 (30%)Ships in 1-2 Business DaysProduct Specifications- Other Name: Lock Assembly, Front Door W; Door Latch Assembly, Front Left; Door Lock Actuator Motor; Door Lock Actuator; Door Lock; Lock Assembly; Control Sub-Assembly, Door Lock Remote, Driver Side; Front Door Lock Assembly
- Manufacturer Note: W(POWER DOOR LOCK)
- Position: Driver Side
- Replaces: 69040-33221

Scion Lock Actuator, Passenger Side Part Number: SU003-04114
$162.10 MSRP: $213.42You Save: $51.32 (25%)Product Specifications- Other Name: Latch&Actuator Assembly Door Front Right-Hand; Lock Actuator Motor; Latch Assembly; Lock Actuator; Lock Assembly; Lock Assembly, Front Door, Passenger Side
- Position: Passenger Side
| Page 1 of 2 |Next >
1-20 of 33 Results
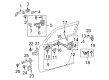
Scion Door Lock
OEM parts deliver unmatched quality you can rely on. They pass extensive quality control inspections. Scion produces them to the official factory specifications. This process helps prevent defects and imperfections. So you can get exceptional lifespan and a flawless fit. Need new OEM Scion Door Lock? You'll love our wide selection of genuine options. Shop in minutes and skip the hunt. Our prices are unbeatable, you'll save time and money. It's easy to shop and find the right piece. Our committed customer service team gives professional help from start to finish. Every part includes a manufacturer's warranty. We ship quickly, your parts will arrive fast at your door.
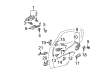
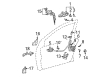
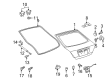
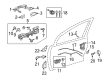
Scion Door Lock keeps the thieves out and allows drivers to only have to make one click to access a secure door. Scion has cut out a niche in the youth culture by selling small cars in loud colors at no-haggle prices. The online build tool is quick and the Release Series drops that resembled sneaker launches were a favorite among buyers. The brand hosted digital events within its online Scion City which attracted gamers even before they had a license. As the test laboratory of Toyota, it experimented with daring trim combinations, streaming showroom playlists, and unpriced stickers that helped first-time drivers to become part of the group. Drivers were also feeling in control since the catalog was only attached to a single trim model. The Scion vibes can be felt in the modern subcompacts of today, which are dominated by customization. The Door Lock of any Scion has a motorized actuator with a coded cylinder to prevent forced entry without affecting battery life. Press the fob and the Door Lock closes or opens within a second. Change to first or strike ten miles per hour and the Door Lock automatically seals all the latches so that nobody gets in in when the light changes. The Door Lock has a thumb switch which allows you to program it with additional entry codes so that it has brains to match its muscles.
Scion Door Lock Parts and Q&A
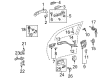
- Q: How to install the rear door lock on Scion xB?A:Begin the rear door lock installation process by checking the door lock packing needs new material replacement if used before and the packing surface should always be free from dirt or grease. Put on MP grease to the moving and turning areas of the front door lock before you install the rear door inside locking cable and activate its three claws and close the cover. Place the rear door lock remote control cable to its position and engage the claw before closing the cover. The new door lock wire harness seal must be mounted onto the rear door lock and the rear door lock must be inserted into the rear door outside handle release plate while the rear door panel is set so that the rear door outside handle frame remains locked. Install the rear door lock using the "TORX" socket wrench T30 on its 3 screws which require Toyota Genuine Adhesive 1324 or Three Bond 1324 or an equivalent product applied to the screw threads and undergo torque application to 5.0 Nm (51 kgf-cm, 44 in-lbf). Connect the connector, then proceed to install the rear door window regulator sub-assembly, rear door glass sub-assembly, rear door quarter window Weather Strip, rear door window division bar sub-assembly, rear door glass run, rear door belt moulding assembly, rear door Weather Strip, rear door check assembly, rear door service hole cover, rear door trim bracket, rear door glass inner Weather Strip, rear door trim board sub-assembly, rear door inside handle bezel, and rear door armrest base upper panel. Apply the cable to the negative battery terminal then tighten it to 5.4 Nm (55 kgf-cm, 48 in-lbf).
- Q: How to install the rear door lock on Scion xD?A:Before installing the rear door lock check that you either use a new packing material for the connector or replace the old packing and be certain that the packing surface remains residue-free. Apply MP grease to all sliding and rotating points of the front door lock before installing the internal locking cable of the rear door. Properly fit the 3 claws then seal the opening with the cover. The rear door lock remote control cable installation requires the user to first position the claw before closing the cover. New door lock wire harness seal must be attached to the rear door lock before inserting the lock into the back door outside handle release plate while adjusting the lock position until the rear door outside handle properly locks into place. Use Toyota Genuine Adhesive 1324, Three Bond 1324 or similar adhesive to torque three screws of the rear door lock installation with a "TORX" socket wrench T30 until they reach 5.0 Nm (51 kgf-cm, 44 in-lbf). After connecting the connector it is necessary to install the listed components including rear door window regulator sub-assembly followed by rear door glass sub-assembly then rear door quarter window Weather Strip then rear door window division bar sub-assembly then rear door glass run then rear door belt moulding assembly then rear door Weather Strip then rear door service hole cover then rear door trim bracket then rear door trim board sub-assembly then rear door inside handle bezel and finally rear door armrest base upper panel. Secure the cable to the negative battery terminal while tightening it to 5.4 Nm (55 kgf-cm, 48 in-lbf).