×
ToyotaParts- Hello
- Login or Register
- Quick Links
- Live Chat
- Track Order
- Parts Availability
- RMA
- Help Center
- Contact Us
- Shop for
- Toyota Parts
- Scion Parts
My Garage
My Account
Cart
OEM 2009 Scion xD Air Bag
Air Bag Module- Select Vehicle by Model
- Select Vehicle by VIN
Select Vehicle by Model
orMake
Model
Year
Select Vehicle by VIN
For the most accurate results, select vehicle by your VIN (Vehicle Identification Number).
3 Air Bags found

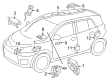
2009 Scion xD Passenger Air Bag, Upper
Part Number: 73960-52131$685.68 MSRP: $1004.86You Save: $319.18 (32%)Ships in 1-3 Business DaysProduct Specifications- Other Name: Air Bag Assembly, Instrument Panel; Instrument Panel Air Bag, Upper; Passenger Inflator Module; Air Bag Assembly, Instrument Panel Passenger W/O Door
- Position: Upper
- Replaces: 73960-52130
- Part Name Code: 73960A
- Item Weight: 8.70 Pounds
- Item Dimensions: 14.9 x 11.3 x 8.0 inches
- Condition: New
- Fitment Type: Direct Replacement
- SKU: 73960-52131
- Warranty: This genuine part is guaranteed by Toyota's factory warranty.

2009 Scion xD Inflator Curtain, Driver Side
Part Number: 62180-52081$564.42 MSRP: $827.17You Save: $262.75 (32%)Ships in 1-3 Business DaysProduct Specifications- Other Name: Air Bag Assembly, Curtain Shield; Curtain Air Bag, Left; Head Air Bag; Air Bag Assembly, Curtain Shield, Driver Side
- Position: Driver Side
- Replaces: 62180-52050, 62180-52080
- Part Name Code: 62180A
- Item Weight: 11.70 Pounds
- Item Dimensions: 47.4 x 18.9 x 9.5 inches
- Condition: New
- Fitment Type: Direct Replacement
- SKU: 62180-52081
- Warranty: This genuine part is guaranteed by Toyota's factory warranty.
2009 Scion xD Inflator Curtain, Passenger Side
Part Number: 62170-52081$564.65 MSRP: $827.50You Save: $262.85 (32%)Ships in 1-3 Business DaysProduct Specifications- Other Name: Air Bag Assembly, Curtain Shield; Curtain Air Bag, Right; Head Air Bag; Air Bag Assembly, Curtain Shield, Passenger Side
- Position: Passenger Side
- Replaces: 62170-52080, 62170-52050
- Part Name Code: 62170A
- Item Weight: 11.60 Pounds
- Item Dimensions: 47.4 x 18.9 x 9.3 inches
- Condition: New
- Fitment Type: Direct Replacement
- SKU: 62170-52081
- Warranty: This genuine part is guaranteed by Toyota's factory warranty.
2009 Scion xD Air Bag
Looking for affordable OEM 2009 Scion xD Air Bag? Explore our comprehensive catalogue of genuine 2009 Scion xD Air Bag. All our parts are covered by the manufacturer's warranty. Plus, our straightforward return policy and speedy delivery service ensure an unparalleled shopping experience. We look forward to your visit!
2009 Scion xD Air Bag Parts Q&A
- Q: How to safely dispose of a curtain shield Air Bag assembly on 2009 Scion xD?A: Curtain shield Air Bag assemblies can be disposed by using the specified Special Service Tool (SST) part number: 09082-00700 to deploy the Air Bags outdoors to avoid causing unwanted effects. Connect the tool's red clip to the positive terminal of the battery while connecting its black clip to the negative terminal next and activate the device using the switch to verify LED illumination. The tool should not be used if the LED lights up by itself when the switch has not been pressed. After disconnecting the tool from the battery the technician must detach the negative battery terminal cable. Take out the headlining material from the roof area while disconnecting the Air Bag connector without causing damage to the wire harness. Use the tool to connect with the curtain shield Air Bag but avoid locking the secondary lock of the twin lock. First position the tool at least 10 meters away from the vehicle and close all windows then deploy the Air Bags placing no one in its vicinity. Weaponizing the Air Bag demands a thirty-minute wait before handling the Air Bag with gloves and safety glasses and necessitates handwashing. To dispose of a battery before vehicle installation you must first prepare the battery then inspect the tool before using it to perform Air Bag deployment when not installed in the vehicle. The tire must get its Air Bag removed right after deployment followed by bagging with plastic before securely tying the bag for general disposal with other parts. The deployment of the Air Bag requires a wire harness with minimum 1.25 sq.mm (0.0019 sq in) cross-section which must be tightly secured to protect against accidents.
Related 2009 Scion xD Parts
 2009 Scion xD Armrest
 2009 Scion xD Ignition Coil
 2009 Scion xD Air Bag Control Module
 2009 Scion xD Air Bag Sensor
 2009 Scion xD Clock Spring
 2009 Scion xD Fuel Pump Seal
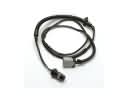 2009 Scion xD Fuel Pump Wiring Harness
 2009 Scion xD Horn
 2009 Scion xD Neutral Safety Switch
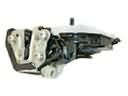 2009 Scion xD Rear Passenger Door Handle Latch
 2009 Scion xD Turn Signal Flasher
 2009 Scion xD Wiper Arm