×
ToyotaParts- Hello
- Login or Register
- Quick Links
- Live Chat
- Track Order
- Parts Availability
- RMA
- Help Center
- Contact Us
- Shop for
- Toyota Parts
- Scion Parts
My Garage
My Account
Cart
OEM Scion xD Air Bag
Air Bag Module- Select Vehicle by Model
- Select Vehicle by VIN
Select Vehicle by Model
orMake
Model
Year
Select Vehicle by VIN
For the most accurate results, select vehicle by your VIN (Vehicle Identification Number).
5 Air Bags found

Scion xD Passenger Air Bag, Upper
Part Number: 73960-52220$603.49 MSRP: $884.43You Save: $280.94 (32%)Ships in 1-3 Business DaysScion xD Passenger Air Bag, Upper
Part Number: 73960-52131$685.68 MSRP: $1004.86You Save: $319.18 (32%)Ships in 1-3 Business Days
Scion xD Inflator Curtain, Driver Side
Part Number: 62180-52081$564.42 MSRP: $827.17You Save: $262.75 (32%)Ships in 1-3 Business DaysScion xD Inflator Curtain, Passenger Side
Part Number: 62170-52081$564.65 MSRP: $827.50You Save: $262.85 (32%)Ships in 1-3 Business Days
Scion xD Air Bag
Choose genuine Air Bag that pass strict quality control tests. You can trust the top quality and lasting durability. Shopping for OEM Air Bag for your Scion xD? Our website is your one-stop destination. We stock an extensive selection of genuine Scion xD parts. The price is affordable so you can save more. It only takes minutes to browse and find the exact fit. Easily add to cart and check out fast. Our hassle-free return policy will keep you stress-free. We process orders quickly for swift delivery. Your parts will arrive faster, so you can get back on the road sooner.
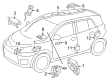
The Scion xD Air Bag system remains a safety foundation of the model line because it deploys inflatable cushions at high speed to protect drivers and passengers during impacts. The multiple Air Bag types within this complex system encompass driver air bags alongside passenger air bags and side-curtain air bags as well as knee bolster air bags to give full coverage to xD model variants. Modern Scion xD Air Bag systems activate ten modules to show the brand's dedication to safety innovation. A diagnostic monitoring unit with crash sensors enables the Air Bag system to activate correctly during impacts of different levels for minimizing injuries. Customers admire the Scion xD for its performance along with safety features because it has a 1.8-liter engine delivering 128 bhp standards while achieving fuel economy ratings of 27 mpg within city limits and 33 mpg on highways. Scion xD component system combines with anti-lock brakes and traction control to create a totality of improved vehicle safety and operational effectiveness. Customers choose the Scion xD because it offers multiple customization choices in addition to top-of-the-line audio features which provides versatility to drivers. The Scion model part system brings enhanced safety to ensure motorists experience secure journeys thus strengthening its reputation as a dependable and high-performing vehicle.
Scion xD Air Bag Parts and Q&A
- Q: How to install the curtain shield Air Bag assembly on Scion xD?A:The first step to install the curtain shield Air Bag assembly requires shutting off the ignition switch and disconnecting the battery negative terminal and waiting 90 seconds to avoid Air Bag activation. The roof side rail bracket should be installed by placing its 2 hooks into body holes then tightening the bolt to reach 9.8 Nm (100 kgf-cm, 86 in-lbf) torque. The installation of the curtain shield back bracket requires similar procedures as the roof side rail bracket with tightened bolts to 9.8 Nm (100 kgf-cm, 86 in-lbf). Place four brand new clips and four new spacers on the curtain shield Air Bag assembly before you fasten it with four new bolts. Tighten Bolt A to 9.8 Nm (100 kgf-cm, 86 in-lbf) and Bolt B to 14 Nm (143 kgf-cm, 10 ft-lbf). During installation avoid twisting the assembly. Embed pins into all clips by strong force while adding marks to prevent any reuse of components before installing the Air Bag connector with proper locking button locking. Proceed to install the roof headlining, Seat Belt anchor cover, shoulder belt anchor cover RH, rear center seat outer belt assembly, upper instrument panel sub-assembly, glove compartment door assembly, combination meter assembly, instrument cluster finish panel sub-assembly, and other interior components, following the specified torque settings and installation procedures for each part, including the rear seat assemblies and leg covers, before finally connecting the cable to the negative battery terminal with a torque of 5.4 Nm (55 kgf-cm, 48 in-lbf) and inspecting the SRS warning light.
- Q: How to remove the curtain shield Air Bag assembly on Scion xD?A:The first task for curtain shield Air Bag assembly removal is disconnecting the negative battery cable terminal. Start by taking off the deck board assembly before removing both No. 1 and No. 2 rear seat leg covers from the right and left sides followed by the rear seat assemblies from both sides. The procedure starts with removing both front and rear door scuff plates as well as the front and rear door opening trim Weather Strips. The procedure requires removal of rear deck trim cover alongside luggage hold belt striker assembly and rear seat outer belt assemblies from both sides and the deck trim side panel assemblies. The next step demands removal of roof side inner garnish assemblies combined with Seat Belt anchor cover caps as well as front seat outer belt assemblies and center pillar and front pillar garnishes. Take out the assist grip as well as the visor assemblies, visor holders, room light assembly and map light assembly. You need to remove the instrument cluster finish center panel sub-assembly followed by the glove compartment door assembly and the instrument cluster finish panel sub-assembly and combination meter assembly and upper instrument panel sub-assembly. Attend to the rear center seat outer belt assembly removal along with its seat belt anchor cover before proceeding to uninstall the roof headlining. Detach the right side curtain shield Air Bag assembly by first removing its 4 clips using a clip remover and then using needle-nose pliers to take the Air Bag off the body. Unlock the locking mechanism with a thin-bladed screwdriver to disconnect the connector and distinguish the 4 bolts for removal of the assembly after freeing the two hooks. Let go of the clips and spacers while replacing all used clips and spacers with fresh ones. First remove the curtain shield Air Bag bracket by unscrewing the bolt then separating the hooks and after that handle the roof side rail bracket in the same sequence.


Related Scion xD Parts
 Scion xD Armrest
 Scion xD Ignition Coil
 Scion xD Air Bag Control Module
 Scion xD Air Bag Sensor
 Scion xD Clock Spring
 Scion xD Fuel Pump Seal
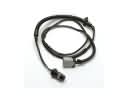 Scion xD Fuel Pump Wiring Harness
 Scion xD Horn
 Scion xD Neutral Safety Switch
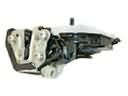 Scion xD Rear Passenger Door Handle Latch
 Scion xD Turn Signal Flasher
 Scion xD Wiper Arm