×
ToyotaParts- Hello
- Login or Register
- Quick Links
- Live Chat
- Track Order
- Parts Availability
- RMA
- Help Center
- Contact Us
- Shop for
- Toyota Parts
- Scion Parts
My Garage
My Account
Cart
OEM Toyota Tundra Brake Proportioning Valve
Proportioning Valve- Select Vehicle by Model
- Select Vehicle by VIN
Select Vehicle by Model
orMake
Model
Year
Select Vehicle by VIN
For the most accurate results, select vehicle by your VIN (Vehicle Identification Number).
2 Brake Proportioning Valves found


Toyota Tundra Load Proportioning Valve Part Number: 47910-34060
$260.37 MSRP: $371.74You Save: $111.37 (30%)Ships in 1 Business Day


Toyota Tundra Load Proportioning Valve Part Number: 47910-34070
$270.15 MSRP: $385.72You Save: $115.57 (30%)Ships in 1-2 Business Days
Toyota Tundra Brake Proportioning Valve
Choose genuine Brake Proportioning Valve that pass strict quality control tests. You can trust the top quality and lasting durability. Shopping for OEM Brake Proportioning Valve for your Toyota Tundra? Our website is your one-stop destination. We stock an extensive selection of genuine Toyota Tundra parts. The price is affordable so you can save more. It only takes minutes to browse and find the exact fit. Easily add to cart and check out fast. Our hassle-free return policy will keep you stress-free. We process orders quickly for swift delivery. Your parts will arrive faster, so you can get back on the road sooner.
The Tundra brake proportioning valve is an essential part of its manufacture that proves Toyota's reliability and performance in Tundra models. This valve serves the function of modulating the pressure of the fluid throughout the braking system for enhancement of the braking force to prevent the rear drum brakes locking up in relation the front disc brakes during emergency braking. This functionality helps to finalize control and safety concerning the car usage, especially in cases of an emergency, which makes the Toyota Tundra one of the premier options to consider for a vehicle to purchase. As suitable for various models of Tundra, the Brake Proportioning Valve has basic components that emphasis on the appropriate brakes and their response, regardless the year of manufacture or style. Even this section, the valve proves to be able to regulate the brake fluid pressure to be proportionate to the condition on which the Tundra is to operate on. First of all, the Brake Proportioning Valve can be mentioned as the offering that impresses in the automotive market, as well as the spring design and engineering. Thus, the Buzzer and the Brake Proportioning Valve are the vivid examples of Toyota's commitment to quality and innovation, which make the Tundra a reliable, safe, and efficient pickup truck. Conclusively, the Brake Proportioning Valve is an essential part for improving the performance and safety of the Tundra; thus, it should be among the crucial parts that every Tundra user needs.
Toyota Tundra Brake Proportioning Valve Parts and Q&A
- Q: How to service and repair a Brake Proportioning Valve on Toyota Tundra?A:Humvee vehicle operators can start LSP & BV repair by disassembling shackle No. 2 from the bracket by first unfastening the nut and cushion retainer followed by 2 bushings and a collar and finally unthreading the 2 bolts and shackle bracket. Start by disconnecting the 3 Brake Lines from the Valve Body through the utilization of Special Service Tool: 09751-36011 before removing the 2 valve bracket mounting bolts. To remove the blend proportioning valve disconnect all four brake lines and take out three bolts which should be torqued at 29 Nm (296 kgf-cm, 21 ft. lbs.). Disassembly begins with removing the valve bracket by first unfastening the nut with washer and bolt and plate washers while secondly removing the 2 nuts as well as 2 washers and set plate and valve bracket from the valve body. The spring clips can be extracted using pliers from the valve and next the bolt nut and washer followed by shackle No. 1 and No. 2 removal while taking away the load sensing spring and 2 plate washers. Detach shackle No. 1 from shackle No. 2 by first loosening the 2 nuts and both plate washers and then removing the load sensing spring using the 4 bushings and 2 collars and taking off the load sensing valve boot and load sensing spring boot. The inspection of both the valve piston pin and the load sensing contact surface needs to check for wear that cannot exceed 0.7 mm (0.028 inch). Reassemble the system by first installing the boots for the load sensing valve and load sensing spring and after that position the 2 collars and 4 bushings while applying lithium soap-base glycol grease to all contact areas. Install the shackle pair by fastening the lock nut to the plate washer followed by shackle No. 1 joined to shackle No. 2. Secure the upper nut with a torque of 13 Nm (130 kgf-cm, 9 ft. lbs.). Fasten two plate washers onto shackle No. 1 before securing it with bolt, washer and nut at 18 Nm (185 kgf-cm, 13 ft. lbs.) torque and connecting the load sensing spring to the load sensing valve by using a clip. The valve bracket installation begins by setting the load sensing valve into position through the bracket and temporarily tightening both washers and nuts before adding the load sensing spring assembly and fixing it with 2 plate washers, a bolt, washer and nut at 18 Nm (185 kgf-cm, 13 ft. lbs.). The Frame should receive the LSP & BV assembly through 2 valve bracket mounting bolts set to 29 Nm (300 kgf-cm, 22 ft. lbs.) torque before using Special Service Tool: 09751-36011 to connect the 3 brake lines with 15 Nm (155 kgf-cm, 11 ft. lbs.) torque. Set dimension A to 120 mm (4.72 inch) before torquing the lock nut to a starting value of 13 Nm (130 kgf-cm, 9 ft. lbs.). After that install the shackle bracket and two bolts by torquing them at 29 Nm (300 kgf-cm, 22 ft. lbs.). Finish by connecting the two bushings and the collar with shackle No. 2 to the shackle bracket with a torque of 13 Nm (130 kgf-cm, 9 ft. lbs.) and installing both the cushion retainer and the nut Set the rear axle load then position the valve body to touch the load sensing spring lightly before secure the 2 valve body mounting nuts with 13 Nm torque (130 kgf-cm, 9 ft. lbs.). The process completion requires brake line bleeding followed by LSP and BV fluid pressure checking and adjustment.

Related Toyota Tundra Parts
 Toyota Tundra Wheel Bearing
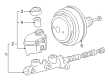
 Toyota Tundra Brake Booster
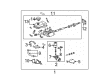
 Toyota Tundra Brake Master Cylinder
 Toyota Tundra ABS Pump And Motor Assembly
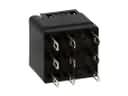 Toyota Tundra ABS Relay
 Toyota Tundra Brake Booster Vacuum Hose
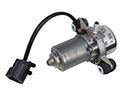 Toyota Tundra Brake Booster Vacuum Pump
 Toyota Tundra Brake Fluid Pump
 Toyota Tundra Brake Master Cylinder Reservoir
 Toyota Tundra Hydraulic Hose
 Toyota Tundra Master Cylinder Repair Kit
 Toyota Tundra Vacuum Pump