×
ToyotaParts- Hello
- Login or Register
- Quick Links
- Live Chat
- Track Order
- Parts Availability
- RMA
- Help Center
- Contact Us
- Shop for
- Toyota Parts
- Scion Parts
My Garage
My Account
Cart
OEM Toyota Solara Crankshaft Seal
- Select Vehicle by Model
- Select Vehicle by VIN
Select Vehicle by Model
orMake
Model
Year
Select Vehicle by VIN
For the most accurate results, select vehicle by your VIN (Vehicle Identification Number).
6 Crankshaft Seals found


Toyota Solara Rear Main Seal Part Number: 90311-A0027
$44.08 MSRP: $61.37You Save: $17.29 (29%)Ships in 1-3 Business Days

Toyota Solara Oil Seal, Front Part Number: 90080-31049
$10.27 MSRP: $14.29You Save: $4.02 (29%)Ships in 1-3 Business Days


Toyota Solara Oil Seal, Front Part Number: 90080-31022
$11.82 MSRP: $16.45You Save: $4.63 (29%)
Toyota Solara Oil Seal, Front Part Number: 90311-A0018
$12.18 MSRP: $16.95You Save: $4.77 (29%)Ships in 1-2 Business Days

Toyota Solara Oil Seal, Front Part Number: 90311-42035
$11.94 MSRP: $16.62You Save: $4.68 (29%)Ships in 1-2 Business Days


Toyota Solara Rear Main Seal Part Number: 90311-89010
$41.57 MSRP: $57.87You Save: $16.30 (29%)Ships in 1-3 Business Days
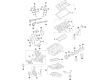
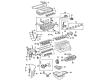
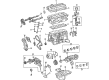
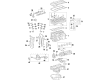
Toyota Solara Crankshaft Seal
Choose genuine Crankshaft Seal that pass strict quality control tests. You can trust the top quality and lasting durability. Shopping for OEM Crankshaft Seal for your Toyota Solara? Our website is your one-stop destination. We stock an extensive selection of genuine Toyota Solara parts. The price is affordable so you can save more. It only takes minutes to browse and find the exact fit. Easily add to cart and check out fast. Our hassle-free return policy will keep you stress-free. We process orders quickly for swift delivery. Your parts will arrive faster, so you can get back on the road sooner.
The Crankshaft Seal is a part of the Toyota Solara models situated at the front of the engine's crankcase, which is intended to prevent the leakage of the engine oil. This is a round shaped seal mostly made from metal and rubber and is used to ensure that lubrication for important parts of the engine is well maintained to reduce on friction hence enhance on the life of the engine. Eventually, a crankshaft seal may deteriorate or get damaged and thus cause cases of oil leakage which are common with cars that have covered so many miles on the road. Any sign of failure on the crankshaft seal should be attended to with the earlier time to prevent any complications in the engine. There may be differences in the gaskets from one model year to other due to minor changes but the main objective of gaskets is to seal and keep the engine components protected from external harm.
Toyota Solara Crankshaft Seal Parts and Q&A
- Q: How to remove the crankshaft seal on Toyota Solara?A:The first step to remove the 2AZ-FE crankshaft main bearing seal requires separating the automatic transaxle assembly by disassembling the transaxle following engine and transaxle separation. The removal method for the crankshaft main bearing seal in manual transaxle assemblies is identical. You must remove the automatic transaxle ring gear sub-assembly along with the drive plate by using Special Service Tools: 09960-10010 and 09962-01000 and 09963-01000 to support the crankshaft before deleting the 8 bolts and rear spacer and drive plate and front spacer. You must take out the clutch cover assembly and clutch disc assembly when working with the manual transaxle. Use the special service tool to fix the crankshaft before taking out the flywheel sub-assembly followed by the removal of 8 bolts and rear spacer and flywheel. The process to remove engine rear oil seal involves using a knife for your seal lip cut and then carefully using a taped-tip screwdriver to unscrew the oil seal from its place. The removed crankshaft should go through a damage assessment followed by sanding its surface with 400-grit sandpaper as needed.
- Q: How to properly install a Crankshaft Seal and its associated components on Toyota Solara?A:The installation process of the engine rear oil seal requires MP grease application to the lip of a new oil seal followed by maintenance of its purity from foreign substances. You must use Special Service Tool: 09223-15030 09950-70010 and a hammer to tap the oil seal inside until its surface reaches flush with the rear oil seal retainer edge before wiping off excess grease from the crankshaft. Fix the crankshaft with Special Service Tool: 09960-10010 09962-01000 09963-01000 then clean the bolt hole and adhesive the first three threads of the bolt end using Toyota Genuine Adhesive 1324 or Three Bond 1324 or equivalent product before installing the front spacer followed by drive plate and rear spacer with 8 bolts tightened to 98 Nm (1,000 kgf-cm, 72 ft-lbf) in specified bolt sequence. Again fix the crankshaft using Special Service Tools: 09960-10010 09962-01000 09963-01000 before cleaning the bolt and bolt hole and applying adhesive to 2 or 3 bolt threads at its end. Secure the flywheel with eight bolts while tightening them uniformly to 130 Nm (1,330 kgf-cm, 96 ft-lbf) torque using the specified sequence. Begin by placing in position the clutch disc assembly (M/T) and the clutch cover assembly (M/T) followed by the automatic transaxle assembly (A/T) or the manual transaxle assembly (M/T). Make sure to install the engine assembly with transaxle at a time after the transaxle.


Related Toyota Solara Parts
 Toyota Solara Cam Gear
 Toyota Solara Cylinder Head
 Toyota Solara Cylinder Head Gasket
 Toyota Solara Dipstick
 Toyota Solara Dipstick Tube
 Toyota Solara Exhaust Valve
 Toyota Solara Intake Valve
 Toyota Solara Piston Ring Set
 Toyota Solara Timing Chain
 Toyota Solara Timing Chain Guide
 Toyota Solara Timing Cover
 Toyota Solara Variable Timing Sprocket