×
ToyotaParts- Hello
- Login or Register
- Quick Links
- Live Chat
- Track Order
- Parts Availability
- RMA
- Help Center
- Contact Us
- Shop for
- Toyota Parts
- Scion Parts
My Garage
My Account
Cart
OEM Toyota Solara Cam Gear
Camshaft Gear- Select Vehicle by Model
- Select Vehicle by VIN
Select Vehicle by Model
orMake
Model
Year
Select Vehicle by VIN
For the most accurate results, select vehicle by your VIN (Vehicle Identification Number).
3 Cam Gears found


Toyota Solara Timing Gear Part Number: 13523-0D010
$45.16 MSRP: $62.86You Save: $17.70 (29%)Ships in 1-2 Business Days


Toyota Solara Camshaft Gear, Passenger Side Part Number: 13050-28021
$268.17 MSRP: $382.89You Save: $114.72 (30%)Ships in 1 Business Day


Toyota Solara Timing Pulley Part Number: 13523-20020
$48.39 MSRP: $67.35You Save: $18.96 (29%)Ships in 1-3 Business Days
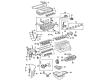
Toyota Solara Cam Gear
Choose genuine Cam Gear that pass strict quality control tests. You can trust the top quality and lasting durability. Shopping for OEM Cam Gear for your Toyota Solara? Our website is your one-stop destination. We stock an extensive selection of genuine Toyota Solara parts. The price is affordable so you can save more. It only takes minutes to browse and find the exact fit. Easily add to cart and check out fast. Our hassle-free return policy will keep you stress-free. We process orders quickly for swift delivery. Your parts will arrive faster, so you can get back on the road sooner.
Cam Gear is one of the core components that also boosts the capability and durability of Toyota Solara cars. This Cam Gear is directly related to the camshaft thus enabling the accurate change in the timing of valves, something that critically affects torque and horsepower. Through the function of changing timing either advancing or retarding, the Toyota Solara Cam Gear provides some of the most important features in enhancing the efficiency of the engine while delivering power to the wheel thus allowing the driver a smooth and tight drive. Designed to fit all Solara versions starting from the first generation produced in 1998 till the second generation 2008, the Toyota Solara Cam Gear does not lose its constant usefulness, which strengthens the vehicle's trustworthy image. The Toyota Solara designed on the basis of the Camry also underscores the brand's Quality and Performance equation. Interestingly enough, mentioning the Cam Gear it is possible to underline that this kind of regulation is highly effective not only due to the enhancement of engine efficiency, but also the contribution to the safety of vehicles in general, as the proper functioning of engine shall be maintained regardless the specific conditions of driving. All these make Toyota Solara Cam Gear stand out in the market; they are built with strength and precision to meet the requirements of the holders of solara cars so that they can smoothly maintain their vehicle's performance. All in all, the Toyota Solara Cam Gear is a prime example of how the company sticks to its promise of providing consumers with long-lasting and great performing automobiles.
Toyota Solara Cam Gear Parts and Q&A
- Q: How to service and repair the Cam Gear/sprocket on Toyota Solara?A:Starting the camshaft gear/sprocket repair requires removal of the front wheel RH as well as front fender apron seal RH and engine cover sub-assembly No.1 and engine moving control rod with bracket by taking out the 3 bolts. The following service order begins with removing engine mounting stay No.2 RH and engine mounting bracket No.2 RH before proceeding to take off the fan and generator V belt. To service and repair the crankshaft pulley first expand the pulley bolt with Special Service Tool: 09960-10010 and then remove the bolt and pulley completely using Special Service Tool: 09950-40011. Use tools 09308-10010 or 09950-60010 (09951-00200) to extract the timing gear case or timing chain case r oil seal. Before installing an oil seal place MP grease on its lips after inspecting for foreign contaminants and strike it in with Special Service Tool: 09223-22010 and a hammer until it reaches the rear oil seal retainer edge. Remove excess grease from the crankshaft. Install the crankshaft pulley through the pulley set key of its key groove while utilizing Special Service Tool: 09960-10010 (09962-01000, 09963-01000) to tighten the pulley bolt to 170 Nm (1,733 kgf-cm, 125 ft. lbs.). After installing the fan and generator V belt the technician should torque the engine mounting bracket No.2 RH to 52 Nm (531 kgf-cm, 38 ft. lbs.) and the engine mounting stay No.2 RH to 64 Nm (653 kgf-cm, 47 ft. lbs.). The front wheel RH reinstallation procedure begins after bracket and 3 bolting the engine moving control rod with bracket which needs to be torqued to 64 Nm (653 kgf-cm, 47 ft. lbs.). Afterward, check for engine oil leaks.

Related Toyota Solara Parts
 Toyota Solara Timing Belt
 Toyota Solara Oil Pump
 Toyota Solara Camshaft
 Toyota Solara Camshaft Seal
 Toyota Solara Crankshaft Seal
 Toyota Solara Cylinder Head Gasket
 Toyota Solara Dipstick
 Toyota Solara Dipstick Tube
 Toyota Solara Piston
 Toyota Solara Timing Chain
 Toyota Solara Timing Cover Gasket
 Toyota Solara Variable Timing Sprocket